
At Typeform, we love to use our product to run things. As you may have read in a previous post, we use typeforms to rate our lunches every day, gather feedback about upcoming features, and even run our internal FIFA contest. There are so many ways to use Typeform :)
We are also heavy Salesforce users: we use it to keep our partner program organized. Companies that are interested in integrating with Typeform contact us via this partner form, but then nothing happens. If we believe a lead could produce an interesting conversation, we have to create the lead manually in Salesforce.
I can hear developer folks out there saying, “There should be a better way!” 🤔
You’re right! We should be able to enjoy both by using the engaging Typeform UI to collect data and the powerful Salesforce funnel to organize the data into leads.
And this is what I’m going to explain here. I connected our typeform to our Salesforce organization and saved our team precious time.
Prerequisites 🛒
To follow this tutorial, you will need:
- A Salesforce organization
- A Typeform account--create one for free
- A half hour of free time
Buckle up and let's get started! 🛫
Principles 📖
This hack relies on Typeform webhooks. You can attach one or more webhooks to a Typeform so that when a new response is submitted, you are notified at the URL of your choice.
Webhooks happen in real time, so they allow you to react quickly and keep everything in sync.
On the Salesforce side, we will rely on their Web-to-Lead solution. It's a quick way to generate leads from a web form.
To receive webhook details from Typeform and send them to Salesforce, we use Glitch. Glitch is both an online IDE and a server. The app is deployed automatically, so there’s no need to worry about servers.
You can also use other serverless solutions like AWS Lambda, Google Cloud functions, Azure, and Stdlib. Your choice! 😉
Implement the solution 👩💻
Prepare the typeform
Our typeform contains all of the questions we want to ask. Each question is identified by both an id and a ref property. Both are unique and automatically generated, but the id value can't be changed. Example of form definition.
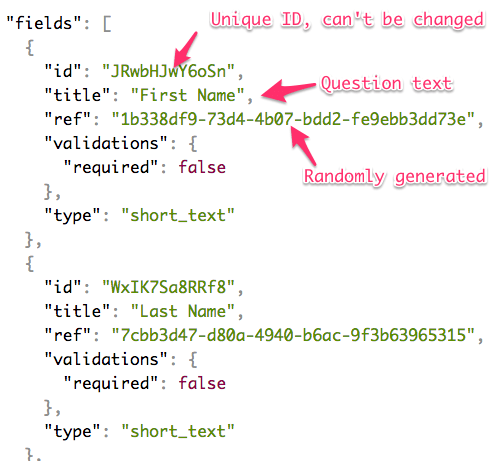
We can update the ref values to make the code more readable. I’ll use the Typeform Edit Block Ref app to modify the ref properties of fields in our typeform.
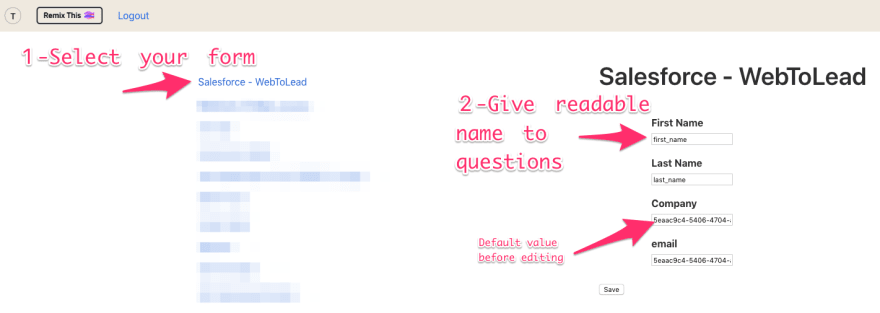
Now the questions have ref values like first_name, last_name instead of random characters. 👍

Get your Salesforce organization ID 🗄️
To send leads to our Salesforce organization, I need to identify it by passing our oid (organization ID) as a parameter.
You can find the OID in your Salesforce dashboard. Click on the ⚙️ icon, and you should find it under Settings in the Company Information section.
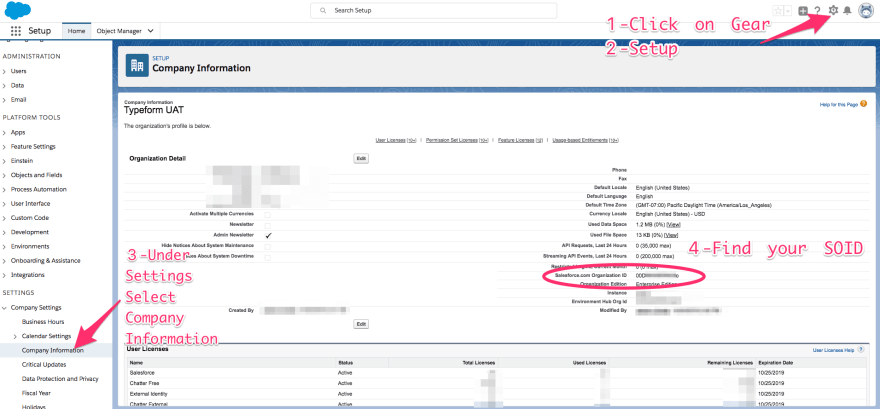
Keep the OID handy! You will need it later. 😉
Let's code 🎉
I knew you wanted to get to this part as soon as possible! So let's get our hands dirty. 😈
As I said earlier, our function will extract details from the Typeform webhook payload and then call the Salesforce API to create a lead.
app.post('/hook', function(request, response) {
  response.sendStatus(200) // let's answer back quickly to typeform 👌
  let { form_response } = request.body
  let { answers } = form_response

  console.log('received from Typeform webhook', form_response)

  // build the lead object
  let lead_data = {
    first_name: answers.find(a => a.field.ref === 'first_name').text,
    last_name: answers.find(a => a.field.ref === 'last_name').text,
    email: answers.find(a => a.field.ref === 'email').email,
    company: answers.find(a => a.field.ref === 'company').text,
    oid: process.env.OID,
    debug: request.query.debug===1 ? 1 : 0 // salesforce debug mode
  }
})
As you can see in this snippet, you’ll create a /hook route, excepting a POST request. Then, you’ll process the incoming request and extract the relevant data to build the lead_data object.
For security reasons, don't store the OID value directly in the code. Instead, store it as an environment variable.
I also added a debug parameter so you can test it out without harming your real organization.
The only thing left to do is to call the Salesforce Web-to-Lead API and create a lead.
This is the missing piece to add:
axios({
    method: 'POST',
    url: 'https://webto.salesforce.com/servlet/servlet.WebToLead?encoding=UTF-8',
    data: qs.stringify(lead_data),
    config: { headers: {'Content-Type': 'application/x-www-form-urlencoded' }}
    })
    .then(function (response) {
        console.log('res',response.status, response.data);
    })
    .catch(function (err) {
        console.log('err',err);
    });
That's all you need to connect things together. 🎊
Try it live
To quickly try this integration, follow these steps:
- Remix the project on Glitch
- Add your own
OIDto the.envfile - Remove, add, or modify data extraction from the Typeform webhook payload in lines 21-28 in
server.js - Click
Showto see the URL of your project hosted on Glitch (and keep it for the next step) - In Typeform, select your lead generation typeform and add your Glitch app URL under
Connect > WebhooksThe URL format should behttps://{random_name}.glitch.me/hook - Test by filling in and submitting your lead generation typeform--after you submit it, you should see a new lead in your Salesforce organization
- Celebrate! 🎉

Go beyond 🗺️
This is a simple hack to connect Typeform and Salesforce. To make it more complete, you can map more fields from your lead object to your typeform questions. It even works with custom Salesforce fields.
If you are curious about connecting Typeform with other services, check out our developer documentation and build your own solution! 😉
To stay updated about projects like this one, subscribe to our Developer Newsletter.


Latest comments (0)