
This blog post was written for Twilio and originally published at the Twilio blog.
Twilio Programmable Messaging lets you send SMS, MMS, and WhatsApp messages, but up until now, you couldn't schedule messages ahead of time. If you wanted to send messages in the future, you would have to store the message in some data store and then use cron jobs or write some other complicated code to deliver your messages at the right time.
Lucky for you, Programmable Messaging now supports Message Scheduling! With it, you can schedule SMS messages with a single API call. No need for your own complicated scheduling infrastructure.
In this tutorial, you’ll learn how to schedule SMS's using C# and .NET.
Prerequisites
You will need these items to follow along:
- An OS that supports .NET (Windows/macOS/Linux)
- .NET 6 SDK
- A code editor or IDE (I recommend VS Code with the C# plugin, Visual Studio, or JetBrains Rider)
- A free or paid Twilio account (If you register here, you'll receive $10 in Twilio credit when you upgrade to a paid account!)
- A phone to receive the SMS's
You can use older versions of .NET, including .NET framework, but you may need to make slight adjustments. For example, instead of using top-level statements, you may need to put the code in the Program.Main method of your console app.
You can find the source code for this tutorial on GitHub. Use the source code if you run into any issues, or submit an issue on this GitHub repo if you run into problems.
Buy a Twilio phone number
If you haven't done so already, you'll need to buy a Twilio phone number. To do that, log in to the Twilio Console, select Phone Numbers, and then click on the “ Buy a number ” button. Note that if you have a free account, you will be using your trial credit for this purchase.
On the “Buy a Number” page, select your country and check SMS in the “Capabilities*” field. If you’d like to request a number that is local to your region, you can enter your area code in the “Number**” field.

Click the “Search” button to see what numbers are available, and then click “Buy” for the number you like from the results. After you confirm your purchase, click the “Close” button.
Configure a Messaging Service
Scheduled messages can only be sent from a Messaging Service at this time, so the next step is to configure a Messaging Service and add your Twilio phone number to it.
In the Twilio Console, find the “Messaging” product and click on its Services option. Then click the “Create Messaging Service” button.
On the first page of the creation process, enter a friendly name for the service, such as “Appointments”, and select “Notify my users” in the “Select what you want to use Messaging for” dropdown.

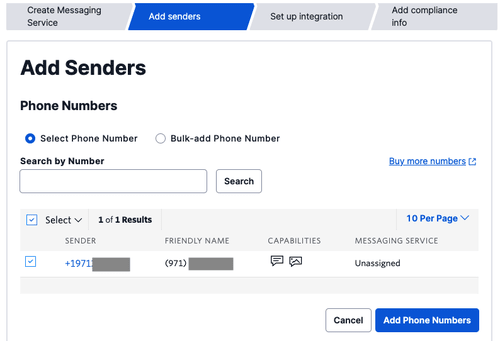
Click the “Create Messaging Service” button to move to the second step. In this part of the configuration, you have to add the sender phone number(s) to the sender pool used by the service. Click the “Add Senders” button to add the Twilio phone number you acquired in the previous section.

Select Phone Number in the “Sender Type” dropdown, and click “Continue”.
Add a checkmark next to the phone number you want to use as a sender, and click “Add phone numbers”.
Click the “Step 3: Set up integration” button to move on to the next step. You don’t have to change any of the settings on this page, just click on “Step 4: Add compliance info”.
To complete the configuration of your Messaging Service, click on “Complete Messaging Service Setup”. You will now be offered the option to send a test message.

It is a good idea to test that your messaging service is able to send messages, so go ahead and click on “Try sending a message”.
In the “To phone number” dropdown, select your personal number, which should be registered and verified with your Twilio account. Select the Messaging Service you just created in the “From Messaging Service SID”. Enter some text to send yourself in the “Body Text”.
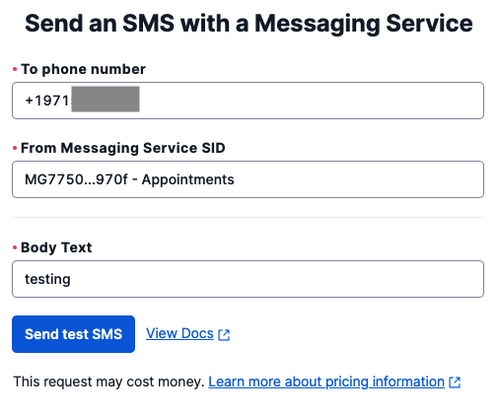
Click the “Send test SMS” button, and make sure you receive the SMS on your phone.
Send Scheduled SMS with C# and .NET
Now that you have a Twilio phone number and Messaging Service, you can get started with the .NET application. Open your preferred shell, then run these commands to create a new folder ScheduleSmsDotNet and navigate to it:
mkdir ScheduleSmsDotNet
cd ScheduleSmsDotNet
Next, use the .NET CLI to create a new console project:
dotnet new console
You can use the Twilio SDK for C# and .NET to easily interact with Twilio's APIs. Add the Twilio SDK using the Twilio NuGet package by running the command below:
dotnet add package Twilio
At the time of writing this, the version of the Twilio NuGet package is 5.70.0. Earlier versions will not contain the new APIs for scheduling messages.
Open Program.cs in your preferred editor and replace it with the following code:
using System;
using Twilio;
using Twilio.Types;
using Twilio.Rest.Api.V2010.Account;

string twilioAccountSid = Environment.GetEnvironmentVariable("TwilioAccountSid");
string twilioAuthToken = Environment.GetEnvironmentVariable("TwilioAuthToken");
string twilioMessagingServiceSid = Environment.GetEnvironmentVariable("TwilioMessagingServiceSid");
string toPhoneNumber = Environment.GetEnvironmentVariable("ToPhoneNumber");

TwilioClient.Init(twilioAccountSid, twilioAuthToken);

var message = MessageResource.Create(
    messagingServiceSid: twilioMessagingServiceSid,
    body: "Sending SMS with Twilio and .NET is easy!",
    to: new PhoneNumber(toPhoneNumber)
);

Console.WriteLine($"Message SID: {message.Sid}");
This application fetches the Twilio Account SID, the Twilio Auth Token, the SID of your Messaging Service, and your phone number from the environment variables. It then initializes the TwilioClient using the Account SID and Auth Token to authenticate. Lastly, it sends an SMS immediately to your phone number from the phone number you configured in your Messaging Service.
Before you can run this program, you'll need to set those environment variables. Switch back to your shell and use the following commands to set the environment variables.
If you're using Bash or a similar shell :
export TwilioAccountSid=[TWILIO\_ACCOUNT\_SID]
export TwilioAuthToken=TWILIO_AUTH_TOKEN]
export TwilioMessagingServiceSid=[TWILIO\_MESSAGING\_SERVICE\_SID]
export ToPhoneNumber=[YOUR\_PHONE\_NUMBER]
If you're using PowerShell :
$Env:TwilioAccountSid = "[TWILIO\_ACCOUNT\_SID]"
$Env:TwilioAuthToken = "[TWILIO\_AUTH\_TOKEN]"
$Env:TwilioMessagingServiceSid = "[TWILIO\_MESSAGING\_SERVICE\_SID]"
$Env:ToPhoneNumber = "[YOUR\_PHONE\_NUMBER]"
If you're using CMD :
set "TwilioAccountSid=[TWILIO\_ACCOUNT\_SID]"
set "TwilioAuthToken=[TWILIO\_AUTH\_TOKEN]"
set "TwilioMessagingServiceSid=[TWILIO\_MESSAGING\_SERVICE\_SID]"
set "ToPhoneNumber=[YOUR\_PHONE\_NUMBER]"
Make sure to replace the placeholders in the script above. The first two placeholders are your Twilio “ Account SID ” and your “ Auth Token ”. You can find them in the dashboard of the main page of the Twilio Console, under “Account Info”:

The [TWILIO_MESSAGING_SERVICE_SID] placeholder is the SID assigned to the Messaging Service. You can find it in the Messaging Services page of the Twilio Console. This identifier starts with the letters MG.
Now that the environment variables are present, you can run the application using the .NET CLI:
dotnet run
If all goes well, you'll receive an SMS on your phone and the application outputs something looking like this: Message SID: SM54a40e2fc2b443fb97b514ab79d36127.
To schedule an SMS to be sent in the future, you'll need to add two extra parameters to the MessageResource.Create method. To do that, update Program.cs, by adding the highlighted lines in the code below:
using Twilio;
using Twilio.Types;
using Twilio.Rest.Api.V2010.Account;

string twilioAccountSid = Environment.GetEnvironmentVariable("TwilioAccountSid");
string twilioAuthToken = Environment.GetEnvironmentVariable("TwilioAuthToken");
string twilioMessagingServiceSid = Environment.GetEnvironmentVariable("TwilioMessagingServiceSid");
string toPhoneNumber = Environment.GetEnvironmentVariable("ToPhoneNumber");

TwilioClient.Init(twilioAccountSid, twilioAuthToken);

var message = MessageResource.Create(
    messagingServiceSid: twilioMessagingServiceSid,
    body: "Sending SMS with Twilio and .NET is easy!",
    to: new PhoneNumber(toPhoneNumber),
    sendAt: DateTime.UtcNow.AddMinutes(61),
    scheduleType: MessageResource.ScheduleTypeEnum.Fixed
);

Console.WriteLine($"Message SID: {message.Sid}");
The sendAt parameter specifies when the message will be sent. The parameter expects an instance of DateTime and it has to be expressed using Coordinated Universal Time (UTC).
Any scheduled message has to be scheduled at least later than 1 hour (3600 seconds) from now, and before 7 days from now. There is a delay between when the DateTime instance is created and when Twilio receives the MessageResource on their servers. For example, if you create a DateTime exactly 3600 seconds from now, by the time Twilio receives your API request, the DateTime may be 2599 or fewer seconds from now. In that case, the Twilio API will reject your request.
To make sure your scheduled message is within the supported range, you can account for the delay if needed, by adding extra seconds or a minute to your DateTime.
Lastly, the scheduleType parameter configures the type of scheduling that you want to use. At the time of writing, Fixed is the only available enum value.
To test out your application, run your project again:
dotnet run
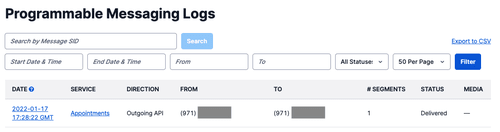
The output should be the same, but you will not receive a text message immediately. You'll have to wait 61 minutes to receive the message. However, in the meantime, you can view the message in the Programmable Messaging Logs section of the Twilio Console, under which the message will show with its status set to “ Scheduled ” until the time of delivery.

When the hour passes and your SMS is delivered, the status of the message will change to “ Delivered ”. You will also be able to see your Twilio phone number as the sender.
Cancel a Scheduled SMS with C# and .NET
If at some point you need to cancel a scheduled message, you can do so as long as it hasn't been delivered yet.
To try this out, update your Program.cs file as follows:
using Twilio;
using Twilio.Types;
using Twilio.Rest.Api.V2010.Account;

string twilioAccountSid = Environment.GetEnvironmentVariable("TwilioAccountSid");
string twilioAuthToken = Environment.GetEnvironmentVariable("TwilioAuthToken");
string twilioMessagingServiceSid = Environment.GetEnvironmentVariable("TwilioMessagingServiceSid");
string toPhoneNumber = Environment.GetEnvironmentVariable("ToPhoneNumber");

TwilioClient.Init(twilioAccountSid,twilioAuthToken);

Console.Write("Do you want to schedule an SMS? (y/n)");
if (string.Equals(Console.ReadLine(), "y", StringComparison.OrdinalIgnoreCase))
{
    var message = MessageResource.Create(
        messagingServiceSid: twilioMessagingServiceSid,
        body: "Sending SMS with Twilio and .NET is easy!",
        to: new PhoneNumber(toPhoneNumber),
        sendAt: DateTime.UtcNow.AddMinutes(61),
        scheduleType: MessageResource.ScheduleTypeEnum.Fixed
    );
    Console.WriteLine($"Message SID: {message.Sid}");
}

Console.Write("Do you want to cancel a scheduled SMS? (y/n)");
if (string.Equals(Console.ReadLine(), "y", StringComparison.OrdinalIgnoreCase))
{
    Console.Write("Enter message SID:");
    string messageSid = Console.ReadLine();

    var messages = MessageResource.Update(pathSid: messageSid, status: MessageResource.UpdateStatusEnum.Canceled);
    Console.WriteLine($"Scheduled SMS canceled");
}
The application will now ask you if you want to schedule a message. If you enter 'y', it will schedule the message as before. Then, it will ask if you want to cancel a scheduled message. If you enter 'y', it will ask you for the SID of the message. If you enter the message SID, it will go ahead and cancel the scheduled message, by updating the status to Canceled on line 31.
Run the application again:
dotnet run
Enter 'y', then copy the SID of the newly scheduled message, enter 'y' again, and then paste in the message SID. The application will now cancel the scheduled message.
Next steps
Congratulations on learning how to send scheduled SMS with .NET and C#! Here are a number of resources on scheduling SMS that you may want to review to learn more:
- How to schedule a message (API documentation)
- How to cancel a scheduled message (API documentation)
- Message Scheduling Public Beta announcement
- Message Scheduling FAQs and Beta Limitations
We can't wait to see what you'll build with Twilio and Message Scheduling!


Latest comments (0)