Netlify
Netlify is a very useful and appreciated service that you all know and love, but for the poor people who use it for free**, there is a certain problem that arises every month.
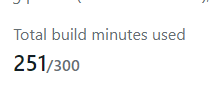
This month's build time is XX minutes left!
Netlify works with GitHub repositories to run front-end builds and deploy them, but there is a time limit on how long it takes to run these builds.
The free version is limited to 300 minutes per month. (If you want to use it more than that, you can charge $19/month for the Pro version. I've already paid for it.)
It's not that I don't think 300 minutes will be enough, but
If you're using Netlify across multiple repositories, if you're using a lot of images in Gatsby.js and it's taking a long time for Sharp to resize them, or if Dependabot is getting PRs and Preview deploys regularly
You may be surprised to find that you're on the edge.

So, at the end of the month, poor folks like me are so worried about Netlify build time that they stop writing this blog post** and slow down the pace of Site Refactor.
So at the end of the month, poor folks like me are so worried about Netlify's build time that they don't write any more posts on this blog or slow down the pace of Site Refactor.
For example, the article I'm writing right now is written from my phone on the train to work, so I'd like to hit commit and save it in detail, but if I hit commit and push it, the build will run, so I'm too lazy to commit with WIP, and as a result, I don't have a work space like at home where I can push it all together. As a result, I don't blog anymore unless I'm at home where I have a work space where I can push it all together.
As a result, I don't write blogs anymore unless I am at home where I have a work space where I can push them all together.
Leave this problem to GitHub Actions!
So, I'd like to solve this problem with GitHub Actions.
Find out what Netlify is doing when it builds and try to do it yourself.
Basically, what Netlify does when building, for example, Gatsby.js, is to run the gatsby build command and deploy the built JS in a specific directory (usually ./public) and deploys the pre-built JS placed in a specific directory.
However, there is a pattern that Netlify performs post-processing (PostProcess) on the built JS.
In my case, Asset optimization, which optimizes JS and images, and Form detection, which creates forms automatically by adding attributes to Form tags, were set.


This will no longer be done by Netlify, so you will need to reimplement it here.
gatsby-plugin-minify
Among asset optimization, JS and CSS minifers can use gatsby-plugin-minify to minify html, JS, and CSS can be minified.
You can install it from NPM (yarn) as usual.
npm install gatsby-plugin-minify
You can use it by setting the plugins in gatsby-config.js as follows.
    {
      resolve: 'gatsby-plugin-minify',
      options: {
        caseSensitive: false,
        collapseBooleanAttributes: true,
        useShortDoctype: false,
        removeEmptyElements: false,
        removeComments: true,
        removeAttributeQuotes: false,
        minifyCSS: true,
        minifyJS: true,
      },
    },
By setting minifyCSS and minifyJS to true, the CSS will be minified together using clean-css and the JS will be minified together using UglifyJS to minify the JS together. Also, the other side of gatsby-plugin-minify is just multiplying html-minifier by postbuild in gatsby-node.js. You can set detailed options in html-minifier.
By the way, you have to be careful to set the removeAttributeQuotes option to false.
If you set this option to true, double-quotes will be removed from the attributes in the HTML tags, and the file will be a little lighter, but it will not load well in systems like berss.com that retrieve RSS links from sites. I've been using it all day.
Be careful if you are planting RSS links as page links.
By using imgur, you can do image hosting and resizing at the same time.
There is a service called imgur.
It is mainly known as an image hosting service for Reddit and Gifs, but I use imgur on this blog because it allows you to easily resize and host images.
This can be done by inserting the keyword that matches the image size after the image URL.
For example, if you have an image with this URL
https://i.imgur.com/Wfz9G0B.png
To resize to 160x160, attach b to the back.
https://i.imgur.com/Wfz9G0Bb.png
This completes the image optimization.
getform.io
Getform.io](https://getform.io/) is a great service that provides a backend for forms.
You need to pay for the paid version to use the useful integrations, but if you just want to send a notification email to a specified email address when a form is submitted, you can do that for free.
We will now replace Netlify's Form detection.
First of all, when you create a new form, you can issue an Action URL for the form.
The following blog explains how to create a Form in an easy-to-understand manner.
https://blog.nakamu.life/posts/getform-io
Now, once the Form is created, you can follow the tutorial and set this URL to the action of the Form tag, but the free version of GetForm does not allow you to set the Thanks page after submitting the Form.
<!--
* Add your getform endpoint into "action" attribute
* Set a unique "name" field
* Start accepting submissions
-->
<form action="{getform-endpoint}" method="POST">

  <input type="text" name="name">
  <input type="email" name="email">
  <button type="submit">Send</button>

</form>

Well, this is good enough, but since we are using React, let's specify that the URL of getform.io should be POST fetched behind the scenes and sent to your own Thanks URL defined in actions.
First, we need to set onSubmit on the Form.
<form
name="contact"
method="post"
action="/thanks/"
onSubmit={this.handleSubmit}
>
<label>
<span className="icon-user" /> Your name<br />
<input
type="text"
name="name"
className="form-control"
maxLength="30"
minLength="2"
required
placeholder="Enter your name"
onChange={this.handleChange}
/>
</label>
</p>
Then, separately define a function that will fire onSubmit.
  handleSubmit(e) {
    e.preventDefault();
    const form = e.target;
    fetch('https://getform.io/f/xxxxxxxxxxxxxxxxxxxxxxxxx', {
      method: 'POST',
      body: Contact.encode({
        'form-name': form.getAttribute('name'),
        ...this.state,
      }),
    })
  }
Since we are sending a Form, we need to send the elements appended to FormData in the fetch.
  static encode(data) {
    const formData = new FormData();
    // eslint-disable-next-line no-restricted-syntax
    for (const key of Object.keys(data)) {
      formData.append(key, data[key]);
    }
    return formData;
  }
Again, in React, in addition to actions, onSubmit can be a function in a Form.
However, when onSubmit is pressed, the input items of the Form must be passed via POST Fetch, so for each changeEvent that occurs on input of the Form, the value of the Form should be saved as a state.
handleChange(e) {
this.setState({ [e.target.name]: e.target.value });
}
handleAttachment(e) {
this.setState({ [e.target.name]: e.target.files[0] });
}
(中略)
<label>
<span className="icon-user" /> Your name<br />
<input
type="text"
name="name"
className="form-control"
maxLength="30"
minLength="2"
required
placeholder="Enter your name"
onChange={this.handleChange}
/>
</label>
</p>
Also, if you use onSubmit, you will not be able to jump to the Thanks page after the Post process is finished using Gatsby's navigate function.
  handleSubmit(e) {
    e.preventDefault();
    const form = e.target;
    fetch('https://getform.io/f/897f187e-876d-42a7-b300-7c235af72e6d', {
      method: 'POST',
      body: Contact.encode({
        'form-name': form.getAttribute('name'),
        ...this.state,
      }),
    })
      .then(() => navigateTo(form.getAttribute('action')))
      .catch((error) => alert(error));
  }
Now you can create your own Thanks page even with GetForm free version.

Build and Deploy with GitHub Actions
Once you've done this, all you need to do is build and deploy with GitHub Actions.
We'll create two actions, one for preview deployment with a PR to the master branch, and another for production deployment with a commit to master.
First, let's do Preview deployment.
name: DeployToNetlifyPreview
on:
  pull_request:
    branches:
      - master

jobs:
  build:
    runs-on: ubuntu-latest

    steps:
      - name: Checkout source code
        uses: actions/checkout@v2
      - name: Cache node_modules
        uses: actions/cache@v1
        with:
          path: node_modules
          key: ${{ runner.OS }}-build-${{ hashFiles('**/package-lock.json') }}
          restore-keys: |
            ${{ runner.OS }}-build-
            ${{ runner.OS }}
      - name: Setup Node
        uses: actions/setup-node@v1
        with:
          node-version: 12.x
      - name: npm install and build
        env:
          GATSBY_GITHUB_CLIENT_SECRET: ${{secrets.GATSBY_GITHUB_CLIENT_SECRET}}
          GATSBY_GITHUB_CLIENT_ID: ${{secrets.GATSBY_GITHUB_CLIENT_ID}}
          GATSBY_ALGOLIA_SEARCH_API_KEY: ${{secrets.GATSBY_ALGOLIA_SEARCH_API_KEY}}
          GATSBY_ALGOLIA_INDEX_NAME: ${{secrets.GATSBY_ALGOLIA_INDEX_NAME}}
          GATSBY_ALGOLIA_APP_ID: ${{secrets.GATSBY_ALGOLIA_APP_ID}}
          GATSBY_ALGOLIA_ADMIN_API_KEY: ${{secrets.GATSBY_ALGOLIA_ADMIN_API_KEY}}
          FAUNADB_SERVER_SECRET: ${{secrets.FAUNADB_SERVER_SECRET}}
        run: |
          npm install
          npm run build
      - name: Deploy to netlify
        run: npx netlify-cli deploy --dir=./public > cli.txt
        env:
          NETLIFY_AUTH_TOKEN: ${{ secrets.NETLIFY_AUTH_TOKEN }}
          NETLIFY_SITE_ID: ${{ secrets.NETLIFY_SITE_ID }}
      - name: Cat cli.txt
        run: |
          cat cli.txt
          sed -i -z 's/\n/\\n/g' cli.txt
      - name: Post Netlify CLI Comment
        env:
          GITHUB_TOKEN: ${{ secrets.GITHUB_TOKEN }}
          URL: ${{ github.event.pull_request.comments_url }}
        run: |
          curl -X POST \
               -H "Authorization: token ${GITHUB_TOKEN}" \
               -d "{\"body\": \"$(cat cli.txt)\"}" \
               ${URL}
The node setup, npm install, and build are the same as usual.
In GitHub Actions, you can specify a secret, so API keys for Algolia search and FaunaDB are passed as secrets in the environment variable at build time.
Incidentally, if you set GATSBY_XXXX in the environment variable, the environment variable will also be entered in the built JS. (Don't forget to do this when using environment variables from JS. This is a point that gets stuck quite a bit.
To deploy, use netlify-cli.
The required environment variables are site ID and AUTH TOKEN.
One of the features of netlify-cli is that when the deployment is successful, the deploy URL will appear in the standard output**.
I also send the URL to PR comments.
The great thing about GitHub Actions is that you can retrieve the GITHUB TOKEN by using secrets.GITHUB_TOKEN without setting it, so you can easily send it to PR comments.
      - name: Deploy to netlify
        run: npx netlify-cli deploy --dir=./public > cli.txt
        env:
          NETLIFY_AUTH_TOKEN: ${{ secrets.NETLIFY_AUTH_TOKEN }}
          NETLIFY_SITE_ID: ${{ secrets.NETLIFY_SITE_ID }}
      - name: Cat cli.txt
        run: |
          cat cli.txt
          sed -i -z 's/\n/\\n/g' cli.txt
      - name: Post Netlify CLI Comment
        env:
          GITHUB_TOKEN: ${{ secrets.GITHUB_TOKEN }}
          URL: ${{ github.event.pull_request.comments_url }}
        run: |
          curl -X POST \
               -H "Authorization: token ${GITHUB_TOKEN}" \
               -d "{\"body\": \"$(cat cli.txt)\"}" \
               ${URL}
The next step is to deploy to production.
name: DeployToNetlifyPRD
on:
  push:
    branches:
      - master

jobs:
  build:
    runs-on: ubuntu-latest

    steps:
      - name: Checkout source code
        uses: actions/checkout@v2
      - name: Cache node_modules
        uses: actions/cache@v1
        with:
          path: node_modules
          key: ${{ runner.OS }}-build-${{ hashFiles('**/package-lock.json') }}
          restore-keys: |
            ${{ runner.OS }}-build-
            ${{ runner.OS }}
      - name: Setup Node
        uses: actions/setup-node@v1
        with:
          node-version: 12.x
      - name: npm install and build
        env:
          GATSBY_GITHUB_CLIENT_SECRET: ${{secrets.GATSBY_GITHUB_CLIENT_SECRET}}
          GATSBY_GITHUB_CLIENT_ID: ${{secrets.GATSBY_GITHUB_CLIENT_ID}}
          GATSBY_ALGOLIA_SEARCH_API_KEY: ${{secrets.GATSBY_ALGOLIA_SEARCH_API_KEY}}
          GATSBY_ALGOLIA_INDEX_NAME: ${{secrets.GATSBY_ALGOLIA_INDEX_NAME}}
          GATSBY_ALGOLIA_APP_ID: ${{secrets.GATSBY_ALGOLIA_APP_ID}}
          GATSBY_ALGOLIA_ADMIN_API_KEY: ${{secrets.GATSBY_ALGOLIA_ADMIN_API_KEY}}
          FAUNADB_SERVER_SECRET: ${{secrets.FAUNADB_SERVER_SECRET}}
        run: |
          npm install
          npm run build
      - name: Deploy to netlify
        run: npx netlify-cli deploy --prod --dir=./public
        env:
          NETLIFY_AUTH_TOKEN: ${{ secrets.NETLIFY_AUTH_TOKEN }}
          NETLIFY_SITE_ID: ${{ secrets.NETLIFY_SITE_ID }}
It is almost the same, but by including the --prod option in the deploy command in netlify-cli, it will be deployed to the production environment.
      - name: Deploy to netlify
        run: npx netlify-cli deploy --prod --dir=./public
        env:
          NETLIFY_AUTH_TOKEN: ${{ secrets.NETLIFY_AUTH_TOKEN }}
          NETLIFY_SITE_ID: ${{ secrets.NETLIFY_SITE_ID }}
Conclusion
Now the build time of Netlify is zero, which is a mental relief.

And I can get on with refactoring and writing articles!


Top comments (0)