Min HW requirement -
Master — 2GB RAM, 2vCPU’s, min 1GBPS nw
Nodes — 1GB RAM, 2vCPU’s, min 1GBPS nw
SW requirement -
Docker or any container mgmt systems should be installed.
kubelet service should be running on each node.
We have 3 Ubuntu 18.04 systems running with following configuration -
Kubernetes Master Node ->
172.42.42.200 kmaster-rj.example.com/kmaster-rj
4 GB RAM, 2 vCPU’s, 64 GB HDD
Kubernetes Worker Nodes ->
172.42.42.201 kworker-rj1.example.com/kworker-rj1
2 GB RAM, 2 vCPU’s, 64 GB HDD
172.42.42.202 kworker-rj2.example.com/kworker-rj2
2 GB RAM, 2 vCPU’s, 64 GB HDD
Note: You can use any number of worker nodes with a single master node.
Installation ->
Install the following software packages on all 3 servers;
Install and enable Docker
apt-get update
apt install docker.io
systemctl enable docker
Add the Kubernetes gpg key
apt install curl && curl -s https://packages.cloud.google.com/apt/doc/apt-key.gpg | sudo apt-key add
Add the Xenial Kubernetes repository
apt-add-repository "deb http://apt.kubernetes.io/ kubernetes-xenial main"
Install kubeadm
apt install kubeadm
kubeadm version
Kubernetes Deployment -->
Disable swap -
If you run nodes with (traditional to-disk) swap, you lose a lot of the isolation properties that make sharing machines viable. You have no predictability around performance or latency or IO. So its recommended to off the swap.
swapoff -a && sed -i ‘/ swap / s/^/#/’ /etc/fstab
Kubernetes Cluster Initialization (On Master)->
Method 1 of deployment (from command line)->
Initialize the cluster, also by passing a flag that is later needed for the networking plugin (CNI).
kubeadm init --apiserver-advertise-address $(hostname -i) --pod-network-cidr=172.16.213.0/24
Note: If 172.16.213.0/24 is already in use within your network you must select a different pod network CIDR, replacing 172.16.213.0/24 in the above command as well as in any manifests applied below.
Method 2 of deployment (using config file)->
You can initialize the cluster by passing the kubeadm-config.yaml file with specific values as given below
https://github.com/TroubleshooteRJ/kubernetes-demo/blob/master/kubeadm-config.yaml

Here you can change the kubernetesVersion, external IP addresses and domain names you would use to connect to the Kubernetes API server, Pod CIDR and Service CIDR based on your networking requirements etc.
You can init the master with the following command.
curl https://github.com/TroubleshooteRJ/kubernetes-demo/blob/master/kubeadm-config.yaml -o kubeadm-config.yaml# update the file as necessary and then run belowkubeadm init --config kubeadm-config.yaml
This will output a join command. Save this command somewhere as this will later be used to connect worker nodes to the master.
Configure kubectl as it lets you connect to the cluster from the master (The command for this step is given in the output of the previous command).
mkdir -p $HOME/.kube
sudo cp -i /etc/kubernetes/admin.conf $HOME/.kube/config
sudo chown $(id -u):$(id -g) $HOME/.kube/config
Type the below command to check if kubectl is working (The status will be ‘NotReady’ as we haven’t set up our networking yet. )
kubectl get nodes
Now let’s deploy a Pod Network through the Master Node.
Here we will use Calico as the network of choice.
Install the Calico Networking Plugin in the Cluster (This will handle networking between different pods and nodes).This can be done by applying a yaml file that describes the objects needed to create in the cluster.
kubectl apply -f https://docs.projectcalico.org/manifests/calico.yaml

Wait until each pod has the STATUS of Running.
Confirm that all of the pods are running with the following command.
kubectl get pods --all-namespaces -w
Now check if kubectl is working (The status should be ‘Ready’ now ).
kubectl get nodes -o wide
Now let’s add the Worker nodes to the Network in order to form a Cluster.
The kubeadm init command that you ran previously on the master should output a kubeadm join command containing a token and hash. If you have copied that command from the master and saved it somewhere, run it on both worker nodes with sudo to connect them to the master.
kubeadm join 172.42.42.200:6443 --token bl4tmf.p5vld9mlo3zbqy66
--discovery-token-ca-cert-hash sha256:2aba01741a419a17d257b60f4aa2ae7b13185056a24986669347bfbcf9f6ecbe
Now check if the 2 worker nodes are connected (on master).
sudo kubectl get nodes

Make sure all 3 of your nodes are listed with the above command and have a status of ‘Ready’.
With the following command you can see some of back-end system pods that are fully up and running.
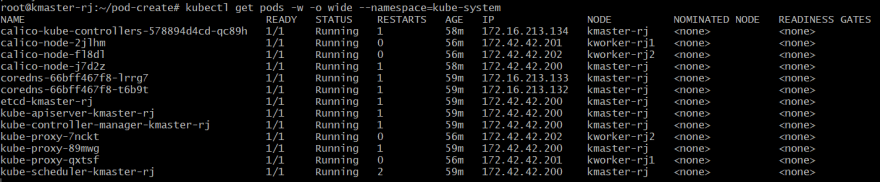
Now we have a Kubernetes cluster fully up and running on Ubuntu!
Hope you like the tutorial. Let me know your feedback in the response section.
Happy Learning!


Top comments (0)