
A few weeks ago I started the “Get to know the Command Line” series with this Basic Commands article. This article that you are currently reading is the second installment which will cover basic Git commands that I believe new developers should get acquainted with. Actually, more than just acquainted. New developers need to get downright cozy with these commands as they are not likely to be going anywhere any time soon.

Before jumping in let's cover the following question: What is Git? It's a version control system that can be used for small and large projects alike. What is a version control system? At the surface level, a version control system helps keep track of changes made to a codebase while at the same time keeping a copy of the previous versions.
With that introduction behind us, let's go ahead and get started.
git init
git init is the command that allows us to add Git to our current working directory (project). To go into more detail, this command creates an empty Git repository or reinitializes one that already exists.
For the purpose of this blog post, I created a new project called git-command-practice and used the command cd git-command-practice to change into the project's directory. From here, I am going to initialize Git for this project.

git remote add origin <GitHub URL>
For those of us who use GitHub as our preferred repository hosting site, we need to create a new GitHub repository. The next step would be to use the command git remote add origin <GitHub URL> in order to connect our local project with the GitHub repository.
![]()
This allows us to see the changes and commits we've made to our code on GitHub. we'll be able to see file changes, new lines of code, deleted lines, as well as commit messages for each commit that has been made.
git clone <GitHub URL>
The git clone command is used to copy an existing repository to one's local machine. Let's say someone wanted to clone one of the existing projects I've worked on that exists on my GitHub profile, like my portfolio site. The way to do this is by using the command git clone https://github.com/torianne02/victoria-fluharty-portfolio.
Now that we have covered the commands that we need to get a repository up and running, let's discuss some of the commands that we will be using often while writing code.
git / git --help
I am about to throw a few commands at y'all and it might feel a little overwhelming. Don't worry though, these next few commands are really helpful for those of us who have a hard time memorizing things, like me.
If one feels lost or can't remember a command at any time while writing code, they could make use of either of the commands git or git --help, which return the same thing: a list of common git commands.

As with most Git commands, git --help has options that allow us to add to it to receive a different kind of output.
Note: Most Git commands have a multitude of options and I will not discuss them all here, but I will discuss a few notable ones I think may be helpful.
git --help -a
This command lists available subcommands.
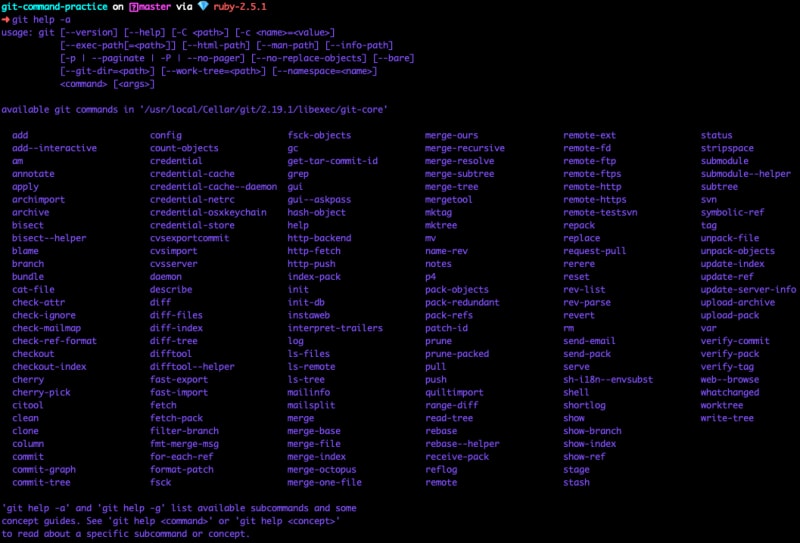
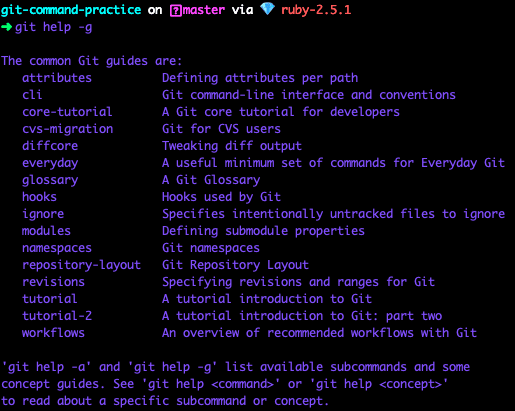
git --help -g
This Git command outputs a list of Git guides available.
git --help <command name>
This is a helpful Git command that allows us to view details about a specific Git command, such as the description, options, examples, etc..
git status
git status, in my opinion, is arguably the most important Git command that is used regularly while writing code. This command allows us to see the status of the current working tree. It does this by outputting the paths that
- have differences between the index file and the current HEAD commit.
- have differences between the working tree and the index file.
- are in the working tree that are not yet tracked by Git.
At this point, let's create a file in this project called practice-file.rb. Now let's use the command git status.

Notice that it says our new file is "untracked," this leads me to our next command:
git add <file path>
git add is the command used to add the contents/changes of a file to the index. In order to add our newly created file to Git so that it can be tracked, we would run the following command
![]()
git add .
If one wants to add all the files that they have recently changed, they could use the command git add ..
If there is one thing that I want my readers to take away from this article, it would be that one should never use this command without first running git status. Why? To make sure that one is aware of all the files that have been changed and are about to be added to the index. What if a dev accidentally hit a key and caused a typo on a file that was never meant to be edited?

Okay, okay. Maybe it isn't that dramatic, but please always be aware of what you are adding to the index!!
Now that we used git add let's use the command git status again to see what it looks like.

Notice the phrase "Changes to be committed" followed by the file path that we recently added to the index, practice-file.rb. This brings us to the next command: git commit.
git commit
The command git commit records the current contents of the index, which just happens to be all of the changes made to the code that we added to the index by using git add.
git commit -m
When committing code, one wants to add a detailed message about the changes being made to the code. In the case of this example, I created a practice file in order to take screenshots of the commands I am covering here so I should express that in the message. In order to accomplish this, I have to add -m 'message here in quotes' to the command git commit. Here is what it looks like:

You will notice in the screenshot that I had a few typos.

Guess what?! It's not a nightmare and we can fix this!
git commit --amend -m
Let's be honest, we all make mistakes from time-to-time. Thankfully, Git gives us the ability to fix our typo mistakes in our commit messages.
If we notice our mistake BEFORE using the next command (git push), we can use the command git commit --amend -m 'new message to replace old message'. Let's fix that typo!

Awesome! Now we are good to move on to the next command.
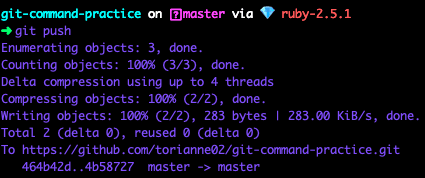
git push
The command git push comes into play once one is happy with the changes made to their code and with the commit messages that they have recorded. git push updates remote references and repositories, in our case the GitHub repo, of the current repo with local commits and changes.
git checkout <branch name>
git checkout is a command that allows one to switch between the different branches of a repository. What is a branch? A branch is essentially a copy of the master version of the repository with a unique name that a developer can use to make changes to the codebase without directly changing the master branch.
git checkout -b <branch name>
One common practice when using Git is to create a branch for each new feature or major change one wishes to add to the project. A branch allows the developer to work on a branch of the master codebase. In other words, the developer can make a ton of changes to this branch and it wouldn't affect the main version of the codebase. At least not until they choose to add the new changes to master.
Let's create a new branch called new-practice-branch and switch to it by using the command:

Now, let's use git checkout to switch back to the master branch.

Now that we've covered branches, let's cover what command to use when one wants to join two branches together.
git merge <branch name>
git merge is the command that one would use when they want to merge two branches together. Let's say we are currently in our master branch and we want to add the changes made to our new-practice-branch to master. In order to accomplish this, we need to use this command

Awesome! Now we've merged two branches together. Now let's say we were working with a partner and they made changes on their own local machine and pushed to our remote GitHub version of master. This means that my local version of master is not up-to-date. Don't worry! There is a command to fix this.
git pull
git pull gives us the ability to fetch changes from another repository or local branch and integrate them with our local repository. Pretty neat, but this doesn't quite fix our problem. The next command does though! Let's check it out.
git pull origin master
The command we need to use in order to update our local version of master with our GitHub's remote version of master is git pull origin master. All we are doing here is adding an origin pointer that tells Git where we want to pull from.

For this example, I was the only one working on the project so there is nothing to be pulled which is why I received the message "Already up to date." This would look different if this wasn't the case.
Final Thoughts
Phew! It probably feels like I just threw a lot of new commands at you. Don't worry though! Even senior developers have to Google things from time to time, so don't feel bad if it doesn't stick right away. The more you use the commands, the faster they'll become second nature for you.
Good luck with your journey and be on the lookout for future articles in this series!
Note: The cover photo for this post is brought to you by one of my favorite places on earth: Twin Lakes in Mammoth Lakes, Ca.
Resources
Git-- commands you need to git going!
6 Git commands every beginner should memorize
Essential git commands every developer should know
git-help
Basic Git Commands


Top comments (5)
It's a great article. Just one thought from my side since you follow the order of git add, git commit and then git push, I wanted to say this:
If we are working on a shared repository and two or more people are working on it. So it would be a good practice to pull the latest code from the master before pushing our local changes. So that we will always be in sync with other's pieces of code too.
Thank you for adding such a great point.
I rearranged the order multiple times. I actually had it in the order you suggest and then changed it again last minute. As this is a post geared more towards beginners, I figured I'd try to explain the most basic commands first then touch on the ones that are used when pair programming/working with others. I didn't want to make things too complicated. That's why I did the last 3 commands together, since they are all geared towards working with others and are a tad more involved.
Good one! Once you go console and learn the basics you'll never look back.
Setting editor of choice
I remember a fright of ending up in 'vi'-mode for commit messages. If you, like me, couldn't care less of learning how to use the vi-editor properly you should set git to fire the editor of your choice.
git config --global core.editor "notepad"notepad, vs code ("code"), sublime, atom etc.
Loved this guide for those who are newbs sing Git, awesome!
Awesome!