In this tutorial, we will learn how to build an application for internal tickets triaging and for this we will be leveraging the power of Baserow for the backend and ToolJet for the frontend of the application.
Baserow is an open-source no-code database and the Airtable alternative. It can be used to build an online database without technical experience and can be easily used as the backend but creating a custom UI can be challenging. That's where ToolJet comes into action, it is a free and open-source low-code platform that allows you to quickly build applications and has more than 30+ datasources including Baserow that will let you seamlessly perform operations on your database. You can create a free account on ToolJet Cloud or run it on your local machine.
In this tutorial, we will build a Ticket Triaging application. This is going to be a simple and easy tutorial, you can use refer to this tutorial to build dashboards, CRUD apps, and internal tools in minutes using the Baserow and ToolJet combination.
With the Ticket Triaging app, you can:
- List the issues, check their status and assignees
- Update the status of the issue/bug
💡 You can also add more functionality to the application by adding a form in the application to add an issue or a button to delete an issue, making it a CRUD app.
You can try out the application here: https://apps.tooljet.com/ticket-triaging-app

Don't want to read the tutorial and want to jump straight into using the app?
- Import the exported application JSON file to your ToolJet account. Here's the file.
- Once imported the application, you'll need to provide the API Token and choose the host Baserow Cloud or Baserow Self-Hosted

- You can get the API key from the Personal API tokens in Settings of the Baserow

- Here's the Software Application Bug Tracker template that I used as the database to build this application.
Without further ado, let's start building the application.
Building the UI of the application
Let's start with building the UI first. Login to ToolJet and then on the Dashboard, click on the Create new application button to create a new app. Once the app is created, you will be redirected to the visual app builder. You can change the name of the app by editing the default name i.e Untitled app from the top left of the app builder.

The visual app builder has 4 sections:
- Canvas is at the center, where you'll drag and drop widgets to build UI.
- Query Manager at the bottom, where you can create and manage queries.
- On the right sidebar, you'll find the Components Drawer which has a list of built-in components. You can drag and drop to start building out the user interface.
- On the left sidebar, you'll see the Inspector, debugger, comments, settings, and Datasource manager. The datasource manager is used to add a new datasource or manage the connected datasources.
Let's build the UI
For building the user interface, you’ll need to drag and drop the following components from the Components Drawer(right sidebar) and place them accordingly.
Here is the configuration of widgets that I used for building the user interface:
- A Container as header and Text widget inside the container to give a title to the app i.e Ticket Triaging System
- For the Header text, you can use HTML tags for the formatting of the text along with the other Styles options available in the component editor

- Now drag a Tabs component right below the header, and set the value of the following tabs:
{{[
        { title: "'Issues 📋', id: '0' }, "
        { title: "'Review and Triage 🔍', id: '1' }, "
 ]}}

- Drag containers inside the Issues and Review & Triage tabs individually and set the background color for both containers

- On the Issues tab, add a chart component on the right side. Edit Chart's properties and set the chart type as pie and chart data to
{{queries.issues.data.chartData}}- it might throw an error in the debugger as we haven't created any queries yet.
- On the left side of the Issues tab, add a table component and set the table data value to
{{queries.issues.data.results}}- the data will show up when we build the queries later in this tutorial.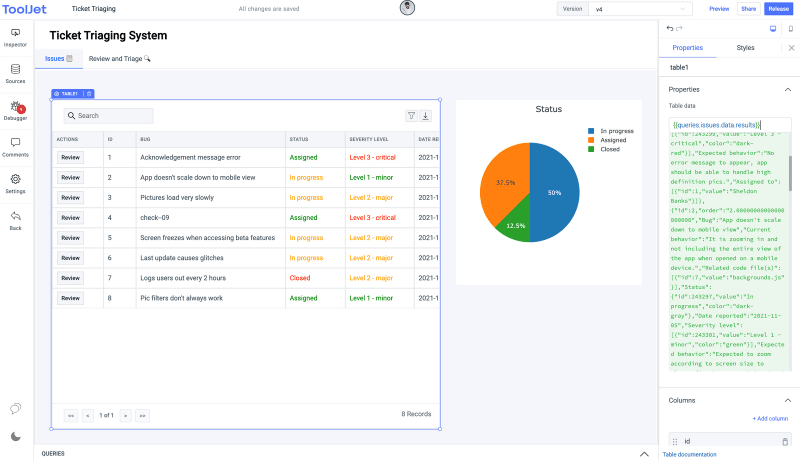
- let's add the following columns to the table
- Name:
Id, key:id - Name:
Bug, key:Bug - Name:
Status, key:Status.value, Text color:{{cellValue === "Assigned" ? "green" : cellValue === "Closed" ? "red" : "orange"}} - Name:
Severity level, key:Severity level[0].value, Text color:{{cellValue === "Level 3 - critical" ? "red" : cellValue === "Level 2 - major" ? "orange" : "green" }} - Name:
Date reported, key:Date reported - Name:
Assigned to, key:Assigned to[0].value
- Name:

- Let's also add an action button on the table so that the users can click on the action button to open the details about the selected issue. We will add an event handler to the action button to control the tab component and change the current tab to
Review & Triage(id 1).
- Enable the highlight selected row option in the table.
Let's switch to Review and Triage tab and add components. In this tab we will need to create 5 sections:
- Issue Details
- Assignee Details
- Code Files
- File Info
- Triage Issue
Let's start with the Issue details section first:
- Add a container and resize it as shown in the screenshot.

- Add a text widget on the top of the container and set its value to <h1> 📝 Issue detail </h1> and then drop a divider below it. You can also change the text color from the Styles tab.

- Next, we will add the text widgets inside this container to display the issue details:
-
Issue (bold it from the styles) and then add another text widget to the right of the issue and set its value to
{{components.table1.selectedRow.Bug}}.Here we are picking up the data from the database with reference to the selected row in the table. - Now add other text widgets accordingly; Date Reported -
{{components.table1.selectedRow['Date reported']}} -
Status -
{{components.table1.selectedRow.Status.value}} -
Severity level -
{{components.table1.selectedRow['Severity level'][0].value}} -
Current behavior -
{{components.table1.selectedRow['Current behavior']}} -
Expected behavior -
{{components.table1.selectedRow['Expected behavior']}}
-
Issue (bold it from the styles) and then add another text widget to the right of the issue and set its value to

Did you notice there is a text Please select an issue from the issues tab - it is only visible when the user doesn't click on any issue on the table. You can set a condition on the Visibility property of this text widget to only show when a row is clicked. Set the value to {{_.isEmpty(components.table1.selectedRow)}}
💡 ToolJet allows you to internally utilize the Moment, Lodash, and Axios libraries.
Now, the Issue details section is done. Similarly, we will build other sections. Let's build the Assignee Details section:
- We will be quickly creating this section by simply copy-pasting the Issue Details section. Select the Issue details container and press c*trl/cmnd+c* and then press ctrl/cmnd+v to duplicate the whole section. Now place it next to the Issue details section and make the required changes.
💡 Check out all the shortcuts supported in ToolJet here.

- At the top of this section add an image component and set the value to
{{queries.team.data.results.filter(x => x.id === components.table1.selectedRow['Assigned to'][0].id)[0].Photo[0].url}}
- Let's add the text components with the following values:
- Name
- Role
- Skills
- Authored code
- Code files worked on
- Add text components next to the components in the previous step and set the value to:
{{queries.team.data.results.filter(x => x.id === components.table1.selectedRow['Assigned to'][0].id)[0].Name}}{{queries.team.data.results.filter(x => x.id === components.table1.selectedRow['Assigned to'][0].id)[0].Role.value}}{{queries.team.data.results.filter(x => x.id === components.table1.selectedRow['Assigned to'][0].id)[0]['Programming languages'].map(i => i.value)}}{{queries.team.data.results.filter(x => x.id === components.table1.selectedRow['Assigned to'][0].id)[0]['Authored code'].map(i => i.value)}}{{queries.team.data.results.filter(x => x.id === components.table1.selectedRow['Assigned to'][0].id)[0]['Code file(s) worked on'].map(i => i.value)}}

The Assignee details section is finished, let's move on to the next section which is Code files:
- Let's copy-paste the assignee details section and place it next to each other. Rename the header in this section to Code Files and delete all the text widgets. Just keep the divider and the title.
- Add a table inside the container as shown in the screenshot.

- Set the table data value as
{{components.table1.selectedRow['Related code file(s)']}}and add two new columns id and Name. Also, enable the highlight the selected row option
Now the Code Files section is done, let's create another section for displaying the details of the selected file in the table of the Code Files section.
- Copy and paste the Assignee Details section as we have done previously in this tutorial. Edit the Title in the header as File Info
- Edit the values of the text components inside the container accordingly. In this section we need the following details:
-
Current use:
{{queries.files.data.results.filter(x => x.id === components.table2.selectedRow.id)[0]['Current use'].value}} -
Language:
{{queries.files.data.results.filter(x => x.id === components.table2.selectedRow.id)[0]['Programming language'].map(i => i.value)}} -
Creator:
{{queries.files.data.results.filter(x => x.id === components.table2.selectedRow.id)[0]['Original creator'].map(i => i.value)}} -
Function:
{{queries.files.data.results.filter(x => x.id === components.table2.selectedRow.id)[0]['Function']}} -
Path:
{{queries.files.data.results.filter(x => x.id === components.table2.selectedRow.id)[0]['Path to source']}}
-
Current use:

Finally, let's build the last section i.e Triage Issue. We can simply use the body of other sections by copy-pasting.
For this section, we need only the Title and divider components. Rename the Title to
Triage Issue
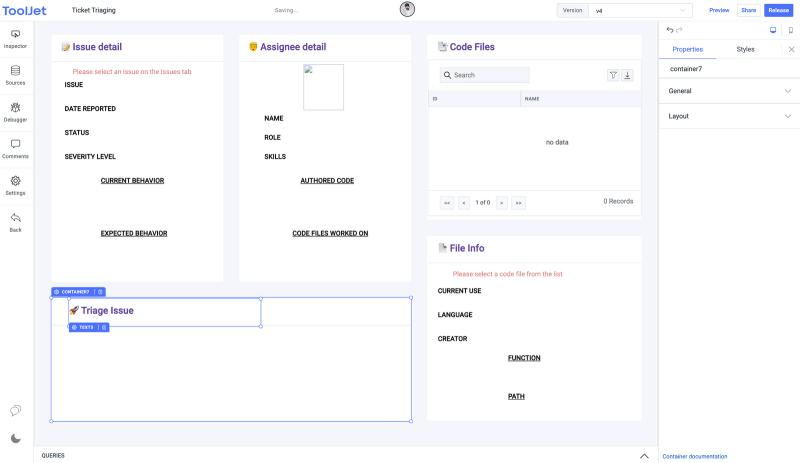
Drag a dropdown and a button widget inside the container.
Edit the properties of the dropdown component, set the label as
Triage, default value as{{243298}}, Option values as{{[243296, 243297, 243298]}}, and Option labels as{{["Assigned", "In progress", "Closed"]}}. The numbers mentioned in the default value and option values are actually the ids of the single select options in the baserow.

Add a button and name it as Update, set its loading state to
{{queries.triage.isLoading}}so that it shows the loader whenever the triage query is running. We will add an event handler to the button to trigger the triage query later in this tutorial once we build the queries. You can also change the color of the button from the styles tab.

Great!!🥳 we are finally done with building the UI of the application. Now let's go ahead and quickly build the queries to make our app fully functional.
Connecting Baserow and creating queries
Let's start by connecting Baserow to ToolJet.
- Go to the Datasource manager on the left sidebar and click on the + button to add a datasource.
- Select Baserow from the modal that pops up.

- Enter the Baserow API key and select whether it's Baserow Cloud or Self-Host.
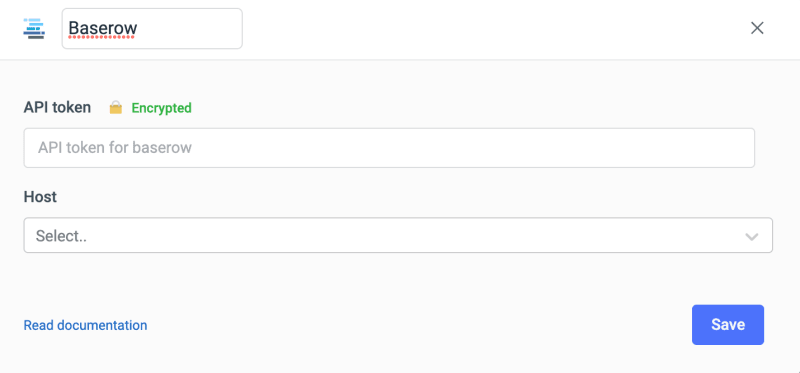
- Let's go to the Baserow dashboard and get the API key. You can create a new API key from the Personal API tokens in Settings of the Baserow

- Copy-paste the API key on ToolJet, and click on the Save button to save the datasource.
Let's create the queries and connect them to components. For this application, we need to create 4 queries:
- issues
- team
- files
- triage
issues
This query will get the list of all the rows from the issues table in the baserow. We will also write some JS code in transformation to transform our returned data from the query.
- Go to the Query Panel, and click on the + button
- Create a new Baserow query and select the List rows operation from the operations dropdown and in the Table ID field enter the ID of the table in database.
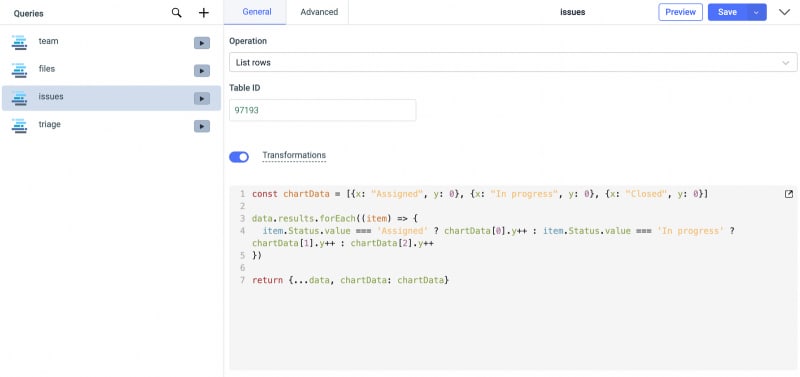
- To get the Table ID, you can go to the Baserow dashboard, click on the three dots next to the database name and select the View API docs option. It will open up the documentation specific to that particular database that will have IDs and all the related information for that database.

- After entering the Table ID, enable the Transformations and write the JS code to add a new object in the returned data. The following JS code will add a new array chartData to the returned data from the query. The chartData will include objects that will have the total count for Assigned, In progress, and closed issues in the database.
const chartData = [{x: "Assigned", y: 0}, {x: "In progress", y: 0}, {x: "Closed", y: 0}]

data.results.forEach((item) => {
  item.Status.value === 'Assigned' ? chartData[0].y++ : item.Status.value === 'In progress' ? chartData[1].y++ : chartData[2].y++
})

return {...data, chartData: chartData}
- Now go to the Advanced tab and enable the
Run query on page load?so that the query runs every time the app is loaded. - Click on Save & Run
- Now, you'll be able to see the updated data on the table and on the chart.
team
This query will list all the rows from the team table in the database.
- Create a new Baserow query, select List rows from the operations dropdown, and enter the Table ID
- Go to the Advanced tab and enable the Run query on page load? so that the query runs every time the app is loaded.
- Click on Save & Run

files
This query will list all the rows from the files table in the database.
- Create a new Baserow query, select List rows from the operations dropdown, and enter the Table ID
- Go to the Advanced tab and enable the Run query on page load? so that the query runs every time the app is loaded.
- Click on Save & Run

triage
This query will update the status of an issue in the issues table.
- Create a new Baserow query, select the Update row from the operations dropdown, and enter the Table ID
- In the Row ID field, we will get the value from the selected row in the table using the dynamic variable
{{components.table1.selectedRow.id}} - In the Record field, we will get the value from the dropdown that we have added in the Review & Triage tab:
{ Status: {{components.dropdown1.value}}}
- Go to the Advanced tab and add an event handler to run the issues query every time the query is successful, so that whenever the status is updated the table gets reloaded on the ToolJet.
- Click on Save & Run

- Now go to the Update button on Review & triage tab and add an event handler to run the triage query.

Releasing your application
Click on the Release button at the top right corner of the app builder and the version which is currently opened will be released.
You can click on the Share button and enable the make application public allowing anyone to use the application without signing it. You can also customize the shareable URL of your application.

Voila!! You have successfully created an internal Ticket Triaging Application using almost no code 🎉
If you have any queries related to building applications with ToolJet or just want to hang out in the community of low-code application developers just drop us a Hi in our Slack Community. 🚀


Top comments (0)