As an Android developer, it's quite critical to figure out how you can develop your app as efficient as possible. When it comes to showcasing a series of items on the screen, it would be too expensive to inflate them in a regular way as it would significantly impact the data usage. As such, using AdapterView such as ListView, GridView or Spinner, and Adapter such as ArrayAdapter will help us to reduce the usage of the resource.
Why AdapterView and Adapter?
When you have a series of items to display on the screen, there are multiple ways to achieve it. One way is to use LinearLayout and populate the child Views by using a loop. However, this approach is not preferable as it consumes quite a lot of memory. Imagine if your list has heaps of items to showcase like a timeline for social media or a feed of articles or news. It's quite simple that your App would take so much resource to build all these lists of items. But what if there is a better way so that your app does not use a huge amount of resources when populating these Views? That's when using the combination of AdapterView and Adapter comes in handy as you can recycle the Views.
What is View Recycling?
View recycling is a very powerful and important concept to understand. What it does is that the View gets recycled as the name suggests. Probably you could guess it, however, what exactly is happening behind the scenes? To understand that let's take a look at it closely.
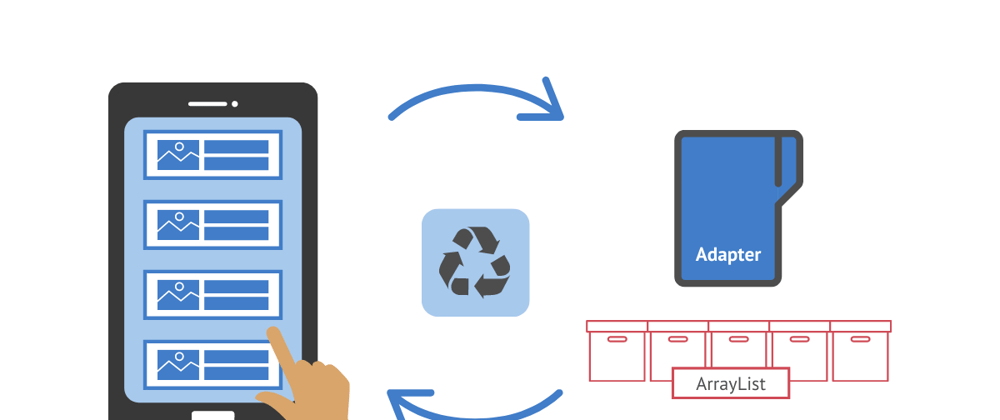
In this article, we assume that we want our list of items to appear in a simple list layout by utilising ListView as one of the AdapterView and the list of data is stored in ArrayList hence we choose to work with ArrayAdapter as our Adapter.
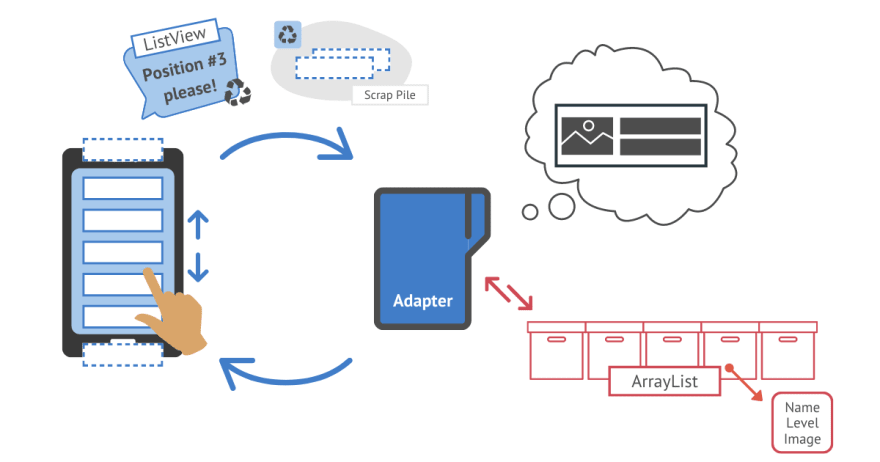
Let's start with a high-level view. When ListView is connected with ArrayAdapter, the ArrayAdapter start populating the children/list items of the ListView until it has enough items to fill up the entire height of the screen. Here, please note that there is no extra View created. So if 5 items can take up the screen, only 5 rows are created at this point. Then as the user scrolls the screen to go through the list, the item goes off the screen gets kept in memory so that it could be reused later. I would think of this as being sent to a place like a scrap pile. In terms of the new item that comes into the screen, it is created by reusing the old row from the scrap pile (the data will be updated to suit the new item).
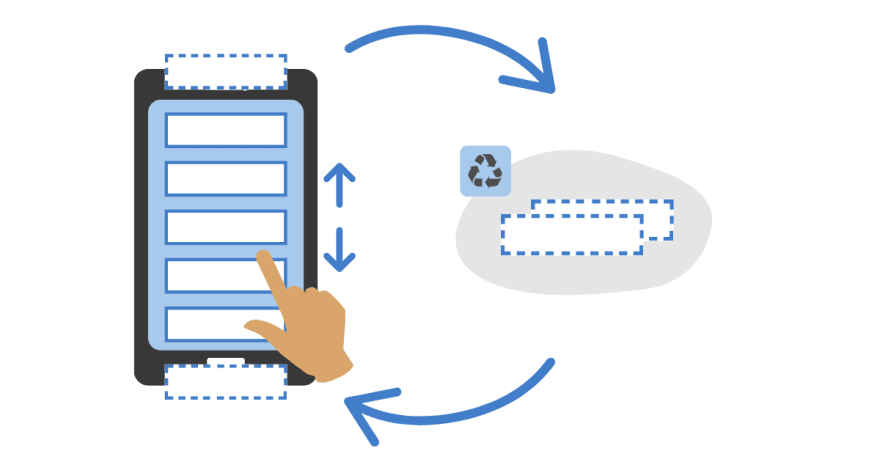
By repeating this process, you can successfully save the usage of the resource because the number of rows that needs to be instantiated is small (probably up to less than 10) even if your list happens to be super long.
How to use ListView with a basic ArrayAdapter
Let's start looking at how we can set up the recycling views with an example situation. Say you want to display the names of students on a screen of your app with minimal styling. This means you need a single TextView as your list item. In that case, all you need to do is to initialise the ArrayAdapter and connect it to your ListView.
// Instantiate an ArrayAdapter
ArrayAdapter studentNameAdapter = new ArrayAdapter(this, android.R.layout.simple_list_item_1, students);
// Getting an ID of ListView
ListView listView = (ListView) findViewById(R.id.list);
// Connect ListView and Adapter
listView.setAdapter(studentNameAdapter);
First, we instantiate the ArrayAdapter by passing 3 arguments: context, layout and the array of data. We passed this for the Context as it represents the current activity. We chose simple_list_item_1 for the layout, which just contains a single TextView. And here we assume that there is an ArrayList called students containing a series of student names, which was passed as our 3rd argument.
With all these details provided, ArrayAdapter knows what to do. So all that is left to do is to set an Adapter with your ListView. I'd say the ArrayAdapter is quite handy to work with!
Please note that by default ArrayAdapter only returns a single View. This is a key point when you would like to display more than just the names of students.
Showcasing more details in your list
Up until now, our list contains only one details, the student name. But what if you want to display more details like student level and profile image in the list. However, ArrayList is expected to return a single View... It seems like we need to make some adjustments to cater for our new data.
Here is the list of things to do:
- Create a new object to store all of the data types (2
TextViews and 1ImageView) - Adjust
ArrayListto hold the newly created object (contains names, levels and profile images) - Create a custom
ArrayAdapterto update the default behaviour of thegetView()method so that it can return theViewcontaining multiple data
Let's go through it one by one. The first step is to create a new object so that we can store the data we want. Remember, the fields we want to set up are for name, level and profile image. To create a new class with the fields required is as follows:
// Student.java
public class Student {
    private String mName;
    private String mLevel;
    private int mImageResourceId;

    public Student(String name, String level, int imageResourceId) {
        mName = name;
        mLevel = level;
        mImageResourceId = imageResourceId;
    }

    public String getName() {
        return mName;
    }

    public String getLevel() {
        return mLevel;
    }

    public int getImageResourceId() {
        return mImageResourceId;
    }
}
We have created a new public class called Student. Make sure to set your variable private so that it won't be updated by someone accidentally. Also, set getter methods to be public so that we can access the details later.
After setting up this object, make sure to update your list of data to cater for these 3 details. Your ArrayList now should look like this:
// Create an ArrayList with Student obj
ArrayList<Student> studentList = new ArrayList<Student>();
// Assign each details
studentList.add(new Student("Jane", "Beginner", R.drawable.jane));
studentList.add(new Student("Bob", "Intermediate", R.drawable.bob));
studentList.add(new Student("Lisa", "Advanced", R.drawable.lisa));
...etc
Next, we need to create a custom Adapter by extending ArrayAdapter. You can name it whatever it's suitable but in this example, we call it StudentAdapter.
// Creating a custom adapter by extending ArrayAdapter with Student data
public class StudentAdapter extends ArrayAdapter<Student> {
    // Set a custom constructer
    public StudentAdapter(Activity context, ArrayList<Word> studentList) {
    // The second parameter is 0 as we won't use constructer to inflate the views.
        super(context, 0, studentList);
    }

    @Override
    public View getView(int position, View convertView, ViewGroup parent) {
        // Check if the existing view is being reused, otherwise inflate the view manually
        View listItemView = convertView;
        if(listItemView == null) {
            listItemView = LayoutInflater.from(getContext()).inflate(
                    R.layout.list_item, parent, false);
        }

        // Get the Student object located at the given position
        Student currentStudent = getItem(position);

        // Set up one of the TextViews with the name text obtained from the Student object
        TextView studentName = (TextView) listItemView.findViewById(R.id.name);
        studentName.setText(currentStudent.getName());

        // Set up the other TextView with the level text obtained from the Student object
        TextView studentLevel = (TextView) listItemView.findViewById(R.id.level);
        studentLevel.setText(currentStudent.getLevel());


        // Set up the ImageView with the resource ID obtained from the Student object
        ImageView imageView = (ImageView) listItemView.findViewById(R.id.image);
        imageView.setImageResource(currentStudent.getImageResourceId());


        // Return the list item layout (containing 2 TextViews and an ImageView)
        return listItemView;
    }
}
Here we have created a custom adapter called StudentAdapter by extending an ArrayAdapter<Student>. We have also specified what data we use for the adapter by adding <Student>. Inside of that, we have set super constructor (inherited from ArrayAdapter) - one thing to note here is we did not specify the layout. This is because we want getView() method to take care of that.
Moving on to the overring getView() method, we first check if the convertView has something in it, meaning that whether or not there are any old rows in the scrap pile. If not, we need to inflate the views manually. In most cases, this is needed when the activity has just stated (e.g. A user just opened the screen).
If it contains rows, then we can specify what needs to be done before returning a single View. In our case, we have set the name and level texts (obtained from the Student object) on the TextView's respectively and 1 image resource ID on the ImageView. We identified which student data to handle is by using getItem() method with position info that is originally coming from ListView.
After finishing all of the above, we just need to set a listView with an instantiated StudentAdapter as our final step.
// Instantiate the custom ArrayAdapter called StudentAdapter
StudentAdapter adapter = new StudentAdapter(this, studentList);

// Getting an ID for the ListView
ListView listView = (ListView) findViewById(R.id.list);

// Set an adapter
listView.setAdapter(adapter)
Summary
We have gone through from basic to custom usage of ListView and ArrayAdapter. This is one of the ways that I have recently learnt to display a list of items. I'm pretty sure I will encounter alternatives in the near future. When I do, I will write other articles to evaluate them!
If you know the alternatives or any suggestions to improve my approach, please feel free to leave a comment. I just started learning Java 2 weeks ago and am willing to absorb as much as I can throughout my journey! Thanks for reading 😄


Top comments (3)
Good read.
Have you tried Recyclerview?
Yes, I have and I just wrote about the article about it! What a timing! Thanks anyway!
dev.to/tomokawaguchi/how-to-make-a...
great article, very helpful for beginners in Android Studio such as me!