Paddings and margins can help finetuning an Android user interface by increasing the inner or outer size of an UI element. If you are moving from Views to Jetpack Compose you may be wondering if these concepts are available there, too. This article accompanies a sample app called MarginPaddingDemo. Its source code is available on GitHub.

The user interface is divided into two parts. The upper half of the screen shows an inflated XML based layout. Let's look at it first.
Margins and paddings using Views
Besides two buttons you'll notice a bunch of FrameLayouts. Their main purpose is to visualize surrounding background using android:background=.
<?xml version="1.0" encoding="utf-8"?>
<FrameLayout xmlns:android="http://schemas.android.com/apk/res/android"
    android:layout_width="match_parent"
    android:layout_height="match_parent"
    android:background="@color/teal_200">

    <RelativeLayout
        android:layout_width="wrap_content"
        android:layout_height="wrap_content"
        android:layout_gravity="center"
        android:background="@color/teal_700">

        <FrameLayout
            android:id="@+id/button1"
            android:layout_width="wrap_content"
            android:layout_height="wrap_content"
            android:layout_centerHorizontal="true"
            android:background="@color/purple_200">

            <Button
                android:layout_width="wrap_content"
                android:layout_height="wrap_content"
                android:layout_gravity="center"
                android:layout_margin="32dp"
                android:text="@string/button1" />

        </FrameLayout>

        <FrameLayout
            android:layout_width="wrap_content"
            android:layout_height="wrap_content"
            android:layout_below="@id/button1"
            android:layout_centerHorizontal="true"
            android:background="@color/purple_500">

            <Button
                android:layout_width="wrap_content"
                android:layout_height="wrap_content"
                android:layout_gravity="center"
                android:padding="32dp"
                android:text="@string/button2" />

        </FrameLayout>

    </RelativeLayout>

</FrameLayout>

BUTTON #2 is significantly larger than BUTTON #1. That's because of android:padding="32dp". Padding is defined as space between the edges of a View and its content. android:padding sets the padding of all four edges, but you can also set a padding only, for example, left and top. The additional space belongs to the UI element. You can see this by looking at the Getters and Setters of a View.

BUTTON #1 contains android:layout_margin="32dp". This creates a considerable area around the UI element, which in a way does not belong to the View. To be precise, margins don't relate to the properties of this class. They belong to ViewGroup instead, a special view that can (and usually does) contain other views (children). ViewGroup is the base class for layouts and views containers. It also defines the ViewGroup.LayoutParams class which serves as the base class for layout parameters. Margins are layout parameters.
Time to recap. Margins provide space around a UI element, whereas padding increases its size. For interactive UI elements, a margin does not influence the interactive area - padding does. So,
- if you want in increase the clickable area, you can use padding.
- if you want to visually separate a UI element, you can use margins.
I am writing you can because there certainly are other ways to achieve this. Yet, margin and padding is really easy to use.
Let's turn to Jetpack Compose.
Padding in Jetpack Compose
Jetpack Compose isn't a traditional (imperative) UI framework based on class hierarchies. There's no base set of properties and methods. Instead, Compose uses pure Kotlin functions and favors composition over inheritance.
@Composable
fun MainScreen(layout: View) {
  MarginPaddingDemoTheme {
    Surface(
      modifier = Modifier.fillMaxSize(),
      color = MaterialTheme.colors.background
    ) {
      Column(modifier = Modifier.fillMaxSize()) {
        AndroidView(
          modifier = Modifier
            .fillMaxWidth()
            .weight(0.5f),
          factory = {
            layout
          }
        )
        Box(
          contentAlignment = Alignment.Center,
          modifier = Modifier
            .fillMaxWidth()
            .weight(0.5f)
        ) {
          Buttons()
        }
      }
    }
  }
}
The content of the user interface is represented by a Column() with two equally sized children: an AndroidView() and a Box(). The first one shows the inflated layout file. But we'll focus on the Box(). It centers its child (another composable named Buttons()) using contentAlignment = Alignment.Center. The size of the box is configured through a so-called Modifier chain. fillMaxWidth() is an extension function of Modifier - it operates on Modifier instances. As the name suggests, the box will use all horizontal space. weight(0.5f) makes it use half of the height of its parent, the Column(). In my example, the root of the chain, Modifier, is a companion object. Starting with this, the modifier functions are invoked in the same order they appear in the source code. So, we configure a composable by modifying just the way we want it to be.
Now let's look at Buttons().
@Composable
@Preview
fun Buttons() {
  Column(
    horizontalAlignment = Alignment.CenterHorizontally,
    modifier = Modifier
      .background(color = Teal700)
      .padding(32.dp)
  ) {
    OutlinedButton(modifier = Modifier
      .background(Purple200)
      .padding(32.dp),
      onClick = {}) {
      Text("Button #1")
    }
    Box(
      modifier = Modifier
        .background(color = Purple500)
        .padding(32.dp),
      contentAlignment = Alignment.Center,
    ) {
      OutlinedButton(
        onClick = {}) {
        Text(
          text = "Button #2",
          modifier = Modifier.padding(
            32.dp
          )
        )
      }
    }
  }
}
It's a Column, too. We don't modify its size, so both width and height are determined by the children. But look at its modifier chain. First we set a background color (which is executed first) with background(color = Teal700), and then a padding. In case you are wondering why I put the word then in italic:
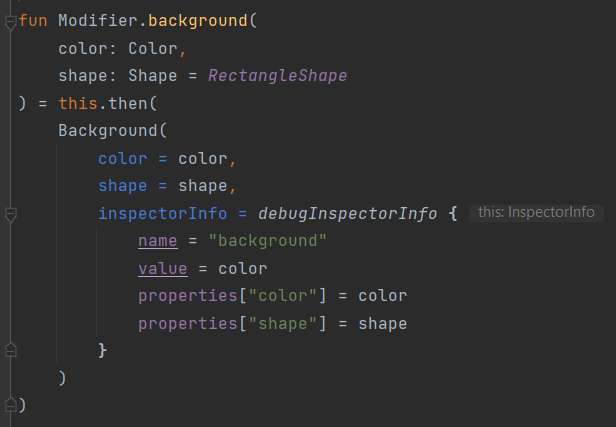
then() belongs to the Modifier interface.
Next, let's look at padding(). It applies additional space along each edge of the content. This is done before the size of the content is calculated (measured). Therefore, the content can only get as large as the remaining space.
But is padding sensitive to user interactions? That depends on how and when we apply the padding() modifier.
OutlinedButton(modifier = Modifier
  .background(Purple200)
  .padding(32.dp),
  onClick = { println("Hello") }) {
  Text("Button #1")
}
Clicking on the purple background will not print Hello. Although padding is applied to the button, it's not part of it the same way it is for Views. If you want it to be a part of the UI element, you may have several options, depending on the composable function to be used.
OutlinedButton(
  onClick = { println("Hello")}) {
  Text(
    text = "Button #2",
    modifier = Modifier.padding(
      32.dp
    )
  )
}
Here we apply the padding to the content of the button, which makes the whole button bigger. But what about composables that don't have a dedicated content?
@Composable
@Preview
fun MyButton() {
  Text(modifier = Modifier
    .clickable {
      println("Hello")
    }
    .background(Color.LightGray)
    .padding(32.dp),
  text = "Click me")
}
This examples shows the power of modifiers and the important role order plays. clickable { } comes first, which - simply put - means that everything is sensitive to user interaction. After that, a light background is applied. Finally, a padding of 32 density independent pixels is added.
Conclusion
Once you have added padding, you can tweak the appearance of your composable by using offset(). Try adding .offset(x = (-26).dp, y = (-26).dp) after the padding in MyButton().

As you can see, you can move the content area into the padding.
So, what do you think about margins and paddings? Please share your thoughts in the comments.


Top comments (0)