Welcome back on the Docker and AWS series by TinyStacks
In this Article, we will create a simple CRUD API using a Flask Application , Docker, Postgres
Video Version:
Steps:
- Create a folder
- Create
requirements.txt - Create app (~50 loc)
- Create
Dockerfile - Create
docker-compose.yml - Run database
- Check database
- Run python app
- Check that the table has been created
- Test endpoints (Postman)
- Test Get All endpoint
- Create a record(x3)
- Get a record
- Update record
- Delete record
Create folder and step into it
You can create a folder in anyway that you prefer. If you use a terminal you can type:
mkdir flask-crud-api
Then, step into the folder:
cd flask-crud-api
Then, open this folder with your favorite IDE. If you use Visual Studio Code, you can type:
code .

Now we’re ready to get started coding our Flask Crud API application with the help of GitHub Copilot!
Create requirements.txt
First of all, we need to define the dependent Python libraries for our application. The standard method in Python is to create a requirements.txt file and list our dependencies there.

So create this file called "requirements.txt". (If you have the Material Icon Theme, it will show a nice little Python icon. It’s a nice to spot typos!)
Then we can type the dependencies for our project:
flask
psycopg2-binary
Flask-SQLAlchemy
Those dependencies are:
- flask: The Python Framework
- psycopg2-binary: To create the connection with the Postgres Database
- Flask-SQLAlchemy: Help generate SQL queries without writing them manually
Create app (~50 loc)
At the root level, create a file called app.py. We will write our crud API app in about 50 lines of code!

Let’s specify the libraries we’ll use:
from flask import Flask, request, jsonify
from flask_sqlalchemy import SQLAlchemy
import os
Next, define the Flask app and how to run it:
app = Flask(__name__)

if __name__ == '__main__':
    app.run(debug=True)
Define an environment variable as a string and initialize the SQLAlchemy instance to handle the Postgres database:
app.config['SQLALCHEMY_DATABASE_URI'] = os.environ.get('DATABASE_URL')
db = SQLAlchemy(app)
Now let's define our data model. We’ll create a class named Item with just title and content as properties. We’ll also add an auto-incremental Integer named id. This will act as the primary key for our table.
class Item(db.Model):
  id = db.Column(db.Integer, primary_key=True)
  title = db.Column(db.String(80), unique=True, nullable=False)
  content = db.Column(db.String(120), unique=True, nullable=False)

  def __init__(self, title, content):
    self.title = title
    self.content = content
Now a little bit of magic: with this line we let SQLAlchemy to synchronize with the Postgres database. This will create our databasetable automatically for us!
db.create_all()
Define REST endpoints
Now we need to implement our CRUD endpoints. CRUD stands for:
- CREATE
- READ
- UPDATE
- DELETE
These are the basic functions of every application.
To retrieve a singleitem, we define this function:
@app.route('/items/<id>', methods=['GET'])
def get_item(id):
  item = Item.query.get(id)
  del item.__dict__['_sa_instance_state']
  return jsonify(item.__dict__)
To get all the items in the database, we define this function:
@app.route('/items', methods=['GET'])
def get_items():
  items = []
  for item in db.session.query(Item).all():
    del item.__dict__['_sa_instance_state']
    items.append(item.__dict__)
  return jsonify(items)
To create a new item:
@app.route('/items', methods=['POST'])
def create_item():
  body = request.get_json()
  db.session.add(Item(body['title'], body['content']))
  db.session.commit()
  return "item created"
To update an existing item:
@app.route('/items/<id>', methods=['PUT'])
def update_item(id):
  body = request.get_json()
  db.session.query(Item).filter_by(id=id).update(
    dict(title=body['title'], content=body['content']))
  db.session.commit()
  return "item updated"
To delete an existing item:
@app.route('/items/<id>', methods=['DELETE'])
def delete_item(id):
  db.session.query(Item).filter_by(id=id).delete()
  db.session.commit()
  return "item deleted"
That's it! and in less than 60 lines of coding (included new lines)!
Create Dockerfile
A Dockerfile is a text file to define a set of commands to create an image. Starting from this image, we will run our python containers
Let's create a file called Dockerfile (capital D, no extension).
We could create of course a file with a different name.But this is the default one that Docker uses. If we use it, we don't have to specify a name for the file when we build our Docker container image.
This is the final file:
FROM python:3.6-slim-buster

COPY requirements.txt .

RUN pip install -r requirements.txt

COPY . .

EXPOSE 80

CMD ["flask", "run", "--host=0.0.0.0", "--port=80"]
Let's explain briefly what's going on here:
-
FROM: Set the baseImage to use for subsequent instructions. FROM must be the first instruction in a Dockerfile. -
COPY: Copy files or folders from source to the dest path in the image's filesystem. The firstCOPYcopies the requirements.txt file inside the filesystem of the image; the second one copies everything else. - RUN
: Execute any commands on top of the current image as a new layer and commit the results. In this case, we are runningpip` to install the Python libraries we need. -
EXPOSE: Informs Docker of the port we will use at runtime. (PRO tip: this line is not really needed. It makes the intent of the Dockerfile clear and facilitates the translation to the docker-compose.yml file) -
CMD: Provide defaults for an executing container. If an executable is not specified, thenENTRYPOINTmust be specified as well. There can only be oneCMDinstruction in a Dockerfile.
Create docker-compose.yml
Now that we have created the Dockerfile, let's create the docker-compose.yml file to make our life easier.
This is the final file:
`yml
version: '3.9'
services:
pythonapp:
container_name: pythonapp
image: pythonapp
build: .
ports:
- "80:80"
environment:
- DATABASE_URL=postgresql://postgres:postgres@db:5432/postgres
depends_on:
- db
db:
container_name: db
image: postgres:12
ports:
- "5432:5432"
environment:
- POSTGRES_PASSWORD=postgres
- POSTGRES_USER=postgres
- POSTGRES_DB=postgres
volumes:
- pgdata:/var/lib/postgresql/data
volumes:
pgdata: {}
`
Let's explain what's happening line by line:
-
version: '3.9' is the current version of the docker-compose.yml file. -
services: The top-level entry of ourdocker-compose.ymlfile. The services are basically the containers. -
pythonapp: The Python application we just wrote -
container_name: Defines a custom name for our application. It’s the equivalent of using the--nameoption at the command line when we rundocker run. -
image: Rhe image for this service (container). Here, we are defining a custom name just to use it locally. If we want to push our containerto a public or private registry (a place to store Docker Images, e.g. Docker hub), we need to change the tag of the image (basically the name). We don’t need to do that now. -
build: We need this option if we are using our custom image and not an existing one. The dot after the semicolon is the path of the Dockerfile, and it means "here is where I’mrunning thedocker-compose.ymlfile". Please note that thedocker-compose.ymlfile and theDockerfileare at the same level. -
ports: A list of ports we want to expose to the outside. A good practice is to make the content a quoted string. -
environment: Key-value pairs. Here, we use them to define our custom URL to connect to the Postgres database. -
depends_on: Express dependency between services. Service dependencies cause the following behaviors:-
docker-compose upstarts services in dependency order. In the following example, db and redis are started before web. -
docker-compose upautomatically includes a service’s dependencies. In the example below,docker-compose up webalso creates and startsdbandredis. -
docker-compose stopstops services in dependency order. In the following example,webis stopped beforedbandredis.
-
-
db: Service for the Postgres database. -
container_name: The default name for this service, also calleddb -
image: postgres:12: We will not use our custom image in this case but an existing one, the one the Postgres team has created and pushed for us on Docker Hub. -
ports: A list of ports we want to expose to the outside. A good practice is to wrap this content in a quoted string. -
environment: Here we define three environment variables for the Postgres service. The keys are not arbitrary, but are the ones defined in the official Postgres image. We can, of course, define the values of these environment variables (this is why the Postgres team has given them to us, to use them!). -
volumes: Here we use a named volume called pgdata. the part before the ':' is the name of the volume, and the part on the right of the ':' is the destination path
At the end of the file, we define the actual volume named pgdata.
Run the database service locally
To run the database service locally, we can type:
bash

docker compose up -d db
the -d option stands for detached, to leave out terminal available after running this container.
You can check the status of the running container by typing:
docker ps

Check the database
To step inside the Postgres container we will use 2 different approaches.
First approach: directly from the Command line
docker exec -it db psql -U postgres

But if we type
\dt
We will see this:
did not find any relations
This is correct, because we haven't run our Python container yet.
To exit the psql process, type:
exit
Or alternatively, just
\q
Run Python app
To run your Python application, type:
docker compose up --build pythonapp
The --build option is to build your application before running it. It's not useful the first time you run this command because Docker is going to build the image anyway. It becomes useful after you run docker compose up multiple times and you’ve made some changes on your app.
Note: If you build an image using the same tag (name), the previous image will become a so-called "dangling image", with <none> <none> as the repository and tag. To remove them, you can type docker image prune and then y to confirm.
if you see something like this, you have successfully launched your Python Flask application:

Now you can once again check the running containers:
docker ps -a

(Side note: don't mind the "created" value, it's just me removing/stopping the containers for demo-purposes! You should see them both running with a status of some minutes ago.)
Check the table has been created
If you step again inside the Postgres container now, using the command:
docker exec -it db psql -U postgres
- and you type:
\dt
- you will see the table has been created automatically, without calling any endpoint!
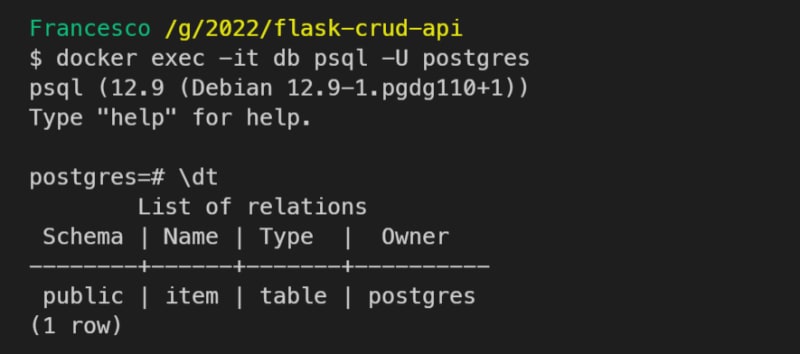
This was possible because of the line (around 22) on the app.py file:
python

db.create_all()
Test endpoints (using Postman)
Let's test this simple application! We will use Postman, but you can use any REST API testing tool that you prefer.
Get All
Let's get all the items:

Create one (x3)
Now let's create some new items


Apologies for my lack of imagination :)
Get one
To get a single item, you can just make a GET request at the endpoint /item/<id>, where <id> is the unique ID of the item that you previously created.
For example, to get the item with id 2:

(Please note that we are not handling errors correctly in this example. If that id doesn't exist, we’ll get an error directly from the application and we won’t show an error message to the end-user.)
Update one
To update an existing item, you can make a PUT request using the <id> of the item in the body:

Delete one
Finally, we can delete an existing item from the database. We can make a DELETE request and appending an existing <id> at the end of the url:

If you get all the items again, this will be the result:

Test the final status using the prompt
You can test the final status also directly on the db:
docker exec -it db psql -U postgres
and then run the psql command (don't forget the final ';'):
select * from item;

`
All the code is available at this url: https://github.com/tinystacks/aws-docker-templates-flask/tree/flask-local-postgres
Video Version:
Video offered by TinyStacks


Latest comments (2)
"[i]t is far easier to standardize representation [formats] and relation type [names] than it is to standardize objects and object-specific interfaces."
— roy fielding. 2008.
try this updated version
dev.to/francescoxx/build-a-crud-re...