To be frank, there are just way too many commands... somebody saves me ༼ಢ_ಢ༽
-
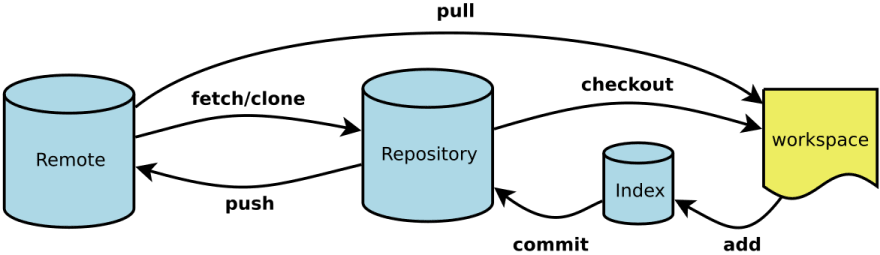
A Git project is broken down into 4 parts:
- A working directory: where you'll be doing all the work ie. creating, editing, deleting and organizing files
- A Staging Area: Where you'll list changes you make to the working directory
- A Repository: where Git permanently stores those changes as different versions of the project
- A Remote: a Git repository that lives outside your Git project folder. Remotes can live on the web, on a shared network or even in a separate folder on your local computer.
Basic Workflow:
-
General
- git init: creates a new Git repository
- git status: inspects the contents of the working directory and staging area
- git add: adds files from the working directory to the staging area
- git diff: shows the difference between the working directory and the staging area
- git log: shows a list of all previous commits
- git commit -m "type your message here": permanently stores file changes from the staging area in the repository
- git remote add origin github repository link: link to GitHub (for existing repository)
- git push -u origin main: link to GitHub (for existing repository)
- git show HEAD: in git, the commit you are currently on is known as the HEAD commit. The most recently made commit is the HEAD commit. The output of the command will display all git log command displays for the HEAD commit, plus files changes that were committed.
-
Backtracking
- git checkout HEAD filename: will restore the file in your working directory to look exactly like what it did when you last made a commit. Basically means discard changes go back to the previous state. REMEMBER that this is entered before commit
- git checkout -- filename: does the same thing as above.
- git reset HEAD filename: This command resets the file in the staging area to be the same as the commit. It does not discard file changes from the working directory, it removes them from the staging area.
- git reset commit_SHA: This command works by using the first 7 characters of the SHA of a commit. Refer to git log to see the version you would like to backtrack to.
-
Branching
- git branch: This command will tell you which branch that you're currently on. (*) marks the current branch that you're currently on.
- git branch new_branch: This command will create a new branch according to the name of the new new_branch
- git checkout branch_name: This command will switch your terminal to the desired branch that you would like to go to
- git merge branch_name: This command is executed when you're in the master branch. This basically merges the custom branch to the master branch and keep the master branch updated on the changes made to the custom branch.
-
conflict resolve: Merge conflicts arise due to the changes with respect to a certain file that exists in two or more different branches. To resolve it, we need to delete the unwanted part in the specific file, and then proceed with add to staging, commit to master branch then delete the custom branch.
- "<<<<<" represents the head. aka the master branch.
- "=====" represents the separator between branches.
- ">>>>>" represents the other branches.
- git branch -d branch_name: This command will delete the branch that is no use / unwanted.
- git branch -D branch_name: This command is able to delete not fully merged branches
-
Teamwork
-
git clone remote_location clone_name:
- remote_location: tells Git where to go to find the remote. This could be a web address, or a file path, such as: /Users/teachers/Documents/some-remote
- clone_name: the name you give to the directory in which Git will clone the repository.
-
git remote -v: This command allows you to see the remotes
- Git lists the name of the remote, origin, as well as its location.
- Git automatically names this remote origin, because it refers to the remote repository of origin. However, it is possible to safely change its name.
- The remote is listed twice: once for (fetch) and once for (push). We’ll learn about these later in the lesson
-
git fetch: This is an easy way to see if changes have been made to the remote and bring the changes down to your local copy. This command will not merge changes from the remote into your local repository. It brings those changes onto what’s called a remote branch.
- Take note: After fetch, the new commits are only in the origin/master branch, but not in the local master branch. We need to use 'git merge origin/master' in order to see the changes made previously.
- git push origin your_branch_name: will push your branch up to the remote, (origin). From there, Sally can review your branch and merge your work into the (master) branch, making it part of the definitive project version.
-
git clone remote_location clone_name:
-
Workflow of Git Collaboration
Steps 1 and 4 are a safeguard against merge conflicts, which occur when two branches contain file changes that cannot be merged with the git merge command. Step 5 involves git push.- Fetch and merge changes from the remote
- Create a branch to work on a new project feature
- Develop the feature on your branch and commit your work
- Fetch and merge from the remote again (in case new commits were made while you were working)
- Push your branch up to the remote for review
Misc
And here's Peter... without any context... Gigidy


Top comments (1)
I usually alias everything. I have an alias to unstage, uncommit, etc.