
Today, I'm going to walk you through the steps of building a simple web3 chrome extension that gets the ETH balance of a given wallet address.
In this tutorial, you will learn the following:
- Setting up a Webpack dev environment.
- Some of Typescript core concepts.
- Making a Web3 call.
- Creating a Chrome Extension and learning about Manifest.
I assume you have basic Javascript knowledge, so I won't get much into the code structure.
Before we start, make sure you have Nodejs and NPM installed on your machine.
Let's jump right off and start setting up our environment.

We start with initializing our project and creating the package.json file
mkdir ts-web3-extension && cd ts-web3-extension && npm init -y
Typescript:
Typescript is a strongly typed language developed and maintained by Microsoft. It’s a superset of Javascript built up on it.
Unlike Javascript which is dynamically typed, Typescript provides optional static typing and extra features that help you identify common errors and write much cleaner code.
You can install Typescript into your project or globally on your machine.
npm i typescript --save-dev
Webpack:
Webpack is a module bundler for Javascript applications, it helps bundle and optimize different files we have in the app, making the code shorter and usable on the browser.
To start building our development setup using Webpack, we need to install some dependencies:
npm i webpack webpack-cli html-webpack-plugin clean-webpack-plugin --save-dev
By default, webpack can only compile and bundle Javascript files, so we will need to use a loader which will allow us to handle Typescript files.
Copy the command below into your terminal to install ts-loader
npm i ts-loader --save-dev
Now that we have installed all the dependencies needed, let's start building our environment.
We create tsconfig.ts file in the root directory
touch tsconfig.ts
tsconfig.json indicates that this is the root of a TypeScript project.
Let's leave the file empty for now or just add {} which will let us use the compiler's defaults.
Next, we create webpack.config.js
touch webpack.config.js
Now, copy the code below into it
const HTMLWebpackPlugin = require('html-webpack-plugin');
const { CleanWebpackPlugin } = require('clean-webpack-plugin');
const path = require('path');

module.exports = {
  mode: 'development',
  entry: './src/index.ts',
  output: {
    path: path.resolve(__dirname, './dist'),
    filename: 'index.js'
  },
  devtool: 'cheap-module-source-map',
  module: {
    rules: [
      {
        test: /\.ts$/,
        exclude: /node_modules/,
        use: {
          loader: 'ts-loader',
        },
      }
    ],
  },
  plugins: [
    new HTMLWebpackPlugin(),
    new CleanWebpackPlugin(),
  ]
};
So, let’s explain each config option individually
mode basically allows you to set what kind of build you want, so here we are setting it to development in which case the build is formatted by adding line breaks and detailed comments making it look more readable. If you change that to production you will notice how the build gets minified and compressed.
entry obviously tells webpack its entry point, where it should start its magic on.
output helps us specify the name of the build file and where it should be located, so here we use Node’s path module to provide us a utility to work with directory paths instead of having to write it ourselves, then we call the file index.js.
___dirname is an env variable that returns the directory path of the current JS file, which is the root. _
After that, we set devtool to cheap-module-source-map.
By default, devtool uses eval function in its source map styling which is a bad practice and chrome doesn't allow using it, so this would remove it.
In module we specify a set of rules and here we determine how webpack will handle Typescript files using the ts-loader.
We set a regular expression in test of what file endings to run the ts-loader on, and in exclude we are telling webpack not to traverse through the node_modules dependencies.
Unlike loaders which apply changes on files before they are bundled, plugins work on the whole generated bundle and control how they are created and in which form.
Here we are adding a couple of plugins, html-webpack-plugin generates an HTML file that includes our webpack bundle using a script tag without the need to create it manually. clean-webpack-plugin simply removes all files inside the build directory after every successful rebuild.
Okay, let's move onto the main part and start building our app
We create src directory that we specified in the webpack entry and inside of it we create index.ts which will contain all of our code.
mkdir src && cd src && touch index.ts
Copy the following code into index.ts
let appEl = document.createElement('div');
appEl.setAttribute('id', 'app')
document.body.appendChild(appEl);

let app = document.getElementById('app')!;

let balanceEl = document.createElement('h2');
balanceEl.setAttribute("id", "balance");
balanceEl.innerText = "0 ETH";
app.appendChild(balanceEl);

let inputEl = document.createElement('input');
inputEl.setAttribute('type', 'text');
inputEl.setAttribute('id', 'address-input');
inputEl.setAttribute('name', 'address-input');
inputEl.setAttribute('placeholder', "Wallet Address');
app.appendChild(inputEl);


let submitEl = document.createElement('button');
submitEl.setAttribute('id', 'submit-btn');
submitEl.innerText = 'Get Balance';
app.appendChild(submitEl);
Here we create our interface for the app, just a simple input, a button and a text element.
Notice how document.getElementById('app') is followed by an exclamation mark (!). Typescript forces us to be clearer while writing our code. It's not sure that it would return something that is not null or undefined so it throws an error, and by adding the non-null assertion operator, we are stating that the element must return something that actually makes sense.
Now we build the functionality
Web3.js
web3.js is a collection of libraries written in Nodejs, used to help us interact with Ethereum nodes.
Let's start by installing the web3 dependency
npm i web3 --save
We import web3 into index.ts
const Web3 = require('web3');
Then we add the following function
const getBalance = async () => {
  submitEl.innerText = "Loading...";
  submitEl.style.pointerEvents = 'none';
  const infura = 'https://goerli.infura.io/v3/your-api-key';
  const web3 = new Web3(new Web3.providers.HttpProvider(infura));
  let addressValue = (document.getElementById('address-input') as HTMLFormElement).value;
  let balance = await web3.eth.getBalance(addressValue);
  balance = web3.utils.fromWei(balance, 'ether');
  balanceEl.innerText = balance + " ETH";
  submitEl.innerText = "Get Balance";
  submitEl.style.pointerEvents = "auto";
};
By default Typescript sets the type of an async function's return to Promise<type> because it's guaranteed that it will return a promise and since we don't typically have a return value in our function it sets the type to void.
As we mentioned earlier, Typescript forces us to be explicit, so here in addressValue we are setting document.getElementById('address-input') as HTMLFormElement just to assure that this input element has an actual value.
To connect to the Ethereum node, we pass a provider into the web3 constructor, here we are passing an HttpProvider, but you can also use WebSocketProvider which allows subscriptions and IpcProvider if the node is running locally.
We then get our network endpoint from Infura after you create an API key and pass it right into the provider.
Here we used fromWei utility to convert the balance that we get into a readable ether value.
Full code:
const Web3 = require('web3');

let appEl = document.createElement('div');
appEl.setAttribute('id', 'app')
document.body.appendChild(appEl);

let app = document.getElementById('app')!;

let balanceEl = document.createElement('h2');
balanceEl.setAttribute("id", "balance");
balanceEl.innerText = "0 ETH";
app.appendChild(balanceEl);

let inputEl = document.createElement('input');
inputEl.setAttribute("type", "text");
inputEl.setAttribute("id", "address-input");
inputEl.setAttribute("name", "address-input");
inputEl.setAttribute("placeholder", "Wallet Address");
app.appendChild(inputEl);


let submitEl = document.createElement('button');
submitEl.setAttribute("id", "submit-btn");
submitEl.innerText = "Get Balance";
app.appendChild(submitEl);

const getBalance = async () => {
  submitEl.innerText = "Loading...";
  submitEl.style.pointerEvents = 'none';
  const infura = 'https://goerli.infura.io/v3/your-api-key';
  const web3 = new Web3(new Web3.providers.HttpProvider(infura));
  let addressValue = (document.getElementById('address-input') as HTMLFormElement).value;
  let balance = await web3.eth.getBalance(addressValue);
  balance = web3.utils.fromWei(balance, 'ether');
  balanceEl.innerText = balance + " ETH";
  submitEl.innerText = "Get Balance";
  submitEl.style.pointerEvents = "auto";
};

(document.getElementById("submit-btn") as HTMLFormElement).onclick = (e) => {
  e.preventDefault();
  getBalance();
};
Now we move to the interesting part of how to turn all of that into a Chrome extension.
Chrome Extension and Manifest:
Manifest is the system that governs how Chrome extensions interact with your browser.
Let's create public in the root directory and inside of it we create manifest.json
mkdir public && cd public && touch manifest.json
In manifest.json we specify basic metadata and information about our extension such as the name, the description, the version that chrome currently supports, and aspects of the extension's functionality such as actions.
{
    "name": "Web3Balance",
    "description": "Get ETH Balance of any given address",
    "version": "1.0",
    "manifest_version": 3,
    "action": {
      "default_popup": "index.html"
    }
  }
We set the default popup which appears when the user clicks the extension's icon into the html file that webpack is going to generate for us.
Let's now install an additional plugin:
npm i copy-webpack-plugin --save-dev
copy-webpack-plugin as the name implies copies the manifest.json file that we have inside public right into the dist folder so that the manifest file is able to access the generated bundle.
Let’s now modify webpack.config.js and add the plugin into it
const HTMLWebpackPlugin = require('html-webpack-plugin');
const CopyWebpackPlugin = require('copy-webpack-plugin');
const { CleanWebpackPlugin } = require('clean-webpack-plugin');
const path = require('path');
module.exports = {
mode: 'development',
entry: "./src/index.ts",
output: {
path: path.resolve(__dirname, './dist'),
filename: 'index.js'
},
devtool: "cheap-module-source-map",
module: {
rules: [
{
test: /\.ts$/,
exclude: /node_modules/,
use: {
loader: "ts-loader",
},
}
],
},
plugins: [
new HTMLWebpackPlugin(),
new CopyWebpackPlugin({
patterns: [
{from: "public", to: "."}
],
}),
new CleanWebpackPlugin(),
]
};
Now we want to add some styling to our app and for that we will need a couple of loaders
npm i css-loader style-loader --save-dev
css-loader simply collects all of our project's css files helping webpack to resolve them, and style-loader takes the generated output and put it inside the style tags.
Let's modify webpack.config.js
const HTMLWebpackPlugin = require('html-webpack-plugin');
const CopyWebpackPlugin = require('copy-webpack-plugin');
const { CleanWebpackPlugin } = require('clean-webpack-plugin');
const path = require('path');
module.exports = {
mode: 'development',
entry: "./src/index.ts",
output: {
path: path.resolve(__dirname, './dist'),
filename: 'index.js'
},
devtool: "cheap-module-source-map",
module: {
rules: [
{
test: /\.ts$/,
exclude: /node_modules/,
use: {
loader: "ts-loader",
},
},
{
test: /\.css$/,
exclude: /node_modules/,
use: ["style-loader", "css-loader"],
}
],
},
plugins: [
new HTMLWebpackPlugin(),
new CopyWebpackPlugin({
patterns: [
{from: "public", to: "."}
],
}),
new CleanWebpackPlugin(),
]
};
Create style.css in the src directory and copy the following code into it
#app{
    width: 350px;
    padding: 20px;
    display: flex;
    flex-direction: column;
    justify-content: center;
    align-items: center;
}

#balance{
    margin: 0;
}

#address-input{
    width: 100%;
    height: 30px;
    padding: 6px 15px;
    margin: 20px 0;
    border: none;
    outline: none;
    border-radius: 25px;
    background-color: #f3f3f3;
}

#submit-btn{
    width: 50%;
    padding: 8px;
    cursor: pointer;
    border: none;
    border-radius: 8px;
    outline: none;
}
Now we import the file into index.ts
import './style.css';
Finally, let's add the build script into package.json
"scripts": {
    "build": "webpack"
}
Now we run the following command in our terminal
npm run build
After the build is done, you will find the dist folder created in the root directory containing the generated bundle.
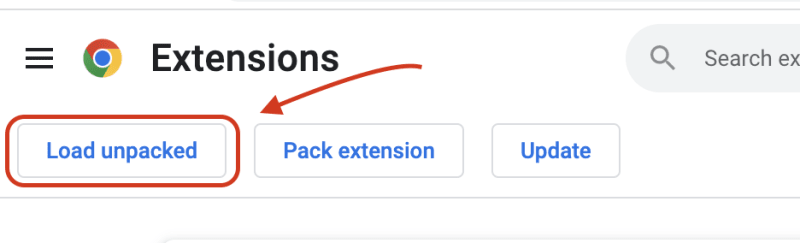
Let's now head to the Chrome browser and navigate to chrome://extensions
On the top left of the page click on Load unpacked to fetch the dist directory
Et voila!

Full code can be found in the github repo here.
Conclusion:
Congrats! You just created your first ever Web3 Chrome Extension!
With Typescript you may put some more effort writing your code, however I believe the effort pays off and the benefits are worth it.
I'm planning to build more complex projects that cover a lot of in-depth Web3 topics, so keep posted!
Have a good one!


Top comments (0)