
Original cover photo by Dele Oke on Unsplash.
Original publication date: 2020-05-25.
One of the use cases for Angular's RouterTestingModule is to test Angular routing components.
An Angular routing component is a component that is used to trigger application navigation. It could be a navigation menu component, a component with one or more RouterLink directives, or it could be a component that calls Router#navigate or Router#navigatebyUrl.
In this article, we're going to explore what the RouterTestingModule does and how we can use it to test routing components.

As a case study, we write routing component tests for the DashboardComponent from the Tour of Heroes tutorial on Angular.io. This routing is part of the show hero detail use case as shown in Figure 1:
- The user clicks a top hero in the dashboard.
- The application navigates to the hero detail.
Angular's RouterTestingModule
To learn what Angular's RouterTestingModule does, we first have to learn about Angular's Location service, its dependencies and how it's related to the Angular router.
What does Angular's Location service do?
Figure 2 illustrates the flow of dependencies from the Router service through the Location service and all of its dependencies all the way down to the browser APIs.

Router service through the Location service and to the browser APIs.The dark box names the the dependency injection symbol. The inner light box names the dependency that is provided when using the BrowserModule and RouterModule Angular modules.
The Router service subscribes to the @angular/common package's PopStateEvents which have the interface listed in Listing 1. It uses the Location service to be notified of these events.
interface PopStateEvent {
  pop?: boolean;
  state?: any;
  type?: string;
  url?: string;
}
PopStateEvent interface from @angular/common.A PopStateEvent wraps a native popstate or hashchange browser event and enriches it with metadata that the Angular router uses to identify which route to activate.
When Router#navigate or Router#navigateByUrl is called or a RouterLink directive is activated, the router figures out which route to activate and uses the Location service to replace the browser's history state stack.
From Figure 2 we can tell that the Location service itself delegates work to other Angular services. The concrete LocationStrategy services are used to decide between path- or hash-based navigation. The concrete PlatformLocation interacts with browser APIs to query parts of the URL through the Location API or listen for history stack state changes or hash changes through the History API.
What does the RouterTestingModule do?
Now that we know the basics of how the Router is related to the Location service and in turn the browser APIs, we can explore what the RouterTestingModule does in terms of dependency injection.

Router service to SpyLocation when using the RouterTestingModule.Believe me, we wouldn't want to create test doubles for all those dependencies in our tests. The router testing Angular module provides a fake location service called SpyLocation as illustrated in Figure 3.
Unfortunately, the name is a bit confusing as it doesn't include any test spies. On the other hand it's good that for example no Jasmine spies were used to implement the service as we wouldn't be able to use other testing frameworks than Jasmine if that was the case.
The router testing Angular module also provides a fake version of LocationStrategy called MockLocationStrategy which we won't discuss further in this article.
You would think that this shouldn't be necessary seeing that SpyLocation doesn't depend on a LocationStrategy service at all.
However, RouterLink depends on LocationStrategy as illustrated in Figure 4.
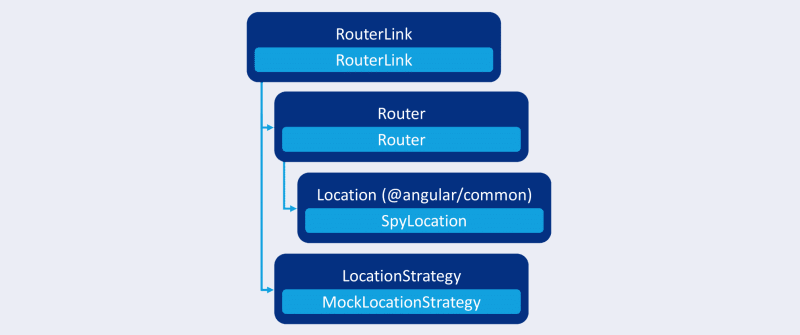
RouterLink directive to the SpyLocation and MockLocationStrategy services when using RouterTestingModule.This dependency probably exists for historical reasons as some of the dependencies listed in Figure 2 were introduced later than the router link directive itself. It should really be depending on the Location service rather than the LocationStrategy service.
Figure 2 reveals that there's a similar issue with the Location service which depends on both the LocationStrategy and PlatformLocation services.
Faking the browser APIs
Why do we need to replace the History API and Location API dependency with a fake? Couldn't we just use the real APIs in our integration tests?
Angular uses Karma out-of-the-box. Karma is a test runner that drives one or more browsers, instruments them and instructs them to load our integration tests.
If we don't use the RouterTestingModule for integration tests that involve navigation, the browser would navigate away from the Karma test page. This would fail our entire test suite.
For other test runners and frameworks, the History and Location APIs might not even be available. Because of this, we should prefer the RouterTestingModule instead of the RouterModule in all of our integration tests.
What does the SpyLocation service do?
We already learned that SpyLocation is a fake implementation of the Location service for integration tests that abstracts away certain browser APIs and removes the need for providing fake services to replace LocationStrategy, PlatformLocation, and DomAdapter in tests.
We won't cover the API of the Location service itself in this article. As we have learned, it's an abstraction on top of the Location and History browser APIs.
SpyLocation has these methods and properties in addition to the public API of Location:
setBaseHref(url: string): voidsetInitialPath(url: string): voidsimulateHashChange(pathname: string): voidsimulateUrlPop(pathname: string): voidurlChanges: string[]
I list them here for reference, but we won't discuss them further as they're created specifically for the Angular router's integration tests. In our tests, we should be able to perform the actions we need through the router service, the router link directive and the public API of the Location service.
As this is the case, we should have no need to use the SpyLocation type in our tests. Instead, we prefer only relying on the interface defined by Location's public API like this:
import { Location } from '@angular/common';
import { TestBed } from '@angular/core/testing';

describe('MyComponent', () => {
  // (...)

  it('navigates to another route when (...)', () => {
    // The type annotation can be left out as it's inferred
    // from `TestBed.inject`
    const location: Location = TestBed.inject(Location);

    // (...)

    expect(location.path()).toBe('/some/other/route');
  });
});
Location , not SpyLocation.Providing fake routes
The final piece of the RouterTestingModule that we need to learn is that it has a static method for providing routes:
withRoutes(routes: Routes, config?: ExtraOptions): ModuleWithProviders<RouterTestingModule>
The static withRoutes method has the same signature as RouterModule.forRoot. This is not a coincidence. It provides routes and router options for the root level injector.
Shallow routing component test
The Angular testing guide shows us how to create isolated unit tests around a routing component. The component under test is the DashboardComponent from the Tour of Heroes tutorial.
The component model and component template are shown in Listings 2A and 2B.
<!-- dashboard.component.html -->
<h3>Top Heroes</h3>

<div class="grid grid-pad">
  <a
    *ngFor="let hero of heroes"
    class="col-1-4"
    routerLink="/detail/{{hero.id}}"
  >
    <div class="module hero">
      <h4>{{hero.name}}</h4>
    </div>
  </a>
</div>

<app-hero-search></app-hero-search>
// dashboard.component.ts
import { Component, OnInit } from '@angular/core';

import { Hero } from '../hero';
import { HeroService } from '../hero.service';

@Component({
  selector: 'app-dashboard',
  templateUrl: './dashboard.component.html',
  styleUrls: ['./dashboard.component.css'],
})
export class DashboardComponent implements OnInit {
  heroes: Hero[] = [];

  constructor(private heroService: HeroService) {}

  ngOnInit() {
    this.getHeroes();
  }

  getHeroes(): void {
    this.heroService
      .getHeroes()
      .subscribe(
        heroes => (this.heroes = heroes.slice(1, 5))
      );
  }
}
The dashboard component is a routing component because it uses a router link directive to trigger navigation.
Before we discuss an integration test, let's create a shallow component test that renders the component's view, but not its view children.
Shallow routing component test utilites
First, we look at the test utilities in Listing 3A.
// dashboard.component.spec.ts
import {
  Directive,
  HostListener,
  Input,
} from '@angular/core';
import {
  ComponentFixture,
  tick,
} from '@angular/core/testing';
import { By } from '@angular/platform-browser';
import { Router } from '@angular/router';

import { DashboardComponent } from './dashboard.component';

@Directive({
  selector: '[routerLink]',
})
class RouterLinkSpy {
  @Input()
  routerLink = '';

  constructor(private router: Router) {}

  @HostListener('click')
  onClick() {
    this.router.navigateByUrl(this.routerLink);
  }
}

const leftMouseButton = 0;

describe('DashboardComponent (shallow)', () => {
  function advance() {
    tick();
    fixture.detectChanges();
  }

  function clickTopHero() {
    const firstLink = fixture.debugElement.query(By.css('a'));

    firstLink.triggerEventHandler('click', {
      button: leftMouseButton,
    });
  }
});
The advance function flushes the NgZone queues and runs change detection to stabilize the testing environment. As it uses tick, it has to be called from within a fakeAsync-wrapped function.
The clickTopHero function queries for the first link in the component's DOM and then triggers a fake mouse click on it.
The FakeRouterLink directive is a router link replacement without other dependencies than Router#navigateByUrl. We isolate the component from as many dependencies as possible.
Shallow routing component test setup
Now let's look at our test setup and variables which are listed in Listing 3B.
// dashboard.component.spec.ts
import { CUSTOM_ELEMENTS_SCHEMA } from '@angular/core';
import {
  ComponentFixture,
  fakeAsync,
  TestBed,
} from '@angular/core/testing';
import { Router } from '@angular/router';
import { asapScheduler, of } from 'rxjs';
import { observeOn } from 'rxjs/operators';

import { HeroService } from '../hero.service';
import { HEROES } from '../mock-heroes';
import { DashboardComponent } from './dashboard.component';

describe('DashboardComponent (shallow)', () => {
  beforeEach(async () => {
    const fakeService = {
      // [1]
      getHeroes() {
        return of([...HEROES]).pipe(observeOn(asapScheduler));
      },
    } as Partial<HeroService>;
    routerSpy = jasmine.createSpyObj('Router', [
      'navigateByUrl',
    ]); // [2]

    TestBed.configureTestingModule({
      declarations: [
        DashboardComponent, // [3]
        FakeRouterLink, // [3]
      ],
      providers: [
        { provide: HeroService, useValue: fakeService }, // [1]
        { provide: Router, useValue: routerSpy }, // [2]
      ],
      schemas: [CUSTOM_ELEMENTS_SCHEMA], // [4]
    });

    await TestBed.compileComponents();
  });

  beforeEach(fakeAsync(() => {
    fixture = TestBed.createComponent(DashboardComponent);
    component = fixture.componentInstance;
    advance(); // [5]
    advance(); // [6]
  }));

  let component: DashboardComponent;
  let fixture: ComponentFixture<DashboardComponent>;
  let routerSpy: jasmine.SpyObj<Router>;
});
First, we create a fake HeroService (1) to supply the dashboard component with fake data. We replace the Router service with a simple Jasmine spy object (2).
As this is a shallow component test, we only declare the component itself and the fake router link (3) we discussed a moment ago. We use the CUSTOM_ELEMENTS_SCHEMA to enable shallow rendering (4).
The first advance call (5) triggers the initial change detection cycle which triggers OnInit lifecycle moment. The ngOnInit lifecycle hook of the dashboard component reads heroes via the HeroService. The second advance call (6) waits for the heroes observable to emit a value, then triggers change detection.
Finally, we see the component variable for the component instance, the fixture variable for the component fixture, and the routerSpy variable for a Jasmine spy object that is provided to replace the Router service in our test suite.
Shallow routing component test case
// dashboard.component.spec.ts
import { fakeAsync } from '@angular/core/testing';

describe('DashboardComponent (shallow)', () => {
  it('navigates to hero detail when a hero link is clicked', fakeAsync(() => {
    const [topHero] = component.heroes;

    clickTopHero(); // [1]
    advance(); // [2]

    const expectedPath = '/detail/' + topHero.id;
    const [actualPath] =
      routerSpy.navigateByUrl.calls.first().args; // [3]
    expect(actualPath).toBe(
      expectedPath,
      'must navigate to the detail view for the top hero'
    );
  }));
});
Listing 3C shows the test case that exercises routing for the dashboard component. First, we click the top hero link (1) to trigger navigation, then we wait for the component fixture to stabilize (2).
We query the router spy for the route URL passed to Router#navigateByUrl (3). This was done by the FakeRouterLink directive. Finally, we assert that the passed route URL matches what we expected.
Shallow routing component test suite
Listing 4 shows the shallow component routing test suite in its full length for reference.
// dashboard.component.spec.ts
import {
  CUSTOM_ELEMENTS_SCHEMA,
  Directive,
  HostListener,
  Input,
} from '@angular/core';
import {
  ComponentFixture,
  fakeAsync,
  TestBed,
  tick,
} from '@angular/core/testing';
import { By } from '@angular/platform-browser';
import { Router } from '@angular/router';
import { asapScheduler, of } from 'rxjs';
import { observeOn } from 'rxjs/operators';

import { HeroService } from '../hero.service';
import { HEROES } from '../mock-heroes';
import { DashboardComponent } from './dashboard.component';

@Directive({
  selector: '[routerLink]',
})
class FakeRouterLink {
  @Input()
  routerLink = '';

  constructor(private router: Router) {}

  @HostListener('click')
  onClick() {
    this.router.navigateByUrl(this.routerLink);
  }
}

const leftMouseButton = 0;

describe('DashboardComponent (shallow)', () => {
  function advance() {
    tick();
    fixture.detectChanges();
  }

  function clickTopHero() {
    const firstLink = fixture.debugElement.query(By.css('a'));

    firstLink.triggerEventHandler('click', {
      button: leftMouseButton,
    });
  }

  beforeEach(async () => {
    const fakeService = {
      getHeroes() {
        return of([...HEROES]).pipe(observeOn(asapScheduler));
      },
    } as Partial<HeroService>;
    routerSpy = jasmine.createSpyObj('Router', [
      'navigateByUrl',
    ]);

    TestBed.configureTestingModule({
      declarations: [DashboardComponent, FakeRouterLink],
      providers: [
        { provide: HeroService, useValue: fakeService },
        { provide: Router, useValue: routerSpy },
      ],
      schemas: [CUSTOM_ELEMENTS_SCHEMA],
    });

    await TestBed.compileComponents();
  });

  beforeEach(fakeAsync(() => {
    fixture = TestBed.createComponent(DashboardComponent);
    component = fixture.componentInstance;
    advance();
    advance();
  }));

  let component: DashboardComponent;
  let fixture: ComponentFixture<DashboardComponent>;
  let routerSpy: jasmine.SpyObj<Router>;

  it('navigates to hero detail when a hero link is clicked', fakeAsync(() => {
    const [topHero] = component.heroes;

    clickTopHero();
    advance();

    const expectedPath = '/detail/' + topHero.id;
    const [actualPath] =
      routerSpy.navigateByUrl.calls.first().args;
    expect(actualPath).toBe(
      expectedPath,
      'must navigate to the detail view for the top hero'
    );
  }));
});
DashboardComponent.The full test suite is available in this Gist.
As a finishing thought on this example, this test case shows us that having route paths hidden inside templates is a code smell. Magic strings in templates force us to have magic strings in tests. This will become even more apparent in the integrated routing component test.
See Listings 3.1, 3.2, and 3.3 of "Lean Angular components" for a simple example of solving this issue or try out Routeshub by Max Tarsis. Routeshub is a route management library that integrates easily with the Angular router.
Integrated routing component test with the RouterTestingModule
In addition to the shallow routing component test, we want to cover how the dashboard component integrates with its view children and the real Router service.
We'll use the RouterTestingModule to set up testing routes and replace the Location service to abstract away the browser APIs as discussed earlier in this article.
Integrated routing component test utilities
// dashboard.component.integration.spec.ts
import { Component, ViewChild } from '@angular/core';
import { tick } from '@angular/core/testing';
import { By } from '@angular/platform-browser';
import { RouterOutlet } from '@angular/router';

@Component({
  template: '<router-outlet></router-outlet>', // [2]
})
class TestRootComponent {
  @ViewChild(RouterOutlet)
  routerOutlet: RouterOutlet; // [3]
}

@Component({
  template: '',
})
class TestHeroDetailComponent {} // [1]

const leftMouseButton = 0;

describe('DashboardComponent (integrated)', () => {
  function advance() {
    tick();
    rootFixture.detectChanges(); // [4]
  }

  function clickTopHero() {
    const firstHeroLink = rootFixture.debugElement.query(
      By.css('a')
    ); // [5]

    rootFixture.ngZone.run(() =>
      // [6]
      firstHeroLink.triggerEventHandler('click', {
        button: leftMouseButton,
      })
    );
  }

  function getActiveComponent<T>(): T {
    return rootComponent.routerOutlet.component as T; // [7]
  }
});
Listing 5A shows the test utilities we use for our integrated routing component test of the DashboardComponent from the Tour of Heroes tutorial.
As we'll see in a minute, our integrated tests simulates a tiny application in which the only two routed components are our component under test, the dashboard component, and a dummy component (1) which will serve as the target of our routing component.
We'll replace the real HeroDetailComponent with TestHeroDetailComponent so that we don't have to set up any of its dependencies. What we're exercising here is the routing that is initiated by the user through the dashboard component. Which actual component is targeted by that route URL is not important for the purpose of this test.
If we wanted an integration test that exercised a full use case starting at the dashboard, selecting a top hero and looking up its hero details, we could include the real hero detail component in our test setup. That would actually be a nice behaviour test to include. We could also choose to implement it as and end-to-end test for even more confidence in our application.
To simulate an Angular application, we're going to need a root component. In a real application, this component is conventionally called AppComponent. As the test doesn't need it to behave like the actual AppComponent of our application, we name it TestRootComponent to indicate its purpose – to be the root component of our ComponentFixture.
The test root component only has a router outlet in its template (2) which it exposes as a public property (3). We'll discuss why shortly.
The advance test utility looks familar, but refers to a variable called rootFixture (4) instead of fixture. This is because the component fixture in this test suite refers to the test root component, not the component under test.
The clickTopHero test utility also looks very similar to the one from our shallow component routing test. However, this version also refers to the rootFixture (5).
(6) fixes Angular warnings related to the Angular zone. As Angular issue #25837 discusses, Angular outputs a warning when we trigger navigation outside of a test case – usually in beforeEach hooks.
To address this, we wrap route navigation in a callback (6) which we pass to NgZone#run to execute it inside the Angular zone.
The getActiveComponent test utility gets the active component through the test root component's router outlet (7).
Integrated routing component test setup
The test setup in Listing 5B replaces the hero service with the same fake service (1).
// dashboard.component.integration.spec.ts
import { Location } from '@angular/common';
import {
  ComponentFixture,
  fakeAsync,
  TestBed,
} from '@angular/core/testing';
import { Router } from '@angular/router';
import { RouterTestingModule } from '@angular/router/testing';
import { asapScheduler, of } from 'rxjs';
import { observeOn } from 'rxjs/operators';

import { HeroSearchComponent } from '../hero-search/hero-search.component';
import { HeroService } from '../hero.service';
import { HEROES } from '../mock-heroes';
import { DashboardComponent } from './dashboard.component';

describe('DashboardComponent (integrated)', () => {
  beforeEach(async () => {
    const fakeService = {
      // [1]
      getHeroes() {
        return of([...HEROES]).pipe(observeOn(asapScheduler));
      },
    } as Partial<HeroService>;

    TestBed.configureTestingModule({
      declarations: [
        TestRootComponent, // [2]
        TestHeroDetailComponent, // [2]
        DashboardComponent, // [3]
        HeroSearchComponent, // [3]
      ],
      imports: [
        RouterTestingModule.withRoutes([
          // [5]
          {
            path: '',
            pathMatch: 'full',
            component: DashboardComponent,
          }, // [4]
          {
            path: 'detail/:id',
            component: TestHeroDetailComponent,
          }, // [4]
        ]),
      ],
      providers: [
        { provide: HeroService, useValue: fakeService }, // [1]
      ],
    });

    await TestBed.compileComponents();

    rootFixture = TestBed.createComponent(TestRootComponent); // [6]
    rootComponent = rootFixture.componentInstance; // [6]
    location = TestBed.inject(Location); // [7]
  });

  beforeEach(fakeAsync(() => {
    const router = TestBed.inject(Router);
    rootFixture.ngZone.run(() => router.initialNavigation()); // [8]
    advance(); // [9]
    advance(); // [10]
  }));

  let location: Location;
  let rootComponent: TestRootComponent; // [6]
  let rootFixture: ComponentFixture<TestRootComponent>; // [6]
});
In the Angular testing module, we declare the fake root component and the dummy hero detail component replacement which we discussed before (2). We additionally declare the dashboard component and the HeroSearchComponent (3) as it's a view child used in the dashboard component template.
The final part of configuring the Angular testing module is to add fake routes for the dashboard component and the dummy target component (4) by using RouterTestingModule.withRoutes (5).
We initialise the rootFixture and rootComponent variables by calling TestBed.createComponent(TestRootComponent) and by getting the ComponentFixture#componentInstance property (6).
The location variable is initialised by injecting the Location service (7) which – as we know – will resolve to the SpyLocation service. However, we discussed earlier that we should only depend on the Location API in routing component tests.
In the second test case setup hook, we navigate to the default route after initialising the simulated application by calling Router#initialNavigation (8). As we learned, we need to wrap this in a callback and pass it to NgZone#run to prevent warnings when running this test suite.
As in the shallow component routing test, our first advance function call (9) triggers the OnInit lifecycle moment and the equivalent lifecycle hook in the dashboard component which resolves data from the hero service.
Our second advance function call (10) waits for the heroes observable to emit its first value and then calls changes detection to update the dashboard component's DOM.
Integrated routing component test case
I know, that was a lot of utilities and setup. Now, let's move on to the test case. Hopefully, our rigorous preparations enable a concise test case.
// dashboard.component.integration.spec.ts
import { fakeAsync } from '@angular/core/testing';

import { DashboardComponent } from './dashboard.component';

describe('DashboardComponent (integrated)', () => {
  it('navigates to the detail view when a hero link is clicked', fakeAsync(() => {
    const component: DashboardComponent =
      getActiveComponent(); // [1]
    const [topHero] = component.heroes;

    clickTopHero();
    advance();

    const expectedPath = '/detail/' + topHero.id;
    expect(location.path() /* [2] */).toBe(
      expectedPath,
      'must navigate to the detail view for the top hero'
    );
  }));
});
The integrated test case in Listing 5C looks surprisingly similar to the shallow test case in Listing 3C with a few exceptions:
- As the component fixture wraps the
TestRootComponent, we use thegetActiveComponentto access theDashboardComponent. - This time we don't have a
Routerservice spy object to ask for arguments toRouter#navigateByUrl. Instead, we callLocation#pathto see the URL path as it would appear in a browser at runtime.
Integrated routing component test suite
Listing 6 shows the full test suite for reference.
// dashboard.component.integration.spec.ts
import { Location } from '@angular/common';
import { Component, ViewChild } from '@angular/core';
import {
  ComponentFixture,
  fakeAsync,
  TestBed,
  tick,
} from '@angular/core/testing';
import { By } from '@angular/platform-browser';
import { Router, RouterOutlet } from '@angular/router';
import { RouterTestingModule } from '@angular/router/testing';
import { asapScheduler, of } from 'rxjs';
import { observeOn } from 'rxjs/operators';

import { HeroSearchComponent } from '../hero-search/hero-search.component';
import { HeroService } from '../hero.service';
import { HEROES } from '../mock-heroes';
import { DashboardComponent } from './dashboard.component';

@Component({
  template: '<router-outlet></router-outlet>',
})
class TestRootComponent {
  @ViewChild(RouterOutlet)
  routerOutlet: RouterOutlet;
}

@Component({
  template: '',
})
class TestHeroDetailComponent {}

const leftMouseButton = 0;

describe('DashboardComponent (integrated)', () => {
  function advance() {
    tick();
    rootFixture.detectChanges();
  }

  function clickTopHero() {
    const firstHeroLink = rootFixture.debugElement.query(
      By.css('a')
    );

    rootFixture.ngZone.run(() =>
      firstHeroLink.triggerEventHandler('click', {
        button: leftMouseButton,
      })
    );
  }

  function getActiveComponent<T>(): T {
    return rootComponent.routerOutlet.component as T;
  }

  beforeEach(async () => {
    const fakeService = {
      getHeroes() {
        return of([...HEROES]).pipe(observeOn(asapScheduler));
      },
    } as Partial<HeroService>;

    TestBed.configureTestingModule({
      declarations: [
        TestRootComponent,
        TestHeroDetailComponent,
        DashboardComponent,
        HeroSearchComponent,
      ],
      imports: [
        RouterTestingModule.withRoutes([
          {
            path: '',
            pathMatch: 'full',
            component: DashboardComponent,
          },
          {
            path: 'detail/:id',
            component: TestHeroDetailComponent,
          }, // [1]
        ]),
      ],
      providers: [
        { provide: HeroService, useValue: fakeService },
      ],
    });

    await TestBed.compileComponents();

    rootFixture = TestBed.createComponent(TestRootComponent);
    rootComponent = rootFixture.componentInstance;
    location = TestBed.inject(Location);
  });

  beforeEach(fakeAsync(() => {
    const router = TestBed.inject(Router);
    rootFixture.ngZone.run(() => router.initialNavigation());
    advance();
    advance();
  }));

  let location: Location;
  let rootComponent: TestRootComponent;
  let rootFixture: ComponentFixture<TestRootComponent>;

  it('navigates to the detail view when a hero link is clicked', fakeAsync(() => {
    const component: DashboardComponent =
      getActiveComponent();
    const [topHero] = component.heroes;

    clickTopHero();
    advance();

    const expectedPath = '/detail/' + topHero.id; // [2]
    expect(location.path()).toBe(
      expectedPath,
      'must navigate to the detail view for the top hero'
    );
  }));
});
Like in the shallow routing component test, we see magic strings in use, representing the hero detail route, but this time in two places:
- Our fake target route has to match the route URL specified in the dashboard component template.
- As in the shallow routing component test, the expected path in our test case also has to match the one specified in the dashboard component template.
The full test suite is available in this Gist.
Conclusion
I hope that you enjoyed learning about how the Router interacts with the browser through a series of dependencies, starting with the Location service.
We discussed how to test a routing component both by using a shallow component test and an integrated component test approach. Both can be useful, so we don't necessarily have to pick one over the other. If we have to choose, I would prefer an integration routing component test as it covers more ground, gives a higher level of confidence and requires less custom test doubles.
What did we test in our routing component test suite?
We tested the show hero detail use case from the dashboard: When the user clicks a top hero in the dashboard, the application navigates to the hero detail.
Let's finish by summing up what we learned about all of these topics.
Shallow routing component test
When testing an Angular routing component, we can create a shallow component test which doesn't need routing as it renders our component under test as the root component.
For shallow routing component tests, we need to create a spy object representing the Router service. We also isolate our component from data services by replacing them with fake services.
In shallow routing component tests, we use the test bed and a component fixture to test as a user by clicking the component DOM which triggers navigation to a different route. To verify this navigation, we ask our router spy for arguments passed to it.
Integrated routing component test
Instead of – or in addition to – a shallow routing component test, we can create an integrated routing component test.
In an integrated routing component test, we simulate an Angular application by creating a fake root component with a primary router outlet which we can use to access the active component at any given time during our test case.
In addition to the fake root component, we declare the component under test, its view child components and a dummy component to replace our route target.
We use RouterTestingModule.withRoutes to add a default route to our component under test and a target route to the dummy component we declared. This target route must match the route passed to a router link directive or Router#navigateByUrl.
We use the component fixture's debug element to query for an element and activate it to trigger navigation.
After waiting for navigation to finish, we use Location#path to query for the path as it would appear in a browser's URL address bar. Finally, we compare this to the expected target route.
The RouterTestingModule
We learned how Angular's Location service and its dependencies abstract away the Location and History APIs as well as native popstate and hashchange events.
Router service to SpyLocation when using the RouterTestingModule.As seen in Figure 3, the RouterTestingModule replaces Angular's Location service with the SpyLocation service. This prevents tests from trying to navigate which is problematic when using the Karma test runner or a test environment that doesn't have all browser APIs.
For the purpose of routing component tests, we don't need the extra properties and methods introduced by SpyLocation. This is proven in that we keep the Location type when resolving a SpyLocation service instance from the Location dependency injection symbol.
The additional SpyLocation API should only be required for the Router's own test suite.
RouterLink directive to the SpyLocation and MockLocationStrategy services when using RouterTestingModule.Figure 4 illustrates the need for the RouterTestingModule to provide MockLocationStrategy for the LocationStrategy dependency injection symbol. This is the case as the RouterLink directive depends on LocationStrategy#prepareExternalUrl instead of Location#prepareExternalUrl – probably for historical reasons.
Thank you
Thank you for reading. I appreciate your support! It's been my pleasure to educate you. I learned a lot myself while preparing this article.
Related articles
Continue learning about the RouterTestingModule and how it's used to test routed Angular components in "Testing routed Angular components with the RouterTestingModule".
Learn how to fake routing data and stub services to test Angular route guards in isolation as well as how to verify them in practice using the RouterTestingModule in "Testing Angular route guards with the RouterTestingModule".
Reviewers
The peer reviewers for this article include:
Thank you, friends!


Oldest comments (3)
Great, great post! Awesome... Thanks for sharing.
Just wanted to reach out and say this article was exactly what I was looking for as someone who is new to angular but experienced in software development.
There is so much content out there geared toward beginners since they are the largest audience but that content has too much background info to slog through if you are already familiar with general software engineers concepts. I don't need to learn the difference between a fake and a mock, I don't need any background info on how the browser APIs work, I just want to learn about the details of the angular router abstractions.
It is refreshing to read an article that will just lay out the dependency graph and say "This is the boundary they are faking. These are the additional methods on the fake. No you don't need to reference the fake in your tests unless you are literally testing the router, just use the public interface." etc.
Thanks again!
Thank you for your feedback, @kevinaud . I'm glad the article was well-suited for you. It took me 3 years of professional and spare-time Angular development to figure this out 😄
An evolution of this article series is the Spectacular feature testing API. Let me know what you think.