Security leaders and engineers have gone from using the term “skills shortage” to now “chronic skills shortage”.
The reason why is because the security skill gap is at an all-time low.
If you think about how many developers are at a company compared to how many security engineers are at the same company, the number is drastically different. That is if the company has any security engineers at all.
Because of that, having the knowledge and the tools to scan your Kubernetes clusters for vulnerabilities most likely isn’t happening at all, or at the very least it’s not happening at a suitable frequency.
In this blog post, you’ll learn about how to make this process easier even if you don’t have a vast security background using Kubescape’s Cluster Scanning.
For the purposes of this blog post, the Kubescape cloud will be used. The Kubescape CLI is a great option, but the UI definitely gives a more robust feel and makes your life easier from a visual perspective. If you’d like to sign up for it, you can do so here.
Prerequisites
If you’re following along with the hands-on portion of this blog post, you will need:
- The Kubescape CLI, which you can find here.
- A Kubernetes cluster. Minikube will work just fine as well as any other cluster.
Why Cluster Scanning
When you’re thinking about a Kubernetes cluster, there are so many pieces that make it work. Within the control plane, you have ETCD, the Scheduler, the API server, and the Controller Manager. Within the worker nodes, you have every Pod running, the kube-proxy, DNS, the container runtime, and the Kubelet.
The list above is at the highest possible level of explanation and it still sounds incredibly complex to manage. It’s literally an entire data center in itself.
Because of that, you have to imagine that about a million and a half things can go wrong.
Let’s take a networking example. Say you create a Kubernetes cluster and the server that the control planes are running on has a public IP address, or you create a Kubernetes cluster in the cloud and the cluster has a public IP address. Right off the bat, by something so simple as a button click change, you now have an entire cluster that’s vulnerable to anyone that can keep attempting to breach it. If you don’t have proper RBAC set up, which a lot of organizations don’t, or you aren’t checking the logs for the API servers metrics endpoint to see the number of request rates coming in, you may have a breach on your hands.
There are two types of clusters you’ll be scanning:
- On-prem/raw Kubernetes clusters.
- Kubernetes services in the cloud, like AKS, GKE, EKS, or OpenShift.
Regardless of what option you choose, you still need to scan the cluster.
If you’re thinking to yourself well, the Kubernetes service is managed by the cloud vendor, so I don’t have to do scanning, you need to re-evaluate what the Kubernetes services in the cloud are doing for you. They aren’t minimizing vulnerabilities inside of your Kubernetes cluster. They’re simply hosting the Kubernetes cluster for you. All of the security implications that can occur are still 100% on you to mitigate as well as possible.
Top Five Cluster Security Measures
In the previous section, you learned about why you want to scan clusters, and the reason is because it’s an entire environment/data center within itself and has all of the same types of vulnerabilities as any other environment.
In this section, let’s talk about the top five security measures that you can take for a Kubernetes cluster.
First, ensure that the control planes don’t have a public IP address associated with them. This leads to clusters being able to be searched over the network. In a recent report, over 900,000 Kubernetes clusters were found exposed on the internet.
Second, RBAC. RBAC is arguably the most looked-over configuration in a Kubernetes cluster. Without proper RBAC permissions, your cluster is literally wide open. When you’re designing RBAC for your users that are authenticating to Kubernetes, ensure that they receive the permissions and authorization that they need, and nothing more. Be especially cautious about this when you’re running CRD’s to install an Operator in a Kubernetes cluster. There are a lot of platforms out there that when installing a CRD, they configure a service account and RBAC permissions for their platform, which 9 times out of 10 give full admin/root access.
Third, policy setup. Think of policies like gatekeepers to anything and everything in your Kubernetes cluster. It could be who has access to what Kubernetes namespace to no one is allowed to deploy a Kubernetes Manifest with latest marked via the container image. Open Policy Agent (OPA) is a standard that a lot of engineers are taking on, and there’s also Kyverno, which is like OPA, but specifically for Kubernetes.
Fourth, logging. It’s easy to set up a log aggregator to collect logs. The question then becomes - what do you do with those logs? Logs from metric endpoints in Kubernetes will literally be your golden ticket to understanding what is going wrong inside of your environment. Ensure that you not only save logs but take action with logs using some type of Application Performance Management (APM) platform.
Fifth, cluster scanning. Thinking about everything that you learned throughout this blog post and throughout your journey in the Kubernetes space, there is a way to mitigate these issues as much as possible. The way to do that is to have a proper cluster scanning tool that you can use to tell you when your cluster is vulnerable. Otherwise, you’ll never know and it’ll be a constant guessing game.
Getting Started With Kubescape Configuration Scanning
Now that you understand the importance of scanning your entire cluster, it’s time to jump into the hands-on portion and learn how to set up cluster scanning.
One of the many cool things about Configuration Scanning is that you can scan any cluster, even Minikube! For the purposes of this blog post, Minikube was used, but you can do the same thing for any Kubernetes cluster.
First, log into the Kubescape UI, and under the dashboard, you’ll see an option to add cluster scans. Click the Add cluster scans button.

Next, you have two options to choose from to deploy cluster scanning:
- In Cluster Deployment, which is a Helm Chart that you deploy inside of your cluster.
- With the Kubescape CLI, which you can use locally or even in an automated fashion with a CICD pipeline.
For the purposes of this blog post, the Helm Chart is used. However, the same outcome/results will exist with any option that you choose.

The below code:
- Adds the ARMO repo via Helm
- Updates the repo
- Installs ARMO inside of the
armo-systemNamespace in your Kubernetes cluster
Run the code below to deploy the In Cluster Deployment.
# Add the Helm repo
helm repo add armo https://armosec.github.io/armo-helm/

# Update the helm repo
helm repo update

# Install ARMO on the k8s cluster
helm upgrade --install armo armo/armo-cluster-components -n armo-system --create-namespace --set accountGuid=your_account_guid --set clusterName=`kubectl config current-context`
Once you run the code above, log into your Kubescape UI. You should now see that your cluster is listed on the DASHBOARD page.

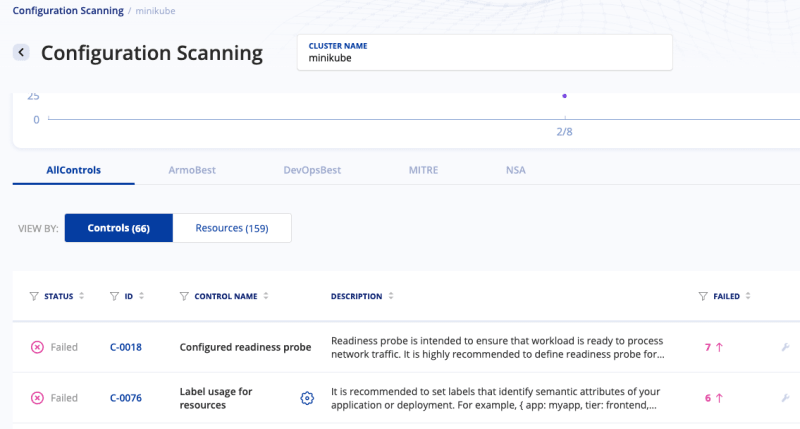
Now that the cluster exists, click on CONFIGURATION SCANNING in the left pane and then click on AllControls.

Once you click on AllControls, you’ll see several pieces of output that contain everything from passed tests to failed tests to tests that are marked as irrelevant. The below screenshot is an example, but please note that your output may look different as you’re scanning your own Kubernetes cluster.
Drilling down a bit into the actual controls, click on ArmoBest.

As you can see, there are several pieces of output from cluster networking failures to Kubernetes Secret failures and ETCD failures.
Vulnerabilities like this in production can be a make or break between a good day and a bad day. For example, C-0012 states that any attacker that has access to configuration files can steal the secrets stored inside of Kubernetes, which could be passwords and connection strings to your entire environment.


Congrats! You have officially set up the Kubescape Configuration Scanner and you’re ready to start remediating any issues inside of your Kubernetes cluster.


Top comments (0)