OpenShift is combining two ideas; Platform-as-a-Service (PaaS) and a containerized platform to run and orchestrate microservices in a similar way that Kubernetes does it. In fact, OpenShift is running Kubernetes underneath the hood.
Although the OpenShift UI is quite intuitive, from a repeatability perspective, no one wants to click around a UI.
In this blog post, you’ll learn how to set up the OpenShift CLI and start deploying resources.
Prerequisites
To follow along with this blog post, you need to have the following:
- Access to a terminal that you have admin rights on.
- An OpenShift environment. If you don’t have one, you can sign up for a free OpenShift Sandbox.
Install the CLI
First things first; you’ll need to install the OpenShift CLI. To do that, you can use your OpenShift environment.
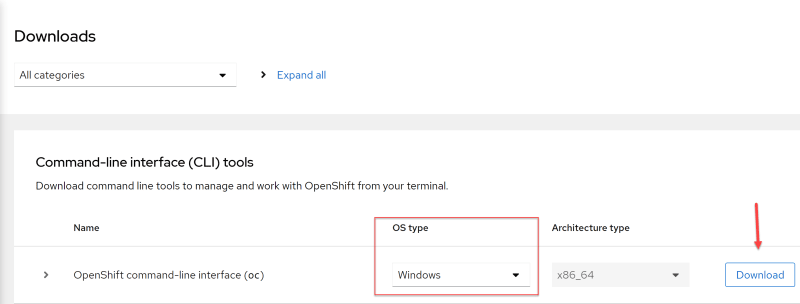
Log into OpenShift and click the Downloads button.

Choose the OpenShift command-line interface (oc) along with your OS type and click the blue Download button.
Once downloaded, create a new directory in your user home directory called oc and move the oc.exe to the oc directory.
To ensure you can use the oc CLI from anywhere, set an environment variable for oc.exe that’s now located in the oc folder in your home directory. For example, on Windows, you would open up the environment variables pane and add the path to the oc directory.
To confirm it works, simply run oc on your terminal.
Configure the CLI
Now that the CLI is installed, it’s time to authenticate from your terminal to your Openshift environment.
Run the following command to log in to OpenShift via the terminal.
oc login
The oc login command will display an output similar to the screenshot below. Click on the URL in the terminal output.

Click the blue Display button and you’ll see an output similar to the screenshot below.

Copy the first command and run it on your terminal.
After running the command, you’ll be logged into the oc terminal. To confirm this, run the following command:
os status
Running Commands
You’re now officially logged into your OpenShift environment via the oc CLI. Let’s try running a few commands to see what’s going on in your environment.
First, try running the following command:
oc projects
You’ll see several projects pop on your terminal. Projects, if you’re not familiar with them, represent a Kubernetes namespace.
One of the cool things about the oc CLI is that the commands are very similar to kubectl, which is the CLI used to interact with standard Kubernetes. If you’re used to interacting with Kubernetes via kubectl, there won’t be a huge transition for you.
For example, here is how you would list Kubernetes Deployments using kubectl and oc CLI:
kubectl get deployments

oc get deployments
Another example is pods:
kubectl get pods

oc get pods
Deploying a Kubernetes Manifest
Just as easy as it is to run get commands on resources in OpenShift, it’s just as easy to create Kubernetes resources.
Let’s take the Kubernetes manifest below:
apiVersion: apps/v1
kind: Deployment
metadata:
  name: nginxfromcli
spec:
  selector:
    matchLabels:
      app: nginxfromcli
  replicas: 2
  template:
    metadata:
      labels:
        app: nginxfromcli
    spec:
      containers:
      - name: nginxfromcli
        image: nginx:latest
        ports:
        - containerPort: 80
The manifest is going to create two Pods running Nginx, a popular web server.
Save the Kubernetes manifest with deployment.yaml as the manifest name on your desktop.
Run the following command to deploy the Nginx application:
oc create -f deployment.yaml
Next run the following command to see the Nginx deployment
oc get deployments
You should see an output similar to the output below:
nginxfromcli 2/2 2 2 7s
Wrapping Up
As with all CLIs, you no longer have to click around a UI and instead, you can create repeatable processes and have quick/easy commands to use to complete your work. The oc CLI interacts with all of your OpenShift resources and allows you to perform CRUD operations on applications and OpenShift components.
In this blog post, you learned how to get the oc CLI up and running from start to finish. You also took a look at how to see resources and how to create new resources.


Oldest comments (0)