Previously in this series we walked through setting up your first Express server, and then setting up the beginnings of an Express API with Mongoose/MongoDB data storage.
This post will jump off exactly where we left of in the previous post, so if you haven't been following along, I recommend at least going back and reading through that post first.
If you prefer to jump straight into the code, you can find that here
And if you prefer to learn by watching video tutorials, you can watch the live stream of this entire API build here
Getting Started...
In the last installment in this series, we left off with having just completed our first Mongoose Schema and database Model. This means we're ready to start building our router and our API endpoints!
The first thing we need to do is create a new folder in the top level directory of our project called routers and put a file inside that folder called puppy.js
$ mkdir routers
$ touch puppy.js
Then we want to tell our Express server (in index.js) that we want to use(puppy.js) for our Puppy routing endpoints.
Here's how we'll do this:
// index.js

const puppyRouter = require("./routers/puppy")
app.use("/puppies", puppyRouter)
these new lines of code can go directly beneath your Mongoose connection function call
What the above is doing is telling our Express server that for any endpoint starting with /puppies we want it to use the routing specified in our puppy.js file.
Now What?
So we've told our Express server to use the puppy router. Now what do we put in there to make this work?
To start writing our routes, we first need to open up our puppy.js file and add some requirements.
First, in order to create our routes, we need to require the Express Router:
//puppy.js
const router = require("express").Router()
This router constant will be used to call all of our routing functions.
Then we also need to require the Puppy model we previously created, so that we can use our model to acces and make changes to data in our MongoDB database.
//puppy.js
const router = require("express").Router()
const Puppy = require("../models/Puppy.model")
Creating a route in Express is as easy as using the correct HTTP verb function (ie: get, post, etc) and pass in the route we want to use to preform that action.
the rest of the code in this tutorial is going to be written inside of puppy.js
Reading from our MongoDB Collection
We're going to start off easy and write a route to access all of our puppies!

To do this, we're going to access our Puppy model using some built-in Mongoose functions. Since our const Puppy points to a Mongoose model, we don't also need to require(mongoose) here, which I think is a nice perk!
First, we need to set up an Express get request:
router.get("/", (req, res) => {
  res.send("Gimme the puppies!")
})
If you go ahead and start your server (using the dev script we added in a previous lesson) and navigate to localhost:5000/puppies/ you should see the string 'Gimme the puppies!'.
What's happening here is we are telling Express we want to get the / route, and then we pass a callback that includes the req (or request object), and the res (or response). Then we're telling Express the send the string "Gimme the puppies!" as our response.
Pretty cool, right!?
Now, let's get fancy
We're going to add onto this route and use the built in Mongoose method find to access every Puppy in our collection.
router.get("/", (req, res) => {
  Puppy.find()
    .then(puppies => res.json(puppies))
    .catch(err => res.status(400).json("Error: " + err))
})
Above, we are using the the same get request frame, and now we're using the Mongoose find method to access all of the instances of Puppy in our collection, and send them back to the response as JSON.
Since find is an asynchronous function, we use then to access and take action on the data that gets returned to us, only once the data has been returned. We also include a catch just in case there's an error. In this case, if there's an error, we send back a 400 status code to indicate a server error, and send back the error details as JSON. (we will use this error format for every database request we write in this tutorial)
Now if you were to look at this route in your browser, you'll see nothing returned. And that's a good thing! We haven't added a Puppy to our collection yet, so there's nothing to be returned.
Let's fix that...
Updating Our Collection
Before we get started with sending our data to our database, we need a way to do that. My preferred method is a product called Postman. Postman allows you to manually test API endpoints by creating request bodies manually without needing an actual GUI form or interactive element to send your data with.
Go ahead and download Postman, and then come back for this next part, or if you have another API interaction tool you prefer feel free to use that!
Now that we have Postman, and are able to test our endpoints, we can go ahead and set up our first post route.
router.post("/", (req, res) => {
  const name = req.body.name
  const breed = req.body.breed
  const age = Number(req.body.age)
  const cute = req.body.cute
  const well_behaved = req.body.well_behaved
  const adopted = req.body.adopted

  const newPuppy = new Puppy({
    name,
    breed,
    age,
    cute,
    well_behaved,
    adopted,
  })

  newPuppy
    .save()
    .then(() => res.json("New puppy created!"))
    .catch(err => res.status(400).json("Error: " + err))
})
This one's pretty long, so let's step through this code and talk about what's happening.
First, we set up our post request route, and pass in the root route (/). This will send the post request to /puppies/, which is the RESTful endpoint for adding new instances to our collection.
Then, we create some variables from the data passed in from our req.body, or the body of our request. When we test this endpoint, we're going to be passing in a set of key-value pairs where the key is the same as the data column we want to add to for this Puppy. If you know that your data will always been passed to the API in this format (via some sort of client-side validation, for example) you can alternatively pass the entire req.body to new Puppy().
We then take all of those variables and use them to create a new instance of our Puppy model. Once we have our instance of a Puppy, we can use the built in Mongoose function save to add this Puppy to our MongoDB collection. Just like the find method, the save method is asynchronous, so we will use then to send back our response. The save method does not return any data by default, so instead we'll just send back the string "New puppy created!" to indicate success here.
Now we can save our router file and test this out in Postman!

In the example above, you can see that I've chosen the post verb option from the dropdown on the left-hand side, passed in our full URL (localhost:5000/puppies/) and then used the request body creator below to pass in my Puppy data as raw JSON. (Make sure to choose JSON from the dropdown!)
Here's the puppy I created:
//req.body
{
  "name": "Hank",
  "breed": "English Springer Spaniel",
  "age": 10,
  "cute": true,
  "well_behaved": false,
  "adopted": true
}
Then we can click "Send" and the result panel at the bottom will read "New puppy created!"

Now if we create a new tab using the + symbol button at the top, we can create a get request to /puppies/ and see our new Puppy returned to us from the database!

Now we get back the puppy we created, and we can see that MongoDB automatically gave our instance of a Puppy an _id field populated with a unique ID code. We'll be using this _id field to get individual instances of a Puppy, as well as making updates via put request, and eventually, sadly, delete-ing puppies if necessary.
Reading Specific Data
Now that we know how to add puppies to our collection, it's understandable that we won't always want to get information about every single Puppy in our collection. Personally, I'm most interested in Hank, because he's my puppy. So how do I access only the data about him?
We can use a method that's very similar to the find method we used previously. Mongoose provides us with the method findById, and it does exactly what it says on the tin. We simply pass in the _id of the Puppy we want to find.
To get access to the _id information, we're going to use a route parameter by adding on to our base /puppies/ route. Here's the get request we'll be using:
router.get("/:id", (req, res) => {
  res.send(`The id you want to get is ${req.params.id}`)
})
Using the above, if you navigate to localhost:5000/puppies/123, you should see the string "The id you want to get is 123" in your browser window.
We'll be using req.params.id to send a specific _id to MongoDB in order to access the specific Puppy we want.
router.get("/:id", (req, res) => {
  Puppy.findById(req.params.id)
    .then(puppy => res.json(puppy))
    .catch(err => res.status(400).json("Error: " + err))
})
Now, we're using the aforementioned findById method, coupled with the id passed to us from req.params.id to request only that instance of a Puppy, and send the data back as JSON.
We can test this in Postman, using the _id that was assigned to the Puppy we previously created...
your _id will be different, as each _id is completely unique
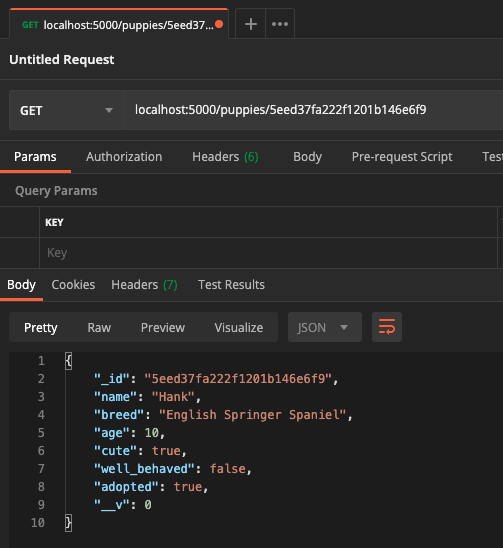
As you should see above, we make a get request to /puppies/:id, passing in the _id for our previously created Puppy in place of :id, and we get back that instance of Puppy.
If you want to test this out further, I encourage you to create a few more Puppy instances using our previously created post route, and then access each of them one at a time using this new route.
Updating Instances
Now that we're able to get data to and from our database, we also want to be able to make changes. In the event that a Puppy ages, gets adopted, or gets some training and becomes well behaved, we want to be able to update those details in our database.
This process is an amalgamation of what we've done so far. It's similar to get-ting and post-ing an individual instance of a Puppy. Remember how Mongoose gave us a convenient findById method? Mongoose also gives us a findOneAndUpdate method for finding and updating instances.
However, in order to use this function, we need to make an update to our mongoose.connect function in our index.js file.
// index.js
mongoose.connect(uri, {
  useNewUrlParser: true,
  useUnifiedTopology: true,
  useFindAndModify: false, // this is the new line of code we're adding
})
In the above code block, passing another option to our connect function and telling Mongoose to set useFindAndModify to false. This will allow us to use the Mongoose findOneAndUpdate method. It's not important in this use case to understand why we're doing this, but if you want to learn more about this, you can check out the Mongoose documentation.
Now that we've got that sorted out, we can create our update route using the put http verb...
router.put("/:id/update", (req, res) => {
  let updates = req.body //we set a variable equal to the entire req.body

  Puppy.findOneAndUpdate({ _id: req.params.id }, updates, { new: true })
    .then(updatedPuppy => res.json(updatedPuppy))
    .catch(err => res.status(400).json("Error: " + err))
})
In this scenario, we are assuming that the only data being passed in the req.body are the updates being made to this specific puppy. Otherwise, we would need to write some extra code to extract the specific updates being made.
findOneAndUpdate conveniently indentifies whether the instance being accessed already has the key (or multiple keys) being passed in by the update object. And since we created this model using a schema, we are only allowed to update columns that already exist. If we were to try to send an update that included a column that does not exist, no updates will be made to the database.
findOneAndUpdate takes in 2 required arguments, and one optional:
First we find the Puppy we're targeting by looking for a Puppy instance with a matching _id ({ _id: req.params.id }), then we pass in the updates variable as the second argument. We can also include { new: true } as an optional third argument, which will cause the updated Puppy data to be returned from the function.
We can test this new endpoint, again using Postman. Let's say I got my Puppy Hank some training lessons, and he's now perfectly well behaved. I can send an update to this endpoint, and in the request body test well_behaved to true:
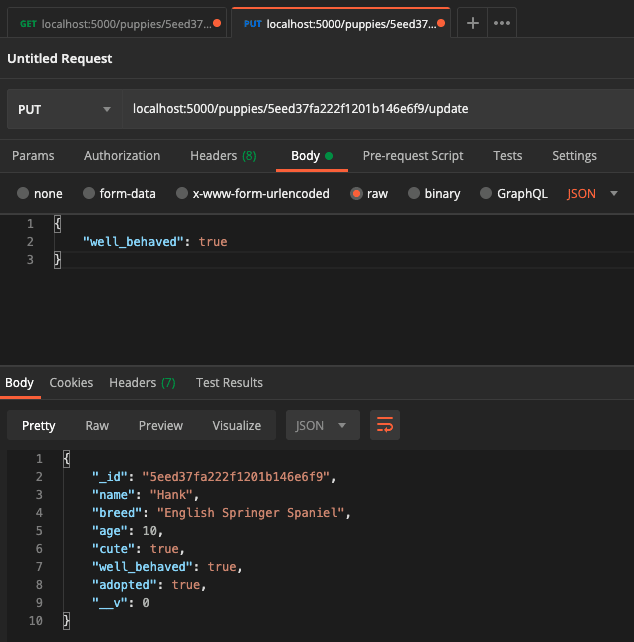
You should see above that I sent the request to this new endpoint that I described above, and in the reponse we see the updated Puppy instance for Hank, where well_behaved is now set to true.
Deleting Data
Sadly, the only thing left to do is to delete some of our puppies.

Since you've been following along, I bet you can guess what http verb we need to use this time: delete!
Similarly to the built in findOneAndUpdate method, Mongoose also provides us with a convenient findByIdAndDelete method.
Here's how we'll utilize this method in our API:
router.delete("/:id", (req, res) => {
  Puppy.findByIdAndDelete(req.params.id)
    .then(() => res.json("Puppy deleted =( "))
    .catch(err => res.status(400).json("Error: " + err))
})
This works pretty similarly to our findById method. We pass in the _id of our Puppy as a request param, and the method does the rest of the work for us. As with all of our other Mongoose methods, this is asynchronous, and like the save method does not return any data to us. Instead we send back the string "Puppy deleted =(" to indicate successful deletion.
Test this route at your own peril, because deleting puppies is pretty sad!
Wrapping Up
Congrats! You made it through every single CRUD action with Express and Mongoose! Now it's time to celebrate 🎉
If you made it this far I just want to say: Thank you and I'm so proud of you!
I encourage you to use what you've learned here to build your own REST API with Express and Mongoose to practice what you've learned.
If you do follow this tutorial and build an API of your own I'd love to see it! Share what you've made with on Twitter
If you want to find out when I put out new blog posts and tutorials, you can follow me on Twitter, where I always post links as soon as my new posts are available.
This tutorial was originally posted on TheCodePixi.dev/blog


Latest comments (1)
Nice! A bit on the longer side but I'm sure beginners will appreciate it :)