
I have some data, and I'd like to make a PDF file for that data. How can I make a PDF file as a quick way in React. In this post, I will try to do it fast as possible in React using PdfMake library.
Requirements
This is a part of PDF file that I want to make in this post.

Before I go forward, I would like to remind you that everything in PdfMake is table. Using the picture above, I can divide it to many tables.
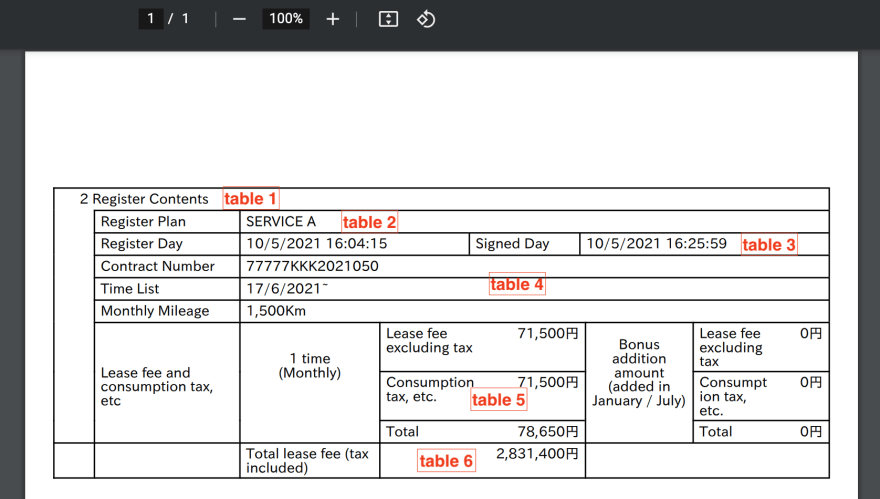
The reason I need to do it, because as you can see the number of columns in each table is different, and the size of each columns is different either. It's very difficult to custom the layout, If I combine them in one table.
Components in PdfMake
In this example, I'm going to use text, table, and stack component in PdfMake.
- text
This is syntax of text component:
''
or
{text: '', // need to define some property here}
- table
This is syntax of table component:
    {
        table: {
            widths: [50, 50], // column sizes: 50pt-50pt
            body: [
                ['Column1', 'Colum2'] // Row1
                ['Column1', 'Colum2'] // Row2
            ]
        }
    }
-
stack: I use
stack, in order to combine many tables.
{
  stack: [
    // table1,
    // table2
    // etc
  ]
}
Ok, That is enough!. We knew the usage of text, table and stack. Let's
move on next step.
Draw PDF
In order to make sure the first column and the second column in each table have the same size . I need to hard code widths for them. I defined [20, 95].
Table1
Table1's requirements:
- A column that have width
*(full width). - Having a text(2 Register Contents) within the column.
- A padding left for the layout of table.
Let's do it:
{
  table: {
    widths: ['*'],
    body: [[{text: '2 Register Contents', border: [true, true, true, false]}]],
  },
  layout: {
    paddingLeft: function () {
      return 18
    },
  },
}
Table2
Table2's requirements:
- Three columns with sizes: [20, 95, '*']
- The second column, the third column must be rendered without the border bottom.
{
  table: {
    widths: [20, 95, '*'],
    body: [
      [
        {text: '', border: [true, false, false, false]},
        {text: 'Register Plan', ...noBorderBottom},
        {
          text: 'SERVICE A',
          ...noBorderBottom,
        },
      ],
    ],
  },
},
Table3
Table3's requirements:
- Five columns with sizes: [20, 95, 155, 70, '*']
- All columns have no the border bottom.
{
  table: {
    widths: [20, 95, 155, 70, '*'],
    body: [
      [
        {text: '', ...noBorderTopBottom},
        {text: 'Register Day', ...noBorderBottom},
        {text: '10/5/2021 16:04:15', ...noBorderBottom},
        {text: 'Signed Day', ...noBorderBottom},
        {text: '10/5/2021 16:25:59', ...noBorderBottom},
      ],
    ],
  },
},
Table4
Table4's requirements:
- Three columns with sizes: [20, 95, '*']
- All columns have no the border bottom.
- First column only have the border left.
{
  table: {
    widths: [20, 95, '*'],
    body: [
      [
        {text: '', border: [true, false, false, false]},
        {text: 'Contract Number', ...noBorderBottom},
        {text: '77777KKK2021050', ...noBorderBottom},
      ],
      [
        {text: '', border: [true, false, false, false]},
        {text: 'Time List', ...noBorderBottom},
        {
          text: '17/6/2021~',
          ...noBorderBottom,
        },
      ],
      [
        {text: '', border: [true, false, false, false]},
        {text: 'Monthly Mileage', ...noBorderBottom},
        {
          text: '1,500Km',
          ...noBorderBottom,
        },
      ],
    ],
  },
},
Table5
Table5's requirements:
- Six columns with sizes: [20, 95, 91, 138, 68, '*']
- First, Second, Fifth column need to be had
rowSpan. - Fourth column and Sixth column have
flexlayout.
// make a flex layout for fourth column and sixth column
const flexLayout = (title: string, money: string) => ({
  table: {
    widths: ['60%', '40%'],
    body: [
      [
        {
          text: title,
          margin: [0, 0, 0, 0],
        },
        {
          text: money,
          margin: [0, 0, 0, 0],
          alignment: 'right',
        },
      ],
    ],
  },
  layout: 'noBorders',
})

// layout of the table
{
  table: {
    widths: [20, 95, 91, 138, 68, '*'],
    body: [
      [
        {text: '', rowSpan: 3, ...noBorderTopBottom},
        {
          text: 'Lease fee and consumption tax, etc',
          rowSpan: 3,
          margin: [0, 30, 0, 0],
          ...noBorderBottom,
        },
        {
          rowSpan: 3,
          text: '1 time\n(Monthly)',
          margin: [0, 20, 0, 0],
          alignment: 'center',
          ...noBorderBottom,
        },
        {
          ...flexLayout('Lease fee excluding tax', '71,500円'),
          ...noBorderBottom,
        },
        {
          rowSpan: 3,
          text: 'Bonus addition amount (added in January / July)',
          alignment: 'center',
          margin: [0, 10, 0, 0],
          ...noBorderBottom,
        },
        flexLayout('Lease fee excluding tax', '0円'),
      ],
      [
        {text: '', border: [true, false, false, true]},
        {text: ''},
        {
          text: '',
        },
        flexLayout('Consumption tax, etc.', '71,500円'),
        {
          text: '',
        },
        flexLayout('Consumption tax, etc.', '0円'),
      ],
      [
        {text: ''},
        {text: ''},
        {
          text: '',
        },
        {
          ...flexLayout('Total', '78,650円'),
          ...noBorderBottom,
        },
        {
          text: '',
        },
        {
          ...flexLayout('Total', '0円'),
          ...noBorderBottom,
        },
      ],
    ],
  },
  layout: {
    paddingTop: function (i: number) {
      return 0
    },
    paddingBottom: function (i: number) {
      return 0
    },
  },
},
Table6
Table6's requirements:
- Five columns with sizes: [20, 95, 91, 138, '*']
{
  table: {
    widths: [20, 95, 91, 138, '*'],
    body: [
      [
        {text: ''},
        {text: ''},
        {
          text: 'Total lease fee (tax included)',
        },
        {
          text: '2,831,400円',
          alignment: 'right',
        },
        {
          text: '',
        },
      ],
    ],
  },
},
Finally, I need to combine six tables in a stack, and add it to a page in Next.js.
{
  stack: [
    // table1
    // table2
    // table3
    // table4
    // table5
    // table6
  ]
}
Note: I will add
stacktoregisterSection, then addregisterSectionto a page in Next.js app.
import * as React from 'react'
import {registerSection} from '../components/register-section'
import pdfMake from 'pdfmake/build/pdfmake'

// I uploaded my font to AWS S3 and set up CORS for it.
const fonts = {
  yourFontName: {
    normal: 'https://okt.s3.us-west-2.amazonaws.com/ipaexg.ttf',
    bold: 'https://okt.s3.us-west-2.amazonaws.com/ipaexg.ttf',
    italics: 'https://okt.s3.us-west-2.amazonaws.com/ipaexg.ttf',
    bolditalics: 'https://okt.s3.us-west-2.amazonaws.com/ipaexg.ttf',
  },
}
const docDefinition = {
  pageMargins: [20, 97, 20, 60] as [number, number, number, number],
  pageSize: {
    width: 595.28,
    height: 879,
  },
  content: [{...registerSection()}],
  styles: {},
  images: {
    snow: 'https://okt.s3.us-west-2.amazonaws.com/logo.png',
  },
  defaultStyle: {
    fontSize: 10,
    font: 'yourFontName',
  },
}

function ClientSidePdf() {
  function openPdf() {
    // @ts-ignore
    pdfMake.createPdf(docDefinition, null, fonts).open()
  }

  return (
    <div>
      ClientSidePdf
      <button onClick={openPdf}>Open</button>
    </div>
  )
}

export default ClientSidePdf
Hmm, I just created a component PDF using PdfMake. While doing that, I encountered a matter that I have thought it was interesting. Let's take a glance in next section.
Table Width
I assume I'd like to add a table(table7) below table6, and in table7 I would like to have one column more than table6, and the size total of fourth column and the fifth column is equal to the size of the fourth column in table6. And I defined sizes: 38 for the fourth column, 100 for the fifth column. I think It will be equal to 138(the fourth column in table6).
{
  table: {
    widths: [20, 95, 91, 38, 100, '*'],
    body: [
      [
        {text: '', ...noBorderTop},
        {text: '', ...noBorderTop},
        {
          text: 'Total',
          ...noBorderTop,
        },
        {
          text: 'Lease fee (tax included)',
          ...noBorderTop,
        },
        {
          text: '2,831,400円',
          alignment: 'right',
          ...noBorderTop,
        },
        {
          text: '',
          ...noBorderTop,
        },
      ],
    ],
  },
},
This is the result I got.

It turns out the width total is not equal to the fourth column in table6. The reason is because in PdfMake when I define:
-
138: 1 paddingLeft: 4pt, 1 paddingRight: 4pt, vlineWidth: 1pt -
38,100: 2 paddingLeft: 4pt, 2 paddingRight: 4pt, 2 vlineWidth: 1pt
So in the second case, the size total will be greater than the first case 9pt.
You can learn more here.
If I set sizes of the fourth column, the fifth column in table7 to 29(decreased 9pt), 100.
Both sizes of the two cases will be equal.

Conclusion
I finished drawing a basic layout in a PDF file. It's time to try to your layout PDF. Why don't pick some layout, and draw it. Go ahead and spend sometime with your PDF file.
Please feel free to refer source code.


Top comments (4)
I've used Puppeteer, which is headless chrome browser, to generate very rich document (graphic, chart, table, etc).
Use HTML, CSS, JS, and with what ever the data you need to inject into the document to generate a HTML document. Then feed that document to Puppeteer and use Puppeteer's print PDF function to generate the PDF file.
I did it a slightly different way. I wrote it in React, then feed that to React's Server Side Rendering (SSR) API to generate a HTML document and then feed the document to Puppeteer to print the PDF document.
I could have skipped the SSR step and feed React code directly into Puppeteer but that way I'd have needed to include all the libraries (including React) in the Puppeteer step.
Thank you for the detailed sharing! I have just known a method for making PDF using Puppeteer. 😀
Puppeteer offers much more elegance in terms of generating pdfs, you should take a look at it.
Wow, I didn't know puppeteer can generate Pdf.
Thank you !