Django is one of the frameworks which builds both the frontend and the backend. There are a lot of libraries like forms, admin panels, paginations, authentication that will help developers save much time. Let’s talk about the simple useful forms of API.
Just like the normal forms, they have input. If you decide to use the forms or build your own, it’s not compulsory to use the API. But on the software engineering journey, it’s a waste of time to reinvent the wheel.
First, you need to create a file in your app known as form.py. Inside the form, import the necessary APIs. Ie. from Django import forms. The next process will depend on what you want to do with your forms.
Part 1: UserForm-Authentication
Here you will have to import another built-in user form for authentication. The form comes along with authentication details like username, password1,password2, email, etc. from Django.crib.auth.forms import UserCreationForm. Again, the form will need some fields and so, from Django.forms import fields.
Registration form
Here you create a class called CreateUserForm.
class CreateUserForm(UserCreationForm):
class Meta:

    model = User

    fields = [‘username’, ’email’, ‘password1’, ‘password2’]
Line 1 creates a class known as CreateUserForm which extends the imported UserCreationForm.
Line2: It declares the sub-class Meta that accepts the model and field.
Line3: This is the model and the category of data you are dealing with. If it’s the user then model=User, if its product then model=Product. The product and users come from model.py. But in this case of authentication, you just need to import the user as a built-in person. from django.contrib.auth.models import User
Line4: It shows the number of fields that your django form will create.
On your views.py, create a method to register a user. In this case, I will just show you how we call and use the form.
def Register(request):
form = CreateUserForm()

context = {‘form’: form}

return render(request, “users/regist.html”, context)
Line1; You create a method called to register with a request.
Line2: variable form takes the method form from form.py, so make sure you import. from users.form import CreateUserForm.
Line3: context is like the python dictionary. It will carry all the fields from your form.py. Make sure you use the same name whereby ‘form’:form.
Line4:These familiar with Django know that we need to return a template where our form will go. But kindly, It’s a must to include context after the template. This is to allow django to read content from context to your template.
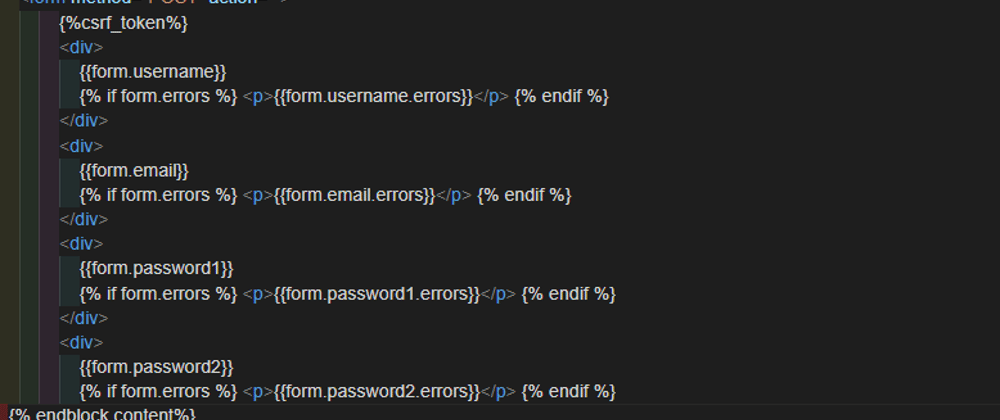
Please go to the last method in HTML templates where you call your form fields. Wrap your content inside a form, ensure the form has method=POST. Use the cover image.
As you can observe, you use the dictionary from context ie form then followed by a respective field of how it must appear. The names of the Django field should remain the same. They are used globally. If its password2 should remain the same although its function is to validate Re-enter your password.
Just as simple as the above ad you have your authentication
Part 2: ProductForm/ AOB forms
This will save you time mostly when you are developing an admin backend where your team will modify, add or delete items. We assume you have created your model table here at model.py with some properties. Create form.py file inside your app.
As usual, the first process is to import your table from model.py and the forms.
from products.models import Category, Product
from django import forms
Then create a class to declare your fields.
class ProductForm(forms.ModelForm):
class Meta:

    model = Product

    fields = [‘name’, ‘image’]

    widgets = {

        ‘name’: forms.TextInput(attrs={‘class’: ‘form-control’}),
‘image’: forms.FileInput(attrs={‘class’: ‘form-control’}),
}
My table database Product has only two properties ie a name and an image.
Line1: create a class called ProductForm and inside the imported forms to use ModelForm. By declaring this, django expects more than enough fields because a model table can have even 100 properties.
Line2: the sub-class Meta is used to accept the model and the fields.
Line3:the model accept the imported table from model.py
Line4: the properties i.e. name and image are stored in a field.
Line5: the widget s not compulsory. But if you want you’re to specify the fields, then it might interest you. The field will also occupy maximum space, giving the user a humble time to maneuver across. If its email use EmailInput, for images use FileInput, for description use TextArea etc
Let’s move to the next file which is view.py
Manager add product
def addProduct(request):
form = ProductForm()

if request.method == ‘POST’:

    form = ProductForm(request.POST, request.FILES)

    if form.is_valid():

        form.save()

        return redirect(‘modifyAllProduct’)

    else:

        form = ProductForm()

context = {

    ‘form’: form

}

return render(request, ‘products/Admin/addProduct.html’, context)
Line1: Create a function that adds a product to the database. It takes the argument request.
Line2: Here we declare the variable form to borrow from ProductForm() which we will import from form.py. from products.forms import ProductForm
Line3-9 is simple functionalities to post a product after you have filled out all the fields from the form.
Line10: Create a context python dictionary that takes ‘form’; form.
Line11; It returns the templates where our form will go. Don’t forget to include context as your last argument otherwise your form will not be created.
Create a form that will post the data to your database. Kindly remember to to put method=”POST” action=”” enctype=”multipart/form-data this content inside your form tag. It really took me 4 hours debugging only to realize I didn’t use the enctype= enctype=”multipart/form-data
You are set to go. Then, access you’re the page through the set URLs and you will find a good form. You can then modify it as per your desires.


Top comments (0)