
Honestly, you might be coming across umpteenth article on this topic, but I had to jot down my experiments with static website setup. For the uninitiated, apart from being the name of a famous 2011 Martin Scorsese movie, Hugo is also an extremely popular static website generator. Hugo uses data files, configuration, layout templates, static files, and content written in Markdown to render a static website, which means no database, blazing fast site speed and no danger of cross-site scripting and SQL injection attacks.
Installation & Prerequisites
To start with I installed Hugo on my Windows 10 laptop (instructions here), I already had Git Bash installed, but it’s easy to install it from here. You may also choose to use a Git GUI tool like Tortoise Git.
Next, I created a new Git repository at my GitHub account with the name [my-github-username].github.io containing just a blank README.md file (note that its necessary to name the repo this way, in order to leverage the GitHub pages feature).
While GitHub will create a “main” code branch by default, at this time I also created an empty new branch and named it “gh-pages” (following sections will talk about the significance of creating this other code branch).
Next, I need to tell GitHub that my repository will use GitHub Pages. To do that, click the "Gear Icon > Settings" for the repo, and then click "Pages" on the left menu. Then, under "Source" on the right pane, select the "Branch" as "gh-pages". This tells GitHub that the website would be rendered using the content in the gh-pages branch (and not the main branch). You might also configure a custom domain for the website, which is not something I did.
All set? Let’s move on.
Hugo Site and Theme
Every Hugo site has an associated theme to apply the site style and look. I decided to use the freely available Academia Hugo theme, and since I might need to make changes to the theme files I decided to fork their Git repo to my GitHub account.
To begin building my site, I first clone my GitHub pages repo locally, as follows:
git clone https://github.com/tanmaychk/tanmaychk.github.io
cd tanmaychk.github.io
I will add the Hugo theme to my site as a Git submodule, this will help me pull-in the theme (which is a separate Git repo, as mentioned above) changes easily. This is especially useful if I were using a theme from a Git repo I don't own.
git submodule add https://github.com/tanmaychk/academia-hugo.git themes/academia-hugo
The Academia Hugo theme thankfully comes with a core set of files needed to create a Hugo site from the theme in a folder "exampleSite", so I recursively copy this folder's entire content to my Hugo site root, as follows:
cp -r themes/academia-hugo/exampleSite/* .
Now the basic structure of my website is ready, and I can immediately test it using the local Hugo server (yes, without even deploying my site yet), as follows:
hugo server -b http://localhost:1313
The site will now be accessible at http://localhost:1313 (your port could vary if you supplied it differently). The parameter -b is to specify the baseURL for the site because as of now I haven't touched the Hugo config.toml file, which contains all the website configurations. I could have also added the baseURL to config/_default/config.toml file directly, in lieu of specifying this parameter.
Academia theme has in-built support to add details about Courses, Projects, Skills, and Blogs. I changed the content (text as well as images) according to my needs and kept checking it locally. Images were added under the static/img folder. I also added my resume PDF under static/files folder and added the link to the PDF via the config/_default/menus.toml config file.
I created the PDF version of my resume using LaTeX and Overleaf. The GitHub repo is here if you are interested.
Generating the website
Hugo can help generate the HTML and static files that we would deploy to our website (remember raw HTML are the crux if the static website thingy). You can deploy them using online CMS tools like Netlify and Forestry.io, after generating the public website through the following simple command:
hugo
I see a new folder public now in my Hugo site folder that contains all the generated HTML files and static assets which can be straightway deployed to any hosting platform.
Since this article is about deploying the site to GitHub pages, I will now focus on that ask. At this point I can safely delete the complete public folder.
Deploying to GitHub pages
Before I start, a quick recall about the two code branches I created when setting up my repo, the default "main" and a "gh-pages" branch. I will now explain why I did that. While the "main" code branch will store all our core "source" files (that I created in above-said steps while creating my Hugo site), the "gh-pages" will contain the content that the public folder in the previous paragraph contained, i.e. the entire generated site. But I will cleverly hand over the job of creating this generated website to GitHub via Actions.
GitHub Actions is a continuous integration and continuous delivery (CI/CD) platform that allows us to automate our build, test, and deployment pipeline.
In my case I create a workflow that will
- get triggered on code check-in to the "main" branch
- check-out our "main" branch code, including the theme submodule
- perform a setup of Hugo (latest version)
- generate the static website in "public" folder, using the "hugo" command
- check-in the content of the "public" folder to the "gh-pages" branch of the repository
To create the workflow, click "Actions" link on the repository page, then click "New Workflow" and paste the YAML content provided below. Then save the workflow.
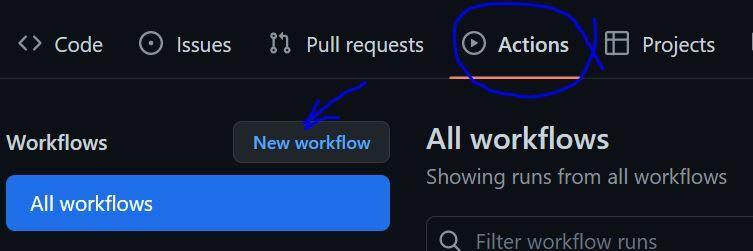
Interesting to note that GitHub stores this workflow in the "main" branch under .github/workflows folder. For more details on this Action please refer the documentation and code at https://github.com/peaceiris/actions-gh-pages.
name: GitHub Pages

on:
  push:
    branches:
      - main  # Set a branch name to trigger deployment
  pull_request:

jobs:
  deploy:
    runs-on: ubuntu-20.04
    permissions:
      contents: write
    concurrency:
      group: ${{ github.workflow }}-${{ github.ref }}
    steps:
      - uses: actions/checkout@v3
        with:
          submodules: true  # Fetch Hugo themes (true OR recursive)
          fetch-depth: 0    # Fetch all history for .GitInfo and .Lastmod

      - name: Setup Hugo
        uses: peaceiris/actions-hugo@v2
        with:
          hugo-version: 'latest'
          extended: true

      - name: Build
        run: hugo --minify

      - name: Deploy
        uses: peaceiris/actions-gh-pages@v3
        if: ${{ github.ref == 'refs/heads/main' }}
        with:
          github_token: ${{ secrets.GITHUB_TOKEN }}
          publish_branch: gh-pages
          keep_files: true
          publish_dir: ./public
Now it's time to check-in the code from our local laptop to the GitHub pages repo "tanmaychk.github.io". As soon as the code is pushed to GitHub, the "GitHub Pages" Actions workflow gets triggered and in couple of minutes my website is published to the gh-pages branch. My site is now ready to be viewed at https://tanmaychk.github.io/.
Hope this helps to create a resume/portfolio website of your own.


Oldest comments (0)