This is a multipart series to help you set up stripe API's within the context of react, express mongoDB applications. In the first section we will make our first test charge to your stripe console. in the second part, we will set up error handling in the testing environment. In the third part, we will deploy our dev environment to heroku and have a functional credit card payment system on the web.
Prerequisites:
Understanding of javascript.
Experience with express, mongoose, mongoDB and node.js.
Understanding of React, including hooks, and context.
Unix command line and use of npm packages. Including nodemon
a bank account, and a stripe account.
deploying applications to heroku.(part 3, not made yet)
you need to have mongoDB compass installed
if you haven't had very much experience with these technologies you could still try and do this tutorial but it would be much better to learn about these things before you try, because this is going to be an advanced tutorial relating to a specific stack and requires a computer already configured for this development environment.
lets go to stripe.com
fill out the information so that you can get to your stripe dashboard.
the dashboard should look something close to this.
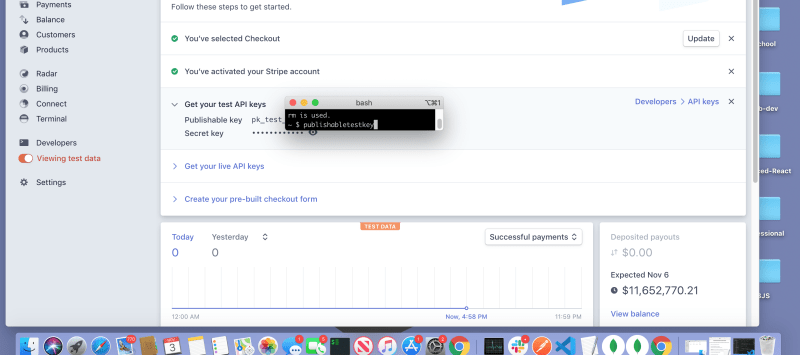
right under the small bash teminal is the publishable-api-key.
these keys need to be handled with care to ensure your site stays secure.
we will get back to that in a moment but let's make our express application.
Make a directory for the project. we will start by making our full-stack application.
mkdir payment-system && cd payment-system
make a git repo.
git init
next let's initialize a package.json from the command-line by running this command.
npm init -y
open the directory with your favorite text editor. I'll be using vscode.
make a file in the root of your project you can do this by pressing control and ~ at the same time to start a command-line instance in the root of your project and type into the command line.
touch server.js
since this tutorial needs a production build to make our payment system work we are going to try and make our server ready for deploy from the start so that we don't have to refactor later.
let's start with dependencies.
npm i express morgan mongoose body-parser stripe dotenv
morgan is a dependency for listening and getting better data for our API requests.
body-parser middleware is there so that you can retrieve the payload from the POST request body.
dotenv will set up our testing environment variables. We have to configure another two .env files. one for the back end another for the front end.
stripe is the library to make the serverside calls of this payment system.
before we start adding code. I want to clarify, the only time you will see duplicate pieces of code the function names and boilerplate for them when I have structured functions and given them structure later or when I talk about certain parts of the file then share the whole thing.
let add the code to get our server running in development.
server.js
const express = require('express')
const app = express()
const mongoose = require('mongoose')
require('dotenv').config()
const bodyParser = require('body-parser')
const morgan = require('morgan')
const PORT = process.env.PORT || 4444

app.use(morgan('dev'))
app.use(bodyParser.text())
app.use(express.json())

mongoose.connect(process.env.MONGODB_URI || 'mongodb://localhost:27017/paymentSystem', {
  useNewUrlParser: true,
  useFindAndModify: false,
  useCreateIndex: true,
  useUnifiedTopology: true,
}, console.log('db connected...'))

//Route goes here


app.listen(PORT, () => {
  console.log(`app is running on ${PORT}`)
})
Everything on the server.js is the bare essentials for a production deploy with the integration of stripe API. Especially the code before the || or operators.
if everything when well you should see this when you type nodemon server.js into command line inside the root directory.

it might only be repeated once.
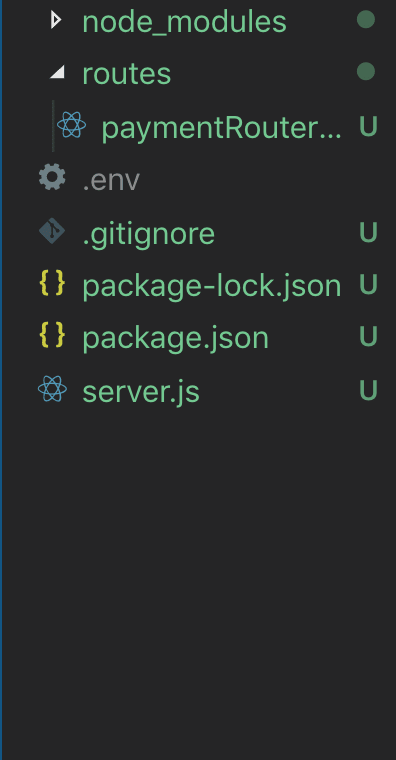
Next we define the paymentRouter to make the post request on the backend.
press control c after clicking on the teminal and in the command line lets write
mkdir routes && touch routes/paymentRouter.js
before we leave the server.js define the route.
server.js
app.use('/charge', require('./routes/paymentRouter'))
since our paymentRouter.js is an empty file, our server is crashing. Add this to the and the server will run normally again.
const express = require('express')

const paymentRouter = express.Router()
const stripe = require('stripe')(process.env.SECRET_LIVE_APIKEY || process.env.SECRET_TEST_APIKEY);


module.exports = paymentRouter
if you're logged into stripe and look at any of the examples in the docs you'll notice that they are nice enough to provide you with your test API keys in the examples.
Rather than adding our keys directly into the code, we will set up environment wide variables to represent our keys so that we can push to public repositories without hackers being able to steal our payment credentials.
now we should make the post request for the POST '/charge' route between the module.exports and the const stripe.
paymentRouter.post('/', async (req,res) => {
  try{
    let {status} = await stripe.charges.create({
      amount: req.body.amount,
      currency: 'usd',
      source: req.body.token,
    })
    return res.json({status})
  } catch(err) {
    console.error(err)
    res.status(500).end()
  }
})
note: you can hard code the amount for testing and choose whatever currency type you are most likely to be receiving payments with but the source key has to get the stripe token from the front end for the value.
The whole file should look like this...
const paymentRouter = express.Router()
const stripe = require('stripe')(process.env.SECRET_LIVE_APIKEY || process.env.SECRET_TEST_APIKEY);


paymentRouter.post('/', async (req,res) => {
  try{
    let {status} = await stripe.charges.create({
      amount: req.body.amount,
      currency: 'usd',
      source: req.body.token,
    })
    return res.json({status})
  } catch(err) {
    console.error(err)
    res.status(500).end()
  }
})

module.exports = paymentRouter
now make and set up a .env file to ensure our secret keys are working.
touch .env .gitignore && echo .env >> .gitignore
the command after the &&, ensures that you don't push anything in the .env files to github which is exactly what we want.
Make sure that the .env looks a little faded out and that it says .env in the .gitignore file before you git add or git commit anything. Remember that we are about to be dealing with real money, real credit card numbers, and real people that deserve your due diligence
just to drive my point home.
now lets our use create-react-app to make a client folder.
create-react-app client
now we install all the dependencies.
npm i axios react-stripe-elements dotenv
lets set up the .env files for the front-end.
Go to your stripe dashboard and get the publishable test key, the one prefixed with pk_test. These are the ones that you can see without typing your password first.
in the terminal for the client directory, make a .env file for the client directory.
touch .env
inside the .env file write...
REACT_APP_PUBLISHABLE_TEST_APIKEY="the publishable key copied from the stripe dashboard"
we have to add the REACT_APP_ part to the apikey because this is the way that create-react-app handles environmental variables.
add the proxy to the package.json for the client folder.
"proxy": "http://localhost:4444",
make sure that your commas and double quotes, follow proper convention for json objects.
now we need to prepare the index.js in the src folder with the stripe and elements context to be available app wide. You can add this more dynamically to your app but for the sake of scale we will add this where we would put any other piece of context.
your index.js will look like this...
index.js
import React from 'react';
import ReactDOM from 'react-dom';
import './index.css';
import App from './App';
import * as serviceWorker from './serviceWorker';
import {StripeProvider, Elements} from 'react-stripe-elements'

ReactDOM.render(
  <StripeProvider apiKey={
    process.env.REACT_APP_PUBLISHABLE_TEST_APIKEY
    ||process.env.REACT_APP_PUBLISHABLE_LIVE_APIKEY
      }>
      <Elements>
        <App />
      </Elements>
  </StripeProvider>

, document.getElementById('root'));

// If you want your app to work offline and load faster, you can change
// unregister() to register() below. Note this comes with some pitfalls.
// Learn more about service workers: https://bit.ly/CRA-PWA
serviceWorker.unregister();
notice that we are adding variables that don't exist yet. that's so that we don't have to refactor for production mode.
you can tell if it worked by opening the dev tools where stripe gives a warning message.

clear out the App.js to make room for the CheckoutForm.js we are about to make.
the new App.js should look like this.
import React from 'react';
import logo from './logo.svg';
import './App.css';
import CheckoutForm from './CheckoutForm'

function App() {
  return (
    <div className="App">
      <header className="App-header">
       <CheckoutForm />
      </header>
    </div>
  );
}

export default App;
now make the checkout form.
touch CheckoutForm.js
then go to the CheckoutForm and make a skeleton component.
import React from 'react';

const CheckoutForm = (props) => {
  return (
    <div>

    </div>
  );
};

export default CheckoutForm;
we know we are going to make a post request from this component so let's add axios right now
import axios from 'axios'
import the higher order component injectStripe and CardElement from react-stripe-elements and make this component its child by adding these two lines of code
first at the top.
import {CardElement, injectStripe} from 'react-stripe-elements';
and at the export default. pass in the injectStripe higher-order component the CheckoutForm as an argument like this...
export default injectStripe(CheckoutForm);
Now that we have all of the props from context, let's render the card element inside the div.
 <p>enter your card information here. This is for test purposes only. do not enter your real credit card information.</p>
      <CardElement />
now we need to make the function to send the users input to the back-end.
this is a hooks refactor from the stripe docs on how to do this.
import useState at the top.
import React, {useState,} from 'react';
let see if we can hit the the post request from the front-end to the back-end. by adding this code.
a button underneath the < CardElement / >
<button onClick={submit}>Purchase</button>
add the boolean for completed transactions at the top of the functional component.
const [complete, setComplete] = useState(false)
here is the function to send the request to the backend
  const submit = async (ev) => {
    let {token} = await props.stripe.createToken({name: "Name"});


    await axios.post('/charge', {
          headers: {"Content-Type": "text/plain"},
          token: token.id,
          amount: "2000",
    }
  ).then(res => {
    if(res.status === 200) {
      console.log(res)
      setComplete(!complete)

      }
    })
    .catch(err => console.log(err))
  }
you can test the system by typing 42 for every number in the transaction like this.

if the payment was successful the complete boolean will be marked as correct and you will see it.

in part 2 we will show you how to make a production deploy to accept real money.


Top comments (1)
I've done everything exact as the article but I got this error:
Error: Please pass either 'apiKey' or 'stripe' to StripeProvider. If you're using 'stripe' but don't have a Stripe instance yet, pass 'null' explicitly.
Thanks.