C++ is a statically-typed general-purpose language middle-level programming language and superset of the C programming language used everywhere but mainly in systems programming and embedded systems. It's also used in making games with the Unreal engine.
In this article, I will show how to set up C++ Compiler with Visual Studio Code. I'm writing this tutorial because I didn't find tutorials with full information in a single place. So here are all the things I have collected from the Internet. I will cover the following things.
Table Of Contents
- Installing
c++ compilerandbuild-tools - Installing VSCode and C++ Extension for VSCode
- Setting up project directory
- Setting up
Makefileand adding C++ files -
Setting up VSCode
tasks.json - Setting up
gdbas Debugger
Prerequisites
- A C++ Compiler (like g++, clang, etc)
-
makebuild tool. - JSON know-how
- Visual Studio Code (you can get it here)
I will be using Linux Operating System If you are on Windows try this tutorial. For macOS, for the most part, It will be the same excluding the installing compiler part. You can check it here.
Let's get started.
Compiler and Build Tools Installation
I will be using GNU Compiler Collection so to install gcc, g++, gdb, and make. You can run the following command in the terminal if you using Ubuntu.
$ sudo apt install build-essential gdb
on Fedora, you can run
$ sudo yum install make gcc gcc-c++ kernel-devel
on Arch-based Linux, you can run
$ sudo pacman -Syu base-devel
Installing VSCode and C++ Extension
Instaling the VSCode is fairly simple, check out this website and check for instructions to install VSCode on your computer.
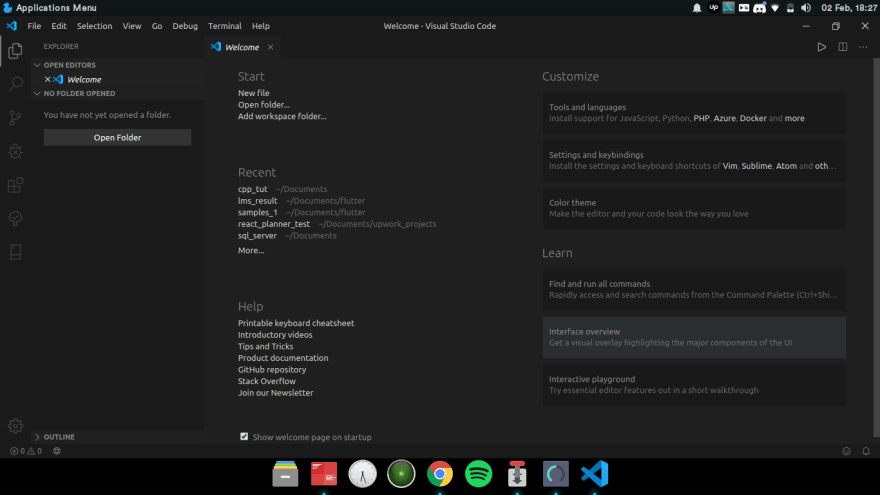
Once VSCode is installed, open it. You should see the following screen. It may differ because I have changed my theme and have several other extensions.
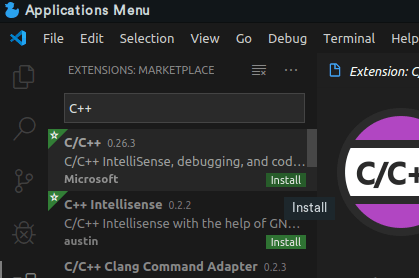
Now, to install C++ extension goto extensions from the activity bar.

Search for C++ in the search bar and install C/C++ Extension By Microsoft.
Now let's move to set up our project.
Setting Up Project Directory
Having a manageable directory structure is important. It can help you quickly understand where you should look for a file. I opted for the following structure because it is simple.
├── bin
├── include
└── src
The bin directory will contain the executable after compilation, the include directory will contain all the header files, src will contain all the (as you have guessed) source files.
Setting up Makefile and adding C++ files
Now that we have a directory structure let's write the Makefile. Open VSCode in your project directory. Before that, Let's see what is a Makefile.
Makefile is read by the make utility which executes the tasks defined in Makefile when the files are modified. We will be using it to build our C++ code. You can learn more about Makefile and make here.
For our purposes, following Makefile should work well. so create a Makefile in the root of your project directory. It should spell exactly the same with a capital M.
CXX       := g++
CXX_FLAGS := -std=c++17 -ggdb

BIN     := bin
SRC     := src
INCLUDE := include

LIBRARIES   :=
EXECUTABLE  := main


all: $(BIN)/$(EXECUTABLE)

run: clean all
    clear
    ./$(BIN)/$(EXECUTABLE)

$(BIN)/$(EXECUTABLE): $(SRC)/*.cpp
    $(CXX) $(CXX_FLAGS) -I$(INCLUDE) $^ -o $@ $(LIBRARIES)

clean:
    -rm $(BIN)/*
If you want to add additional libraries, you can add it after the LIBRARIES variable. You can also change the name of the executable by changing the EXECUTABLE variable. You can tinker with CXX_FLAGS to change the compiler's behavior (i.e. C++ version) but be sure you don't remove -ggdb flag or you won't be able to debug the program correctly.
After creating the file, our directory structure should look like this:
├── bin
├── include
├── lib
├── Makefile
└── src
Now that we have our base ready let's add some C++ files. I will create a HelloWorld class that has a say() function that will print out (you guessed it) "Hello, World". Let's create files in our project. I'm gonna use the command line, you can use VSCode or your file manager.
$ touch include/HelloWorld.hpp src/HelloWorld.cpp src/main.cpp
Paste the following code in the respective files.
Add following to HelloWorld.hpp.
#include <iostream>

class HelloWorld {
public:
 void say();
};
Add following to HelloWorld.cpp.
#include "HelloWorld.hpp"

void HelloWorld::say() {
 std::cout << "Hello, World";
}
Add following to main.cpp.
#include "HelloWorld.hpp"

int main() {
 HelloWorld world;
 world.say();
 return 0;
}
Testing our setup
Now, we have all our project all set up, we have added some test files. let's test everything out. Open a terminal in the project directory and run make.
~/Documents/cpp_tut
▶ make
g++ -std=c++17 -ggdb -Iinclude src/HelloWorld.cpp src/main.cpp -o bin/main
Now, in the output, we will say the exact command that we would have run if we weren't using make. make has got our back. We don't have to write the whole command each time.
Full explanation of this can be found here.
Setting up VSCode tasks.json
It is still a pain to open a terminal and type make to build our code. We can do better than that. For this, we will be using VSCode's task runner. With this, we can map VSCode's build keyboard shortcut to task by making it of type build. The easiest way to set up tasks is to press ctrl+shift+b. It runs the build task, but as we don't have any yet it will ask us to set up a build task. After pressing the button you should see the following.
Note: If you press the shortcut while a C++ file is open, you will see VSCode's default C++ build tasks. We don't want to use those. So, close the C++ and press the shortcut again

Select 'Configure Build task'

Select 'Create tasks.json from template'
Now, select 'Others'. Now you should see a file created, containing the following content.
{
    // See https://go.microsoft.com/fwlink/?LinkId=733558
    // for the documentation about the tasks.json format
    "version": "2.0.0",
    "tasks": [
        {
            "label": "echo",
            "type": "shell",
            "command": "echo Hello"
        }
    ]
}
tasks.json contains all the tasks that VSCode can run for us. In this case, I have created a task that runs a shell command echo Hello by default. Let's change it to make also change the label of the task to better explain the task.
{
    // See https://go.microsoft.com/fwlink/?LinkId=733558
    // for the documentation about the tasks.json format
    "version": "2.0.0",
    "tasks": [
        {
            "label": "build",
            "type": "shell",
            "command": "make",
            "group": {
                "kind": "build",
                "isDefault": true
            }
        }
    ]
}
I also added a property called group where I define what kind of task it is (i.e. build) and if it's default or not. Setting this is important for the build shortcut to run this task. Now try to build the code with ctrl+shift+b.
Setting up Problem Matcher
Problem matchers scan the task output text for known warning or error strings and report these inline in the editor and in the Problems panel. It supports GCC. So in the tasks.json file add the following in the under the "group" property.
"problemMatcher": "$gcc"
Now after running the build task, if any errors or warnings occur you will see them in the problems panel.
Setting up gdb as debugger
We have successfully built our code. Now we are going to configure debugger. To add configuration press F5, A menu will pop up asking you to choose which debugging solution you want to use. Select 'C/C++' and it will generate launch.json in your project directory containing the following config.
{
    // Use IntelliSense to learn about possible attributes.
    // Hover to view descriptions of existing attributes.
    // For more information, visit: https://go.microsoft.com/fwlink/?linkid=830387
    "version": "0.2.0",
    "configurations": [
        {
            "name": "(gdb) Launch",
            "type": "cppdbg",
            "request": "launch",
            "program": "enter program name, for example ${workspaceFolder}/a.out",
            "args": [],
            "stopAtEntry": false,
            "cwd": "${workspaceFolder}",
            "environment": [],
            "externalConsole": false,
            "MIMode": "gdb",
            "setupCommands": [
                {
                    "description": "Enable pretty-printing for gdb",
                    "text": "-enable-pretty-printing",
                    "ignoreFailures": true
                }
            ]
        }
    ]
}
We are almost done, here change the "program" property to ${workspaceFolder}/bin/main. Note that if you changed the executable name change main with the name you wrote in the Makefile. Now, press F5 after running the build, make sure the executable was generated, and resides in the path you just wrote in the "program" property.
There is one problem though, you always have to run build before pressing F5 for debugging. But, we can do better add the following in the launch.json after "setupCommands" property.
"preLaunchTask": "build"
This should run the task we defined before starting the debugger. Press F5 and voilà, Code builds and debugger starts.
I'm hoping this tutorial helped you. If you find any mistake or misinformation please let me know.
Happy coding!


Top comments (14)
I copy-pasted the Makefile content but when running make I was getting the error "mising separator. Stop".
I fixed adding a tab instead of spaces in lines 15, 16, 19 and 22:
run: clean all
[tab]clear
[tab]./$(BIN)/$(EXECUTABLE)
$(BIN)/$(EXECUTABLE): $(SRC)/*.cpp
[tab]$(CXX) $(CXX_FLAGS) -I$(INCLUDE) $^ -o $@ $(LIBRARIES)
clean:
[tab]-rm $(BIN)/*
Note: It woud be nice if the main.cpp file could be put in the root of the project folder, outside of src.
Great post by the way. I spent hours trying to compile in VS Code a multi file project before I seeing this.
Thanks!.
I'm glad you found a work-around, I copy-pasted the makefile from my project, so maybe tabs were removed.
If you want main.cpp in your root directory of your project. try this.
Thank you, I'm glad it helped.
I did the setup as mentioned but I keep getting the following error
Its' not for windows.
for me it always says:
make: The term "make" was not recognized as the name of a cmdlet, function, script file, or executable program. Check the spelling of the name or whether the path is correct (if included),
and repeat the process.
In line: 1 character: 1
You are using windows? or maybe PowerShell Core on Linux?
You need to install
makeon your System and you won't get error again.Thank you so much for this guide!
For anyone struggling with intellisense errors, just add a file called
c_cpp_properties.jsonin.vscode/with the following contents:Great guide!
But when setting up the ProblemMatcher, should it be added after the group {}, or as a field of the group
Thank you!
After the group, like this.
Thanks! Actually VSCodium complains if you do it wrongly, but thanks for taking the time! 😁
Really helpful, well said! One thing though
I notice there is a missing ',' in the tasks.json file needed after "command": "make"
Thank you. I'm glad that it helped.
Yeah I did a mistake, I'll fix it now.
Thank you Talha, it helped a lot !
Just one typo: "and voilà !"
("viola" means "raped" in French 😉)
You welcome. I'm glad it helped.
Sorry for the typo, I had no idea. I'll fix it right away.