Please reach out to me on Twitter @nathangloverAUS if you have follow up questions!
This post was originally written on DevOpStar. Check it out here
Kubeflow is a scalable ML platform that runs on Kubernetes which aims to make organization AI possible while maintaining quality of control.
In this post we will explore how to setup a production read Kubeflow cluster that leverages Amazon Cognito as its authentication provider
Requirments
- AWS CLI Setup and configured
- kubectl
  sudo curl --silent --location -o /usr/local/bin/kubectl https://amazon-eks.s3-us-west-2.amazonaws.com/1.14.6/2019-08-22/bin/linux/amd64/kubectl
  sudo chmod +x /usr/local/bin/kubectl
  sudo curl --silent --location -o /usr/local/bin/aws-iam-authenticator https://amazon-eks.s3.us-west-2.amazonaws.com/1.15.10/2020-02-22/bin/linux/amd64/aws-iam-authenticator
  sudo chmod +x /usr/local/bin/aws-iam-authenticator
  curl --silent --location "https://github.com/weaveworks/eksctl/releases/latest/download/eksctl_$(uname -s)_amd64.tar.gz" | tar xz -C /tmp
  sudo mv -v /tmp/eksctl /usr/local/bin
  curl --silent --location "https://github.com/kubeflow/kfctl/releases/download/v1.0.1/kfctl_v1.0.1-0-gf3edb9b_linux.tar.gz" | tar xz -C /tmp
  sudo mv -v /tmp/kfctl /usr/local/bin
Custom domain for use with Cognito. Must be registered (or at least delegated for use) through Route53 for this purpose of this guide
The demo repository: t04glovern/eks-kubeflow-demo
  git clone https://github.com/t04glovern/eks-kubeflow-demo.git
  cd eks-kubeflow-demo
Cognito
For the cognito portion of this guide we'll be making use of a pre-baked template by Eric Johnson that creates the entire backend provider from one CloudFormation template.
Run the following command from our project repo to deploy the stack.
aws cloudformation create-stack \
  --stack-name "eks-kubeflow-cognito" \
  --template-body file://eks-kubeflow-cognito.yaml \
  --capabilities CAPABILITY_IAM \
  --region us-west-2
Later in this tutorial you will need to retrieve the Cognito details from the CloudFormation stack. This is done by using the
aws cloudformation describe-stacksCLI command.
If you check the CloudFormation console under our new stack named eks-kubeflow-cognito you should see the following outputs.

With our Cognito stack setup it's time to setup our custom domain!
Domain Setup (ACM)
For the purpose of this guide we are going to be working exclusively out of us-west-2. Navigate to AWS Certificate Manager (ACM) in us-west-2 and begin the process of requesting a new public certificate.

In my case I'll be using the domain auth.devopstar.com however feel free to use something that makes sense for your use-case.
NOTE: This is the domain that will front your Kubeflow instance.

Click DNS validation unless you are comfortable handling Email validation. Then click through the rest of the process clicking Confirm and request.

Confirm the domain using DNS validation by clicking Create record in Route53. This process is only applicable if your domain is hosted in Route53. for alternative DNS providers you'll need to add these values yourself.

Before continuing to the next step, take note of the Certificate ARN. This is going to be important in a future step

In my case I've decided to export it as an environment variable using the following command (replaced with your own ARN).
export AWS_ACM_CERT_ARN=arn:aws:acm:us-west-2:XXXXXXXXXXXX:certificate/5cde2e53-8f1b-44c1-920b-6556dc868239
Domain Setup (Cognito)
Now that the certificate is validated, head over to the Amazon Cognito console in the us-west-2 region. Create a new custom domain, in this case I've used kubeflow-devopstar but you'll have to choice something that's unique.
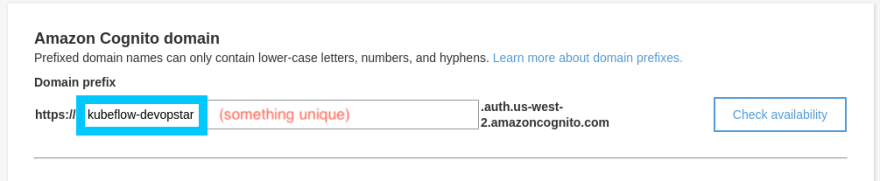
NOTE: You should also update the first line in
eks-kubeflow-install.shto match what you set in the field above. Do this now so you don't forget later.
# Add / replace this in eks-kubeflow-install.sh
export COGNITO_AUTH_DOMAIN=kubeflow-devopstar
It's also worth checking that:
- Enabled Identity Providers box is selected
- Cognito User Pool is checked

We can now move onto setting up our EKS cluster. Note that we will need to come back to update the callback URL for the cognito app later on in the tutorial.
EKS Setup
Create new EKS cluster using the eks config file (eks-kubeflow-cluster.yaml) in the demo repository.
eksctl create cluster -f eks-kubeflow-cluster.yaml
NOTE: This process will take upwards of 15 minutes. Go get a coffee ☕
Kubeflow
We're finally up to the fun part which is setting up and deploying Kubeflow to our EKS cluster. The following steps will take you through the process.
Setup
NOTE: Make sure you have set
AWS_ACM_CERT_ARNwith the certificate ARN from ACM
export AWS_ACM_CERT_ARN=arn:aws:acm:us-west-2:XXXXXXXXXXXX:certificate/5cde2e53-8f1b-44c1-920b-6556dc868239
Make changes to the Kubeflow configuration using the following commands.
source ./eks-kubeflow-install.sh

# Create the Kubeflow setup directory
mkdir -p ${KF_DIR} && cd ${KF_DIR}

# Download the config file
wget -O kfctl_aws.yaml $CONFIG_URI

# Replace existing info with your setup
sed -i -e 's/kubeflow-aws/'"$AWS_CLUSTER_NAME"'/' ${CONFIG_FILE}
sed -i "s@us-west-2@$AWS_REGION@" ${CONFIG_FILE}

# Update Node IAM roles
sed -i "s@eksctl-$AWS_CLUSTER_NAME-nodegroup-ng-a2-NodeInstanceRole-xxxxx@$AWS_CLUSTER_NODE_ROLE@" ${CONFIG_FILE}

# Cognito Details
sed -i "s@arn:aws:acm:us-west-2:xxxxx:certificate/xxxxxxxxxxxxx-xxxx@$AWS_ACM_CERT_ARN@" ${CONFIG_FILE}
sed -i "s@xxxxxbxxxxxx@$COGNITO_CLIENT_APP_ID@" ${CONFIG_FILE}
sed -i "s@arn:aws:cognito-idp:us-west-2:xxxxx:userpool/us-west-2_xxxxxx@$COGNITO_USER_POOL@" ${CONFIG_FILE}
sed -i "s@your-user-pool@$COGNITO_AUTH_DOMAIN@" ${CONFIG_FILE}
To check that things have worked open up the eks-kubeflow/kfctl_aws.yaml template and confirm you have a block similar to the following at the bottom (with your personal account ID present).
  plugins:
  - kind: KfAwsPlugin
    metadata:
      name: aws
    spec:
      auth:
        cognito:
          certArn: arn:aws:acm:us-west-2:xxxxxxxxxxxxx:certificate/5cde2e53-8f1b-44c1-920b-6556dc868239
          cognitoAppClientId: 4coatq7l46irmkacnohbgjpom2
          cognitoUserPoolArn: arn:aws:cognito-idp:us-west-2:xxxxxxxxxxxxx:userpool/us-west-2_Izsf6MKFn
          cognitoUserPoolDomain: kubeflow-devopstar
      region: us-west-2
      roles:
      - eksctl-eks-kubeflow-nodegroup-nod-NodeInstanceRole-1AV291G6VREQL
Deploy
It's time to deploy all the Custom resource definitions (CRDs) for Kubeflow and bring everything up. Change into the new EKS Kubeflow working directory and kick off the process of applying the config.
cd ${KF_DIR}
kfctl apply -V -f ${CONFIG_FILE}
During the process you can check the cluster status using the following command in another terminal window.
kubectl -n kubeflow get all
Once everything has settled down we can retrieve the cluster endpoint by running the following.
kubectl get ingress -n istio-system -o jsonpath='{.items[0].status.loadBalancer.ingress[0].hostname}'
# 82aa8b05-istiosystem-istio-2af2-1293882277.us-west-2.elb.amazonaws.com
Take this endpoint and construct the following variation of it with the OAuth format. Note that if you are using a custom domain for Kubeflow, now is the time to substitute it in place of the one you received from the command above.
https://${CLUSTER_ENDPOINT}/oauth2/idpresponse
# https://82aa8b05-istiosystem-istio-2af2-280604513.us-west-2.elb.amazonaws.com/oauth2/idpresponse
# OR
# https://auth.devopstar.com/oauth2/idpresponse
Back in the Cognito console under our App client settings, insert the callback URL we just constructed.

NOTE: Alternatively (and the way we are going to do it) you can set up the auth.devopstar.com domain to point to the ALB created Kubeflow. Head on over to Route53 and update the A records alias (for your equivalent of auth.devopstar.com)

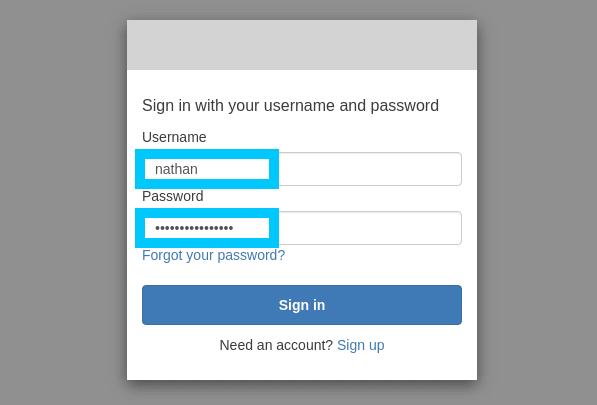
Now we will also need a demo user to work with, so go ahead and make a new one under the Users and groups tab in the User Pool settings.

Finally we can navigate to the cluster endpoint that you retrieved from the kubectl command, or your equivalent domain to auth.devopstar.com and you'll be able to login with Cognito authentication.
Get Started
Lets get started with our new instance of Kubeflow! Create the new namespace ekskubeflow for your user (this can be whatever you like though).

And to wrap things up, how about creating a new Notebook to test everything is working the way it should be.

Great job! Congratulations on setting up everything you need to get Cognito Authentication working with Kubeflow on EKS.
Cleanup
The clean up process for this stack is broken up into a couple different steps that need to be completed in order so that orphaned resources aren't left behind.
## Remove everything from the cluster
cd ${KF_DIR}
kfctl delete -V -f ${CONFIG_FILE}
NOTE: It is VERY important that you let the
kfctl deletecommand finish deleting all resources before removing your cluster. If you don't you might end up with left over resources that EKS cannot delete for you.
## Remove the cluster
### Run this from the root directory of the repo
eksctl delete cluster -f eks-kubeflow-cluster.yaml
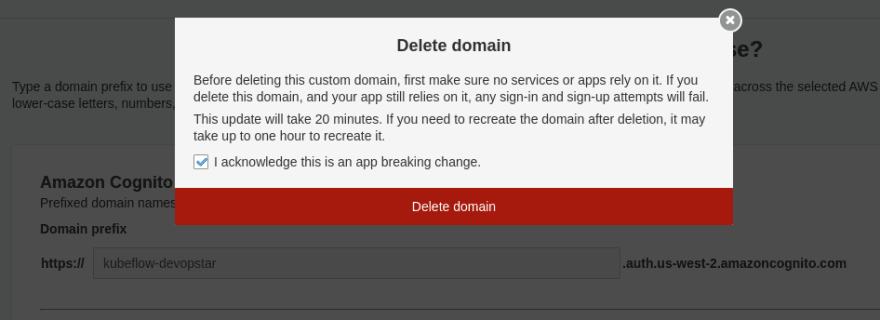
Before we can remove Cognito we must first remove the domain we created for it. This can be done in the same location where we set the domain.
# Remove CloudFormation stack for cognito
aws cloudformation delete-stack \
  --stack-name "eks-kubeflow-cognito" \
  --region us-west-2


Oldest comments (0)