We have all come across a few investment planning applications and webpages. Major portions of them include interactive sliders and a radial gauge to show the output, along with some text widgets.
To design a systematic investment plan (SIP) calculator, we need interactive widgets that provide a smooth UI and a rich set of customization options.
The Syncfusion Flutter Slider is a highly interactive UI widget. It allows users to select a value from a larger data set. It provides rich features, such as numeric and date-time labels, a thumb icon, ticks, dividers, and tooltips.
Our Flutter Radial Gauge is a data visualization widget. It displays numerical values on a circular scale. Its rich set of features, such as axes, ranges, pointers, and annotations, are fully customizable and extendable.
Let’s create an attractive systematic investment calculator using our Slider and Radial Gauge widgets.
Note: If you are new to our Flutter widgets, please refer to the Flutter Slider and Radial Gauge documentation to get started with them.
Creating an investment (SIP) calculator in Flutter
Follow these steps to create an investment (SIP) calculator in your Flutter application:
- Install and configure the Flutter widgets.
- Add and configure the Flutter Slider widget.
- Add the Radial Gauge widget to show results.
- Add text widgets to show results.
Step #1: Install and configure the Flutter widgets
- First, create a simple Flutter project using the instructions given in the Getting Started with your first Flutter app documentation.
- Then, add the Syncfusion Flutter Slider dependency in the pubspec.yaml file with the current version of the Syncfusion Flutter Sliders package. Refer to the following code.
dependencies:
flutter pub add syncfusion_flutter_sliders: ^xx.x.xx
- Now, import the Slider library using the following code.
import 'package:syncfusion_flutter_sliders/sliders.dart';
- Add the Syncfusion Flutter Gauges dependency in the pubspec.yaml file with the current version of the Syncfusion Flutter Gauges package. Refer to the following code.
dependencies:
flutter pub add syncfusion_flutter_gauges: ^xx.x.xx
- Now, import the Gauges library using the following code.
import 'package:syncfusion_flutter_gauges/gauges.dart';
Step #2: Add and configure the Flutter Slider wdget
We are going to render the Slider widget to get the initial investment data and a text field to display the selected value.

Default slider
The following code explains how to render a default Slider widget in your application.
double _value = 0.5;

@override
Widget build(BuildContext context) {
  return Scaffold(
    body: Center(
      child: SfSlider(
        value: _value,
        onChanged: (dynamic newValue){
          setState(() {
            _value = newValue;
          });
        },
      ),
    ),
  );
}

Customize Slider appearance
There are plenty of customization options available in our Flutter Slider widget. We are going to set the size and color of this slider. We will define the minimum and maximum values for the investment option, too.
Refer to the following code example.
SfSliderTheme(
         data: SfSliderThemeData(
           activeTrackHeight: 5,
           inactiveTrackHeight: 5,
           activeTrackColor: const Color(0xff00d09c),
           inactiveTrackColor: Colors.black12,
           thumbColor: Colors.white,
           trackCornerRadius: 0,
           thumbRadius: 15,
         ),
         child: SfSlider(
           min: 500,
           max: 100000,
           // We will change this value later
           value: 800,
         ),
 )

Add the slider values to the text field
Next, add the slider values to the text field like in the following code example.
NumberFormat decimalFormat = NumberFormat.decimalPattern('en_us');
double _monthlyInvestment = 500;
_controller.text = '\$' + decimalFormat.format(_monthlyInvestment.floor());
TextField(
              controller: _controller,
              decoration: const InputDecoration(
              fillColor: Color(0xffe5faf5),
              filled: true,
              contentPadding: EdgeInsets.all(15),
              border: OutlineInputBorder(
                                borderSide: BorderSide.none
                               ),
                          ),
              style: const TextStyle(
                      fontSize: 17,
                      fontWeight: FontWeight.bold,
                      color: Colors.green
              ),
),
SfSlider(
        min: 500,
        max: 100000,
        value: _monthlyInvestment,
),

Then, use the onChanged callback to dynamically change the text field.
Refer to the following code example.
final TextEditingController _controller = TextEditingController();
TextField(
              controller: _controller,
              decoration: const InputDecoration(
              fillColor: Color(0xffe5faf5),
              filled: true,
              contentPadding: EdgeInsets.all(15),
              border: OutlineInputBorder(
                                borderSide: BorderSide.none
                               ),
                          ),
              style: const TextStyle(
                         fontSize: 17,
                         fontWeight: FontWeight.bold,
                         color: Colors.green
          ),
),
SfSlider(
        min: 500,
        max: 100000,
        value: _monthlyInvestment,
        onChanged: (dynamic value) {
            setState(() {
               _monthlyInvestment = value;
               _controller.text = '\$' + decimalFormat.format(_monthlyInvestment.floor());
             });
          }
)
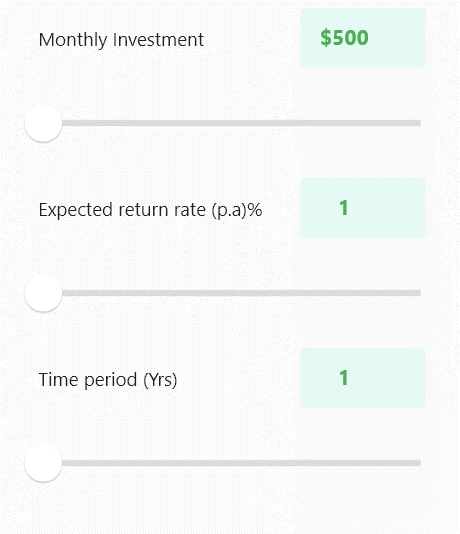
Create other sliders
For this application, we need to add two more Slider widgets for the expected return rate and time period. Repeat the previous steps to render these sliders. After adding all the sliders, the UI will look like the following GIF image.
Step #3: Add the Flutter Radial Gauge widget to show the results
Now, add the Flutter Radial Gauge widget and show the Sliders’ values in it.
Refer to the following code example.
SfRadialGauge(
            axes: <RadialAxis>[
              RadialAxis(
                minimum: 0,
                maximum: 30,
                useRangeColorForAxis: true,
                startAngle: 270,
                endAngle: 270,
                showLabels: false,
                showTicks: false,
                axisLineStyle: const AxisLineStyle(
                    thicknessUnit: GaugeSizeUnit.factor,
                    thickness: 0.35,
                    color: Color(0xFF98a4ff)),
                ranges: <GaugeRange>[
                  GaugeRange(
                      startValue: 0,
                      endValue: 17,
                      color: const Color(0xFF98a4ff),
                      sizeUnit: GaugeSizeUnit.factor,
                      startWidth: 0.35,
                      endWidth: 0.35),
                  GaugeRange(
                      // This will update the gauge based on returns.
                      startValue: _expectedReturnRate,
                      endValue: 30,
                      sizeUnit: GaugeSizeUnit.factor,
                      color: const Color(0xFF5367ff),
                      startWidth: 0.35,
                      endWidth: 0.35),
                ],
              ),
            ],
          ),

Step #4: Add labels to show the results
So, the major UI part is done. Now, we create labels to show the results from our data visualization widgets. This is just a business logic that involves simple calculations.
For more details, check the Flutter SIP Calculator project.
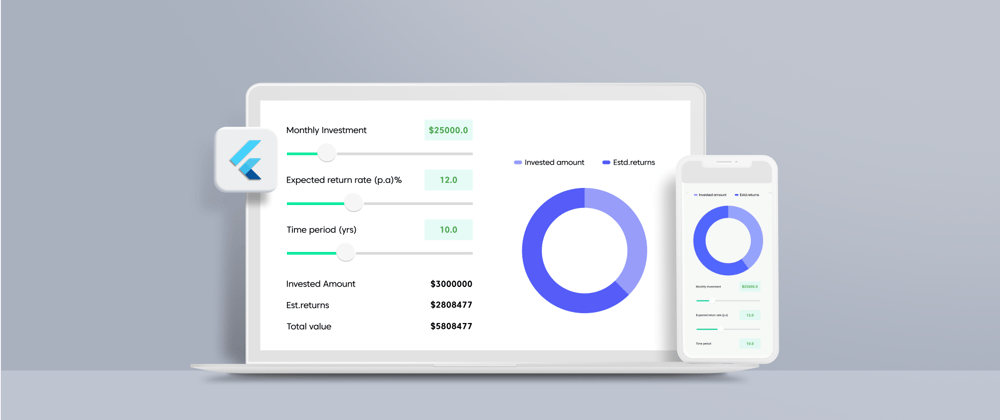
Once done, the web UI will look like the following GIF image.

The mobile layout will look like the following GIF image.
Conclusion
Thanks for reading! I hope this post was useful and you enjoyed creating a SIP calculator in your app using Syncfusion Flutter widgets.
Try out the steps in this blog post and easily estimate your investment returns with an elegant user experience!
Browse our documentation to learn more about our other Flutter widgets. You can also see our Syncfusion Flutter app with many examples in this GitHub repo. Don’t miss our demo app in Google Play, App Store, Web, Windows Store, macOS, and Snapcraft (Linux).
If you aren’t a customer yet, you can try our 30-day free trial to check out these features.
You can contact us through our support forum, feedback portal, or support tickets. We are always happy to assist you!


Top comments (0)