
In this article, we will learn how to create a form in a Blazor WebAssembly (WASM) app. We will create a student registration form as an example. This form will support built-in client-side validations with the help of data annotations. We will also implement a custom client-side validator for the form. Along with the client-side validator, we will also add a custom form validator component for business logic validation in the Blazor WASM app.
Prerequisites
You can use either of the following two approaches to work on a Blazor app:
- .NET CLI and Visual Studio Code: Preferred for Linux.
- Visual Studio 2019: Preferred for Windows and macOS.
In this tutorial, we are going to use Visual Studio 2019. Please install the latest version of Visual Studio 2019. While installing, make sure you have selected the ASP.NET and web development workload.
Creating the Blazor WebAssembly application
First, we are going to create a Blazor WebAssembly app. To do so, please follow these steps:
- Open Visual Studio 2019 and click on the *Create a new Project * option.
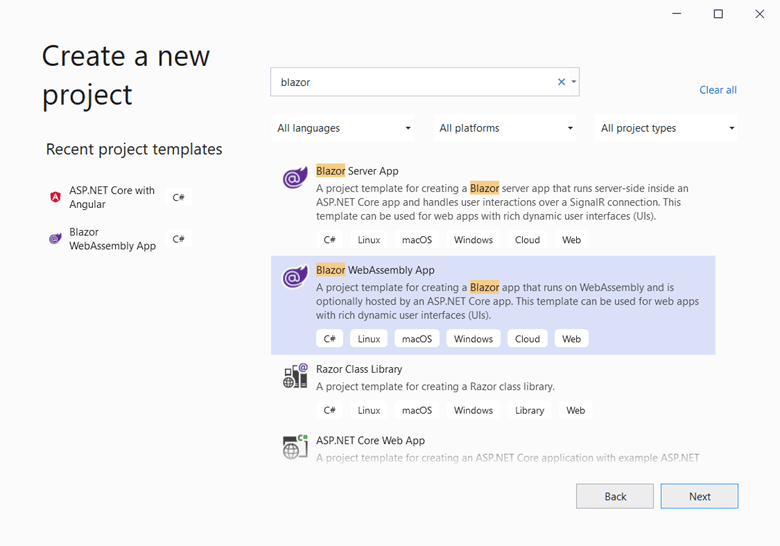
- In the Create a new Project dialog that opens, search for Blazor and select Blazor WebAssembly App from the search results. Then, click Next.
Refer to the following image.
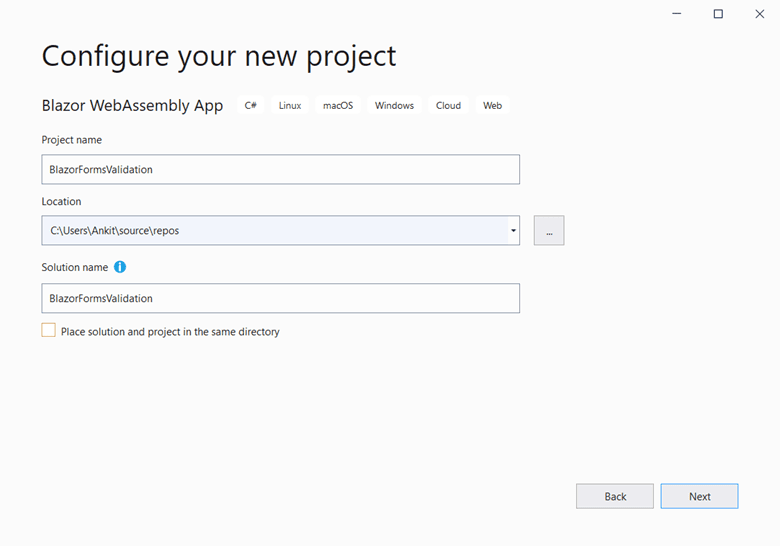
- Now you will be at the Configure your new project dialog. Provide the name for your application. Here, we are naming the application BlazorFormsValidation. Then, click Next. Refer to the following image.
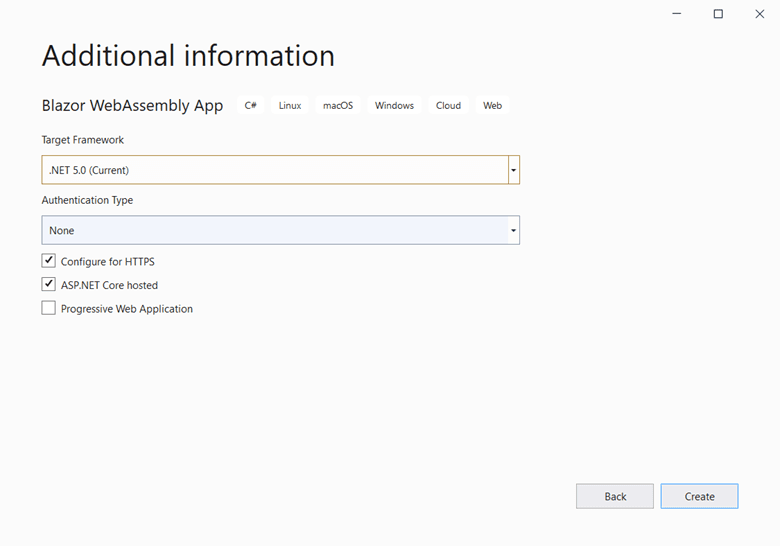
- On the Additional information page, select the target framework .NET 5.0 and set the authentication type to None. Also, check the options Configure for HTTPS and ASP.NET Core hosted , and then click on Create. Refer to the following image.
Now, we have created our Blazor WebAssembly project. Let’s create the form and include form validation in this Blazor app.
Create the Model
Let’s add a new folder named Models inside the BlazorFormsValidation.Shared project. Add a new class file and name it StudentRegistration.cs in the Models folder. Then, include the following code inside the class.
using System.ComponentModel.DataAnnotations;

namespace BlazorFormsValidation.Shared.Models
{
    public class StudentRegistration
    {
        [Required]
        [Display(Name = "First Name")]
        public string FirstName { get; set; }

        [Required]
        [Display(Name = "Last Name")]
        public string LastName { get; set; }

        [Required]
        [EmailAddress]
        public string Email { get; set; }

        [Required]
        public string Username { get; set; }

        [Required]
        [RegularExpression(@"^(?=.*?[A-Z])(?=.*?[a-z])(?=.*?[0-9]).{8,}$",
            ErrorMessage = "Password should have minimum 8 characters, at least 1 uppercase letter, 1 lowercase letter and 1 number.")]
        public string Password { get; set; }

        [Required]
        [Display(Name = "Confirm Password")]
        [Compare("Password", ErrorMessage = "The password and confirm password fields do not match.")]
        public string ConfirmPassword { get; set; }

        [Required]
        public string Gender { get; set; }
    }
}
Now, we have created the class StudentRegistration and annotated all the properties with the [Required] attribute. The [Display] attribute is used to specify the display name for the class properties.
Create a Custom form validation attribute
A custom form validation attribute will allow us to associate the validation logic to a model property in a Blazor app. Here, we are going to attach a custom validation to the Username property of the StudentRegistration class. This custom validator will restrict the use of the word admin in the username field.
Add a new class file called UserNameValidation.cs inside the Models folder in the BlazorFormsValidation.Shared folder. Then, add the following code inside the file.
using System.ComponentModel.DataAnnotations;

namespace BlazorFormsValidation.Shared.Models
{
    class UserNameValidation : ValidationAttribute
    {
        protected override ValidationResult IsValid(object value, ValidationContext validationContext)
        {
            if (!value.ToString().ToLower().Contains("admin"))
            {
                return null;
            }

            return new ValidationResult("The UserName cannot contain the word admin",
                new[] { validationContext.MemberName });
        }
    }
}
In the above code, we have added the UserNameValidation class, which is derived from an abstract class, ValidationAttribute. Also, we have overridden the IsValid method of the ValidationAttribute class.
If the validation is successful, i.e. the value in the field does not contain the word admin , the IsValid method will return null.
If the validation fails, the IsValid method will return an object of type ValidationResult. This object has two parameters:
- The error message to be displayed on the UI.
- The field associated with this error message.
Now, update the StudentRegistration class by decorating the Username property with the custom UserNameValidation attribute.
Refer to the following code example.
public class StudentRegistration
{
    // Other properties

    [Required]
    [UserNameValidation]
    public string Username { get; set; }

    // Other properties
}
Add the student controller
Now, add a new controller to our application. To do so, follow these steps:
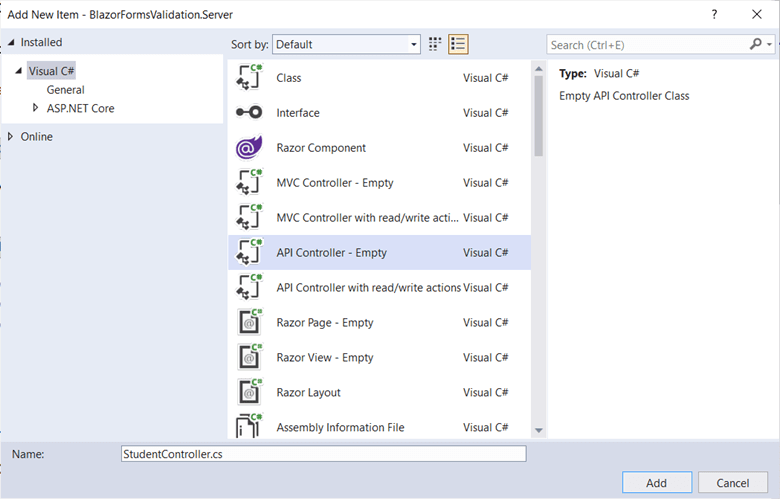
- Right-click on the BlazorFormsValidation.Server\Controllers folder and select the Add -> New Item option.
The Add New Item dialog box will appear. Select the Visual C# option from the left panel. Then, select the API Controller-Empty option from the templates panel and provide the name StudentController.cs. Click Add.
Refer to the following image.
Then, include the following code inside the controller.
using BlazorFormsValidation.Shared.Models;
using Microsoft.AspNetCore.Mvc;
using System.Collections.Generic;

namespace BlazorFormsValidation.Server.Controllers
{
    [Route("api/[controller]")]
    [ApiController]
    public class StudentController : ControllerBase
    {
        readonly List<string> userNameList = new();

        public StudentController()
        {
            userNameList.Add("ankit");
            userNameList.Add("vaibhav");
            userNameList.Add("priya");
        }

        [HttpPost]
        public IActionResult Post(StudentRegistration registrationData)
        {
            if (userNameList.Contains(registrationData.Username.ToLower()))
            {
                ModelState.AddModelError(nameof(registrationData.Username), "This User Name is not available.");
                return BadRequest(ModelState);
            }
            else
            {
                return Ok(ModelState);
            }
        }
    }
}
In the above code, we have created a list and initialized it in the constructor to store three dummy username values.
The Post method will accept an object of type StudentRegistration as the parameter. We will check if the username provided with the object already exists in the userNameList.
If the username already exists, then we will add the error message to the model state and return a bad request from the method. If the username is available, then we will return the Ok response from the method.
Note: For the simplicity of this blog, we are verifying the availability of the username against a list of static values. However, in an ideal scenario, we should check this against a database.
Create a custom form validator component for business logic validation
In the previous section, we added business logic to restrict the use of duplicate values for the username field. Now, we are going to add a custom validator component in the client project to display the error message on the UI.
Add a new class inside the BlazorFormsValidation.Client\Shared folder and name it CustomFormValidator.cs. Then, add the following code inside this file.
using Microsoft.AspNetCore.Components;
using Microsoft.AspNetCore.Components.Forms;
using System;
using System.Collections.Generic;

namespace BlazorFormsValidation.Client.Shared
{
    public class CustomFormValidator : ComponentBase
    {
        private ValidationMessageStore validationMessageStore;

        [CascadingParameter]
        private EditContext CurrentEditContext { get; set; }

        protected override void OnInitialized()
        {
            if (CurrentEditContext == null)
            {
                throw new InvalidOperationException(
                    $"{nameof(CustomFormValidator)} requires a cascading parameter of type {nameof(EditContext)}.");
            }

            validationMessageStore = new ValidationMessageStore(CurrentEditContext);

            CurrentEditContext.OnValidationRequested += (s, e) =>
                validationMessageStore.Clear();
            CurrentEditContext.OnFieldChanged += (s, e) =>
                validationMessageStore.Clear(e.FieldIdentifier);
        }

        public void DisplayFormErrors(Dictionary<string, List<string>> errors)
        {
            foreach (var err in errors)
            {
                validationMessageStore.Add(CurrentEditContext.Field(err.Key), err.Value);
            }

            CurrentEditContext.NotifyValidationStateChanged();
        }

        public void ClearFormErrors()
        {
            validationMessageStore.Clear();
            CurrentEditContext.NotifyValidationStateChanged();
        }
    }
}
The custom validator component will support form validation in a Blazor app by managing a ValidationMessageStore for a form’s EditContext. The CustomFormValidator component is inherited from the ComponentBase class.
The form’s EditContext is a cascading parameter of the component. The EditContext class is used to hold the metadata related to a data editing process, such as flags to indicate which fields have been modified and the current set of validation messages. When the validator component is initialized, a new ValidationMessageStore will be created to maintain the current list of form errors.
The message store receives errors when we invoke the DisplayFormErrors method from our registration component. Then, the errors will be passed to the DisplayFormErrors method in a dictionary. In the dictionary, the Key is the name of the form field that has one or more errors. The Value is the error list.
The error messages will be cleared if a field changes in the form when the OnFieldChanged event is raised. In this case, only the errors for that field alone are cleared. If we manually invoke the ClearFormErrors method, then all the errors will be cleared.
Creating the registration component
Let’s add a new Blazor component inside the BlazorFormsValidation.Client\Pages folder. This component will allow us to register a new student record.
Add the Registration.razor file to the BlazorFormsValidation.Client\Pages folder. Also, add a base class file Registration.razor.cs to the Pages folder.
Then, include the following code inside the Registration.razor.cs file.
using BlazorFormsValidation.Client.Shared;
using BlazorFormsValidation.Shared.Models;
using Microsoft.AspNetCore.Components;
using Microsoft.Extensions.Logging;
using System;
using System.Collections.Generic;
using System.Net;
using System.Net.Http;
using System.Net.Http.Json;
using System.Threading.Tasks;

namespace BlazorFormsValidation.Client.Pages
{
    public class RegistrationModalBase : ComponentBase
    {
        [Inject]
        HttpClient Http { get; set; }

        [Inject]
        ILogger<StudentRegistration> Logger { get; set; }

        protected StudentRegistration registration = new();

        protected CustomFormValidator customFormValidator;

        protected bool isRegistrationSuccess = false;

        protected async Task RegisterStudent()
        {
            customFormValidator.ClearFormErrors();
            isRegistrationSuccess = false;
            try
            {
                var response = await Http.PostAsJsonAsync("api/Student", registration);
                var errors = await response.Content.ReadFromJsonAsync<Dictionary<string, List<string>>>();

                if (response.StatusCode == HttpStatusCode.BadRequest && errors.Count > 0)
                {
                    customFormValidator.DisplayFormErrors(errors);
                    throw new HttpRequestException($"Validation failed. Status Code: {response.StatusCode}");
                }
                else
                {
                    isRegistrationSuccess = true;
                    Logger.LogInformation("The registration is successful");
                }

            }
            catch (Exception ex)
            {
                Logger.LogError(ex.Message);
            }
        }
    }
}
In the above code, we have:
- Declared a base class for the component RegistrationModalBase.
- Injected the HttpClient which will allow us to make HTTP calls to the API endpoints.
- Injected the ILogger interface which allows us to log the messages on the browser console.
- Added the object registration of type StudentRegistration with which to store the values entered by the user in the form.
- Created the RegisterStudent method and invoked the ClearFormErrors method of our custom validators to clear out any existing form errors.
- Made a Post request to our API endpoint and passed the registration object to it.
If the response code contains BadRequest or the error count is more than zero, invoke the DisplayFormErrors method of the custom validator to display the error on the UI. The method will then throw a HttpRequestException. The catch block will handle the exception and the logger will log the error on the console.
If there is no error response from the API, it will set the Boolean flag isRegistrationSuccess to true and log a success message on the console.
Then, include the following code inside the Registration.razor file.
@page "/register"
@inherits RegistrationModalBase

<div class="row justify-content-center">
    <div class="col-md-10">
        <div class="card mt-3 mb-3">
            <div class="card-header">
                <h2>Student Registration</h2>
            </div>
            <div class="card-body">
                @if (isRegistrationSuccess)
                {
                    <div class="alert alert-success" role="alert">Registration successful</div>
                }

                <EditForm Model="@registration" OnValidSubmit="RegisterStudent">
                    <DataAnnotationsValidator />
                    <CustomFormValidator @ref="customFormValidator" />

                    <div class="form-group row">
                        <label class="control-label col-md-12">First Name</label>
                        <div class="col">
                            <InputText class="form-control" @bind-Value="registration.FirstName" />
                            <ValidationMessage For="@(() => registration.FirstName)" />
                        </div>
                    </div>

                    <div class="form-group row">
                        <label class="control-label col-md-12">Last Name</label>
                        <div class="col">
                            <InputText class="form-control" @bind-Value="registration.LastName" />
                            <ValidationMessage For="@(() => registration.LastName)" />
                        </div>
                    </div>

                    <div class="form-group row">
                        <label class="control-label col-md-12">Email</label>
                        <div class="col">
                            <InputText class="form-control" @bind-Value="registration.Email" />
                            <ValidationMessage For="@(() => registration.Email)" />
                        </div>
                    </div>

                    <div class="form-group row">
                        <label class="control-label col-md-12">User Name</label>
                        <div class="col">
                            <InputText class="form-control" @bind-Value="registration.Username" />
                            <ValidationMessage For="@(() => registration.Username)" />
                        </div>
                    </div>

                    <div class="form-group row">
                        <label class="control-label col-md-12">Password</label>
                        <div class="col">
                            <InputText type="password" class="form-control" @bind-Value="registration.Password"></InputText>
                            <ValidationMessage For="@(() => registration.Password)" />
                        </div>
                    </div>

                    <div class="form-group row">
                        <label class="control-label col-md-12">Confirm Password</label>
                        <div class="col">
                            <InputText type="password" class="form-control" @bind-Value="registration.ConfirmPassword"></InputText>
                            <ValidationMessage For="@(() => registration.ConfirmPassword)" />
                        </div>
                    </div>

                    <div class="form-group row">
                        <label class="control-label col-md-12">Gender</label>
                        <div class="col">
                            <InputSelect class="form-control" @bind-Value="registration.Gender">
                                <option value="-- Select City --">-- Select Gender --</option>
                                <option value="Male">Male</option>
                                <option value="Female">Female</option>
                            </InputSelect>
                            <ValidationMessage For="@(() => registration.Gender)" />
                        </div>
                    </div>

                    <div class="form-group" align="right">
                        <button type="submit" class="btn btn-success">Register</button>
                    </div>
                </EditForm>
            </div>
        </div>
    </div>
</div>
In the template page of the component, we have defined the route of the component as /register. Here, we are using a Bootstrap card to display the registration component.
The EditForm component is used to build a form. The Blazor framework also provides built-in form input components such as InputText, InputSelect, InputDate, InputTextArea, InputCheckbox, and so on. We use the Model attribute to define a top-level model object for the form. The method RegisterStudent will be invoked on the valid submission of the form.
The DataAnnotationsValidator component is used to validate the form using the data annotations attributes on the Model class that is bound to the form. To use the custom validator component in the form, provide the validator name as the tag name and provide the reference of the local variable to the @ref attribute.
We are using the InputText component to display a text box in the form. The InputSelect component is used to display the drop-down list to select the gender value. To bind the modal property with the form fields, we use the bind-Value attribute. The ValidationMessage component is used to display the validation message below each field in the Blazor Form.
Adding the navigation link to our component
Before executing the application, we have to add the navigation link to our component in the navigation menu. To do so, open the BlazorFormsValidation.Client\Shared\NavMenu.razor file and add the following navigation link in it:
<li class="nav-item px-3">
    <NavLink class="nav-link" href="register">
        <span class="oi oi-list-rich" aria-hidden="true"></span> Register
    </NavLink>
</li>
Executing the demo
Now, launch the application. Click the Register button in the navigation menu on the left. Then, you will get the output like in the following .gif image.

Thus, we have created the form and included form validation in our Blazor WASM app.
Resource
Also, you can get the source code of the sample from the Form Validation in Blazor demo on GitHub.
Summary
Thanks for reading! In this blog, we learned how to create form and implement form validation with an example of a student registration form in a Blazor WebAssembly app. We implemented the built-in client-side validations to the form with the help of data annotations. We also implemented custom validators to support custom client-side and business logic validation in the form of the Blazor WASM app. Try out this demo and let us know what you think in the comments section!
Syncfusion’s Blazor suite offers over 65 high-performance, lightweight, and responsive UI components for the web—including file-format libraries—in a single package. Use them to build charming web applications!
Also, you can contact us through our support forums, Direct-Trac, or feedback portal. We are always happy to assist you!


Top comments (0)