
Learning and sharing are the best ways to gain expertise in any field. With this in mind, I am going to share one of the features that I learned how to use at the NG-Conf Hardwired, an online Angular conference. This conference was very well organized and was quite successful. I fully enjoyed the three days of the event with so many interesting discussions on Angular 9 and 9.1 features.
At the event, the Angular core team presented over 30 topics. In this blog, though, I want to focus on walking you through the details of one of the most interesting, the Angular Firebase feature, and how to use it with Syncfusion’s JS 2 DataGrid.
Firebase
Firebase is a Google product and it is a real-time NoSQL cloud database. It helps in building apps without the backend. So, you can save and retrieve JSON objects, build user authentication, and get data updates in real-time across connected devices in milliseconds. The data will remain available even if the app goes offline, providing a great user experience regardless of network connectivity.
AngularFire
AngularFire is the official Angular library for Firebase. This library combines the power of Angular, Firebase, and RxJS to act as the serverless backend. It includes modules for the Realtime Database and Firebase Authentication, and Cloud Firestore has recently been added to the list.
AngularFire provides connections to the following Firebase services:
- Observable base: Uses the power of RxJS, Angular, and Firebase.
- Realtime bindings: Synchronizes data in real time.
- Authentication: Logs users in with a variety of providers and monitors authentication state.
- Offline data: Stores data offline automatically with AngularFirestore.
- Server-side render: Generates static HTML to boost perceived performance.
- ngrx-friendly: Easily integrate with ngrx using AngularFire’s action-based APIs.
- Manage binary data: Upload, download, and delete binary files like images, videos, and other blobs.
- Call server code: Directly call serverless cloud functions with user context automatically passed.
- Push notifications: Registers and listens for push notifications.
- Modular: Include only what’s needed. No AngularFire package is above 4KB, with most packages under 2KB (gzipped).
Installation of AngularFire2 and integration with Syncfusion’s DataGrid
Step 1: Create a new project.
npm install -g @angular/cli
ng new <project-name>
cd <project-name>
The Angular CLI’s new command will set up the latest Angular build in the new project structure.
Step 2: Install AngularFire2 and Firebase.
Now, we have a new project setup, installed with AngularFire2 and Firebase from npm.
Step 3: Configure Firebase.
Open /src/environments/environment.ts and configure Firebase. You can find your project configuration in the Firebase Console.
export const environment = {
  production: false,
  firebase: {
    apiKey: '<your-key>',
    authDomain: '<your-project-authdomain>',
    databaseURL: '<your-database-URL>',
    projectId: '<your-project-id>',
    storageBucket: '<your-storage-bucket>',
    messagingSenderId: '<your-messaging-sender-id>'
  }
};
From the project overview page, click Add Firebase to your web app to see the details, as shown in the following screenshot*.  *
*
Step 4: Set up app.module for the AngularFireModule.
Open /src/app/app.module.ts and inject the Firebase providers. Specify your Firebase configuration.
import { BrowserModule } from '@angular/platform-browser';
import { NgModule } from '@angular/core';
import { AppRoutingModule } from './app-routing.module';
import { AppComponent } from './app.component';
import { AngularFireModule } from 'angularfire2';
import { AngularFireDatabaseModule } from 'angularfire2/database';
import { environment } from './../environments/environment';
import { GridModule } from '@syncfusion/ej2-angular-grids';

@NgModule({
  declarations: [
    AppComponent
  ],
  imports: [
    BrowserModule,
    AppRoutingModule,
    AngularFireModule.initializeApp(environment.firebase),
    AngularFireDatabaseModule,
    GridModule
  ],
  providers: [],
  bootstrap: [AppComponent]
})
export class AppModule { }
Step 5: Inject AngularFirestore.
Open /src/app/app.component.ts and add the following code example.
import { Component } from '@angular/core';
import { AngularFireDatabase } from 'angularfire2/database;

@Component({
  selector: 'app-root',
  templateUrl: 'app.component.html',
  styleUrls: ['app.component.css']
})
export class AppComponent {
  constructor(firestore: AngularFireDatabase) {

  }
}
Step 6: Install EJ2 Grid package
Use the following getting started documentation to configure the (EJ2) Grid to the Angular application.
https://ej2.syncfusion.com/angular/documentation/grid/getting-started/
Step 7: Bind Firestore data to JS 2 Grid
Bind Firestore data to the JS 2 Grid in the component.ts in this location /src/app/app.component.ts:
import { Component, ViewChild } from '@angular/core';
import { AngularFireDatabase } from 'angularfire2/database';
import { GridComponent } from '@syncfusion/ej2-angular-grids';
@Component({
  selector: 'app-root',
  templateUrl: './app.component.html',
  styleUrls: ['./app.component.css']
})
export class AppComponent {

  @ViewChild('grid')
  public grid: GridComponent;

  constructor(firestore: AngularFireDatabase) {

    firestore.list('/orders').valueChanges().subscribe(orders => {
      this.grid.dataSource = orders;   //intial data binding to grid
    });

    firestore.list('/orders').snapshotChanges().subscribe(orders => {
      this.grid.dataSource = orders; // sync server data changes to grid
    });
  }
}
Open /src/app/app.component.html and add the following code.
<ejs-grid #grid>
  <e-columns>
      <e-column field='OrderID' headerText='Order ID' width='120' textAlign='Right'></e-column>
      <e-column field='CustomerName' headerText='Customer Name' width='150'></e-column>
      <e-column field='Freight' headerText='Freight' width='120' format='C2' textAlign='Right'></e-column>
      <e-column field='ShipCity' headerText='Ship City' width='130'></e-column>
      <e-column field='ShipCountry' headerText='Ship Country' width='150'></e-column>
  </e-columns>
</ejs-grid>
Step 8: Run your app locally.
Run the application locally using the following command.
ng serve
Now, your Angular app will compile and will be served locally, as shown in the following screenshot. 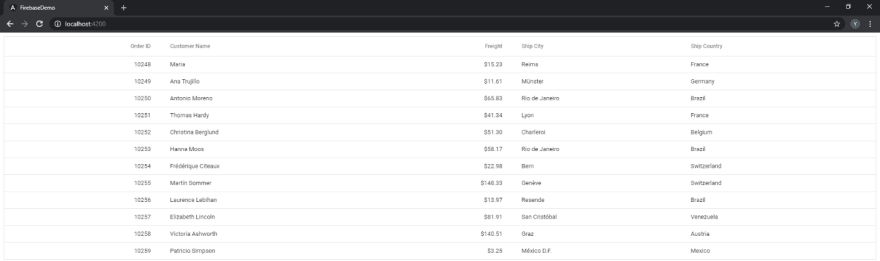
Resource
You can download this application from this GitHub location.
Conclusion
In this blog, we have learned about the installation of AngularFire2 and its integration with our JS 2 Grid. I hope it was helpful. Please share your feedback in the comments section.
For Angular developers, Syncfusion provides over 65+ high-performance, lightweight, modular, and responsive Angular components to speed up your development.
If you are already a customer, you can download our Angular package from the License and Downloads page. If you are not yet a customer, you can try our 30-day free trial to check out all our Angular components have to offer. You can also explore samples in our GitHub repository.
If you have any questions about this blog, please let us know in the comments section below. You can also contact us through our support forum, Direct-Trac, or feedback portal. We are always happy to assist you!
The post Binding a Firebase Data Source to Grid Using AngularFire2 appeared first on Syncfusion Blogs.


Top comments (0)