
The Syncfusion .NET Excel Library (XlsIO) allows users to easily protect and unprotect from Excel files in C# and VB.NET with a variety of customization options. As a result, you can prevent unnecessary data loss or modifications to your Excel worksheets while also making them available to others with limited access. You can also use these features to protect a range of data that needs to be secured in a large Excel file.
In this blog post, we will see how to protect and unprotect Excel files using the various protection options available in our Excel Library with code examples.
Note: If you are new to our .NET Excel Library, it is highly recommended that you follow our Getting Started guide.
The .NET Excel Library provides the following protection options:
Let’s explore them!
Open as read-only
The open in read-only mode in XlsIO provides only read access for the data in the Excel file. With this feature, we can restrict other users from editing the data. When you open a read-only Excel document, a message will appear to indicate this mode.
Refer to the following image.

Refer to the following code to make an Excel document read-only.
using (ExcelEngine excelEngine = new ExcelEngine())
{
    IApplication application = excelEngine.Excel;

    FileStream input = new FileStream("../../../Data/InputData.xlsx", FileMode.Open, FileAccess.ReadWrite);

    //Open the Excel document.
    IWorkbook workbook = application.Workbooks.Open(input);

    //Set Read only.
    workbook.ReadOnlyRecommended = true;

    FileStream output = new FileStream("../../../Output/ReadOnlyOutput.xlsx", FileMode.Create, FileAccess.ReadWrite);

    //Save the document.
    workbook.SaveAs(output);
}
Protect specific sheets
You may come across situations where a specific worksheet needs to be protected in an Excel document. In such cases, you can protect one or more worksheets with a password along with a variety of customizations using our XlsIO library. Before getting into the customization options, we need to learn about locked cells in a worksheet.
Locked cells
By default, all cells in a protected worksheet will be locked. Locked cells in a protected sheet cannot be edited. To edit the locked cells in a protected worksheet, we need unlock specific cells.
Refer to the following code to unlock a specific cell in a protected worksheet.
using (ExcelEngine excelEngine = new ExcelEngine())
{
    IApplication application = excelEngine.Excel;

    FileStream input = new FileStream("../../../Data/InputData.xlsx", FileMode.Open, FileAccess.ReadWrite);

    //Open the Excel document.
    IWorkbook workbook = application.Workbooks.Open(input);

    IWorksheet worksheet = workbook.Worksheets[0];

    //Unlock cell.
    worksheet["A1"].CellStyle.Locked = false;

    FileStream output = new FileStream("../../../Output/LockedCells.xlsx", FileMode.Create, FileAccess.ReadWrite);

    //Save the modified document.
    workbook.SaveAs(output);
}
The output of the above code will look like the following image.

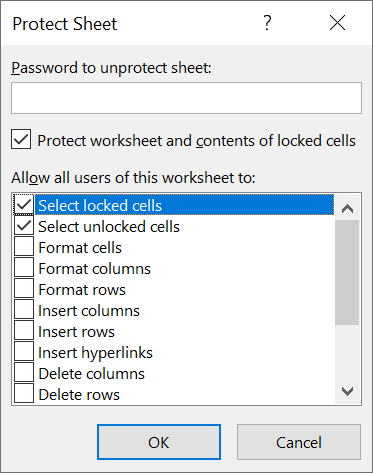
Custom sheet protection options
XlsIO offers the following customization options to allow users certain functionalities while protecting a worksheet:
- Select locked cells.
- Select unlocked cells.
- Format cells.
- Format columns.
- Format rows.
- Insert columns.
- Insert rows.
- Insert hyperlinks.
- Delete columns.
- Delete rows.
- Sort.
- Use Autofilter.
- Use pivot table and pivot chart.
- Edit objects.
- Edit scenarios.
Select locked cells and Select unlocked cells
By default, both select locked cells and select unlocked cells options will be enabled while protecting a worksheet.
The following code example illustrates this.
IWorksheet worksheet = workbook.Worksheets[0];

worksheet.Protect("Protect");
To enable the select locked cells option alone, you can use the following code.
IWorksheet worksheet = workbook.Worksheets[0];

worksheet.Protect("Protect", ExcelSheetProtection.LockedCells);
To enable the select unlocked cells option alone, you can use the following code.
IWorksheet worksheet = workbook.Worksheets[0];

worksheet.Protect("Protect", ExcelSheetProtection.UnLockedCells);
Format cells
This option allows you to modify the cell formatting when the worksheet is protected. You can modify the font name, font size, font color, cell background, and so on.
IWorksheet worksheet = workbook.Worksheets[0];

worksheet.Protect("Protect", ExcelSheetProtection.FormattingCells);
Format columns
This option allows you to adjust the width of the columns in a protected worksheet.
IWorksheet worksheet = workbook.Worksheets[0];

worksheet.Protect("Protect", ExcelSheetProtection.FormattingColumns);
Format rows
This option enables you to adjust the height of the rows in the protected worksheet.
IWorksheet worksheet = workbook.Worksheets[0];

worksheet.Protect("Protect", ExcelSheetProtection.FormattingRows);
Insert columns
This option allows you to insert columns into the protected worksheet.
IWorksheet worksheet = workbook.Worksheets[0];

worksheet.Protect("Protect", ExcelSheetProtection.InsertingColumns);
Insert rows
This option enables you to insert rows into the protected worksheet.
IWorksheet worksheet = workbook.Worksheets[0];

worksheet.Protect("Protect", ExcelSheetProtection.InsertingRows);
Insert hyperlinks
This option allows you to add hyperlinks in the protected worksheet.
IWorksheet worksheet = workbook.Worksheets[0];

worksheet.Protect("Protect", ExcelSheetProtection.InsertingHyperlinks);
Delete columns
The delete columns option allows you to delete columns in the worksheet.
IWorksheet worksheet = workbook.Worksheets[0];

worksheet.Protect("Protect", ExcelSheetProtection.DeletingColumns);
Delete rows
The delete rows option allows you to delete rows in the worksheet.
IWorksheet worksheet = workbook.Worksheets[0];

worksheet.Protect("Protect", ExcelSheetProtection.DeletingRows);
Sort
This option allows the end users to sort a specific range of cells in the worksheet, but the sorting range should not contain any locked cells. So, we should set the locked property value in these cells to false to enable sorting.
IWorksheet worksheet = workbook.Worksheets[0];

worksheet.Protect("Protect", ExcelSheetProtection.Sorting);
Use Autofilter
Select the Autofilter option to use the auto filters that are already available in the worksheet. Remember, we cannot create new filters or remove the existing auto filters in the protected worksheet.
IWorksheet worksheet = workbook.Worksheets[0];

worksheet.Protect("Protect", ExcelSheetProtection.Filtering);
Use pivot table and pivot chart
This option allows you to format, change the layout, refresh, or modify pivot table and pivot chart reports, or create new reports in the locked worksheet.
IWorksheet worksheet = workbook.Worksheets[0];

worksheet.Protect("Protect", ExcelSheetProtection.UsingPivotTables);
Edit objects
This option allows you to format or edit shapes, text boxes, pictures, form controls, and charts. However, we can’t delete these objects when the worksheet is protected.
IWorksheet worksheet = workbook.Worksheets[0];

worksheet.Protect("Protect", ExcelSheetProtection.Objects);
Edit scenarios
This option allows you to edit the scenarios that you have already protected and hidden. If the cells are not protected, then you can change the values in the cells and add new scenarios.
IWorksheet worksheet = workbook.Worksheets[0];

worksheet.Protect("Protect", ExcelSheetProtection.Scenarios);
Refer to the following code example to protect an Excel worksheet with multiple options using C# in XlsIO.
using (ExcelEngine excelEngine = new ExcelEngine())
{
    IApplication application = excelEngine.Excel;

    FileStream input = new FileStream("../../../Data/InputData.xlsx", FileMode.Open, FileAccess.ReadWrite);

    //Open the Excel document.
    IWorkbook workbook = application.Workbooks.Open(input);

    IWorksheet worksheet = workbook.Worksheets[0];

    //Protect the worksheet with multiple options.
    worksheet.Protect("Protect", ExcelSheetProtection.FormattingCells | ExcelSheetProtection.LockedCells |
        ExcelSheetProtection.UnLockedCells);

    FileStream output = new FileStream("../../../Output/ProtectedSheet.xlsx", FileMode.Create, FileAccess.ReadWrite);

    //Save the modified document.
    workbook.SaveAs(output);
}
After executing the above code, the Excel document will display a notification when you try to modify any of the cells in it. Refer to the following image.

Unprotect sheet
We can easily unprotect a protected Excel worksheet using the password that was used to protect it.
Refer to the following code.
using (ExcelEngine excelEngine = new ExcelEngine())
{
    IApplication application = excelEngine.Excel;

    FileStream input = new FileStream("../../../Data/ProtectedWorksheet.xlsx", FileMode.Open, FileAccess.ReadWrite);

    //Open the Excel document.
    IWorkbook workbook = application.Workbooks.Open(input);

    IWorksheet worksheet = workbook.Worksheets[0];

    //UnProtect the worksheet with password.
    worksheet.Unprotect("syncfusion");

    FileStream output = new FileStream("../../../Output/UnProtectedSheet.xlsx", FileMode.Create, FileAccess.ReadWrite);

    //Save the modified document.
    workbook.SaveAs(output);
}
After executing the above code, all the features in the Excel worksheet will be enabled in the output document.

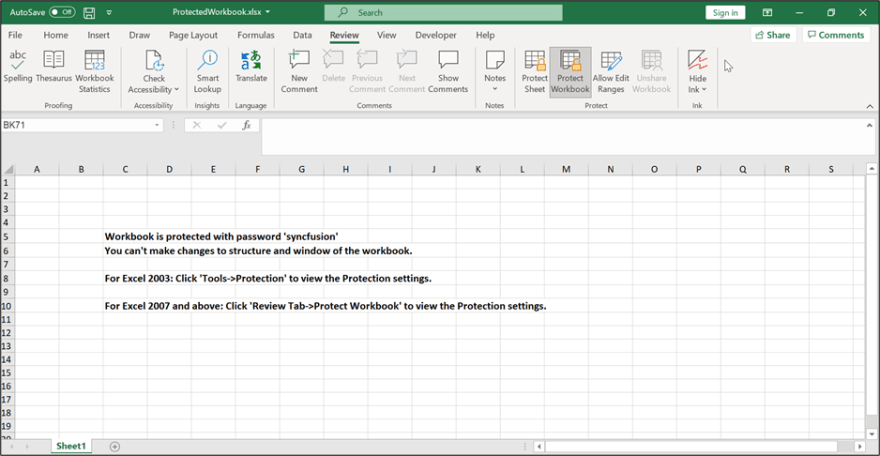
Protect workbook structure
The data in an Excel worksheet is secure when that specific worksheet is protected. The protect workbook option is used to protect an entire Excel workbook’s structure, such as sheet names, sheet order, and the ability access to insert or remove worksheets. This ensures that the structure of the workbook remains unmodified even though we can edit the data in the unprotected worksheets. XlsIO supports protecting a workbook structure with a password in C#.
Refer to the following code example.
using (ExcelEngine excelEngine = new ExcelEngine())
{
    IApplication application = excelEngine.Excel;

    FileStream input = new FileStream("../../../Data/InputWorkbook.xlsx", FileMode.Open, FileAccess.ReadWrite);

    //Open the Excel document.
    IWorkbook workbook = application.Workbooks.Open(input);

    IWorksheet worksheet = workbook.Worksheets[0];

    //Protect the workbook structure and windows with a password. Here, we have provided true for protecting structure and windows.
    workbook.Protect(true, true, "syncfusion");

    FileStream output = new FileStream("../../../Output/ProtectedWorkbook.xlsx", FileMode.Create, FileAccess.ReadWrite);

    //Save the modified document.
    workbook.SaveAs(output);
}
After executing the above code, the worksheet insert and delete options will be disabled in the output document. Refer to the following image.
Unprotect workbook
Also, we can easily unprotect a workbook to edit its structure using our XlsIO library.
Refer to the following code to unprotect a workbook in C#.
using (ExcelEngine excelEngine = new ExcelEngine())
{
    IApplication application = excelEngine.Excel;

    FileStream input = new FileStream("../../../Data/InputWorkbook.xlsx", FileMode.Open, FileAccess.ReadWrite);

    //Open the Excel document.
    IWorkbook workbook = application.Workbooks.Open(input);

    IWorksheet worksheet = workbook.Worksheets[0];

    //UnProtect the workbook with the password.
    workbook.Unprotect("syncfusion");

    FileStream output = new FileStream("../../../Output/UnProtectedWorkbook.xlsx", FileMode.Create, FileAccess.ReadWrite);

    //Save the modified document.
    workbook.SaveAs(output);
}
After executing the above code, the output document will look like the following image.

Encryption
Unlike worksheet and workbook protection, the encryption option completely hides the worksheet data and workbook structure. To open an encrypted Excel document, we have to use the password that was used to encrypt it. This feature ensures data security when sharing the document with other users.
The data in an encrypted Excel document can be viewed or modified by authorized individuals alone. Our Syncfusion Excel Library supports encryption, so you can encrypt/decrypt Excel documents with a valid password.
Encrypt workbook
When we encrypt an Excel document, the Excel data will be transformed into unreadable data with an encryption algorithm. The encrypting password is needed to decrypt the Excel document.
Refer to the following code to encrypt an Excel document with a password in C#.
using (ExcelEngine excelEngine = new ExcelEngine())
{
    IApplication application = excelEngine.Excel;

    FileStream input = new FileStream("../../../Data/InputExcel.xlsx", FileMode.Open, FileAccess.ReadWrite);

    //Open the Excel document.
    IWorkbook workbook = application.Workbooks.Open(input);

    IWorksheet worksheet = workbook.Worksheets[0];

    //Encrypt the workbook with password.
    workbook.PasswordToOpen = "syncfusion";

    FileStream output = new FileStream("../../../Output/EncryptedWorkbook.xlsx", FileMode.Create, FileAccess.ReadWrite);

    //Save the modified document.
    workbook.SaveAs(output);
}
After executing the above code, you will be prompted for a password when trying to open the encrypted Excel document.

After we enter the password, the output Excel document will look like the following image.

Decrypt workbook
Similarly, we can easily decrypt a password-protected Excel document using XlsIO, but we need the password to first decrypt the document and then remove the encryption algorithm by making the password empty.
Refer to the following code to decrypt an Excel document with a password in C#.
using (ExcelEngine excelEngine = new ExcelEngine())
{
    IApplication application = excelEngine.Excel;

    application.DefaultVersion = ExcelVersion.Xlsx;

    FileStream input = new FileStream("../../../Data/EncryptedWorkbook.xlsx", FileMode.Open, FileAccess.ReadWrite);

    //Open the encrypted Excel document with a password.
    IWorkbook workbook = application.Workbooks.Open(input, ExcelParseOptions.Default, false, "syncfusion");

    IWorksheet worksheet = workbook.Worksheets[0];

    //Decrypt the workbook.
    workbook.PasswordToOpen = string.Empty;

    FileStream output = new FileStream("../../../Output/DecryptedWorkbook.xlsx", FileMode.Create, FileAccess.ReadWrite);

    //Save the modified document.
    workbook.SaveAs(output);
}
Mark as Final
The Mark as Final option helps us avoid further editing or reviewing in an Excel document. When we apply Mark as Final to an Excel document, we can’t edit, type, or mark within the Excel document anymore.
Refer to the following code example.
using (ExcelEngine excelEngine = new ExcelEngine())
{
IApplication application = excelEngine.Excel;
FileStream input = new FileStream("../../../Data/InputData.xlsx", FileMode.Open, FileAccess.ReadWrite);

IWorkbook workbook = application.Workbooks.Open(input);

//Set workbook as final.
workbook.MarkAsFinal();

FileStream output = new FileStream("../../../Output/MarkAsFinalOutput.xlsx", FileMode.Create, FileAccess.ReadWrite);

//Save the modified document.
workbook.SaveAs(output);
}
After executing the above code, the output document will show a marked as a final message when we open it.

Github reference
Also, you can download the examples of protect and unprotect Excel documents in C# from GitHub.
Wrapping up
Thanks for reading! As you can see, the Syncfusion .NET Excel Library provides various easy ways to protect and unprotect Excel data in C#. Take a moment to peruse the documentation where you’ll find other options and features, all with accompanying code examples. Using this library, you can also export or write Excel data to PDF, image, data table, CSV, TSV, HTML, collections of objects, ODS file formats, and more.
Are you already a Syncfusion user? You can download the product setup here. If you’re not a Syncfusion user, you can download a free, 30-day trial.
If you have any questions or require clarifications about these features, please let us know in the comments below. You can also contact us through our support forum, support portal, or feedback portal. We are always happy to assist you!


Top comments (0)