
Introduction
Google Chrome is one of the most loved browsers for developers as well as general users. I use Google Chrome across all my devices and it helps me to sync Bookmarks, Browser History, Password Manager, and Much more.
For Desktop, there are many things you can do apart from browsing on the internet. You can test your webpage and all. Google Chrome becomes more powerful with the use of extensions.
So today, we are going to look into how you can create your very first Google Chrome extension with the use of HTML, CSS, and JavaScript.
Setup
Requirement
Requirements are few for getting started with Chrome Extension. The list is here:
- Google Chrome Extensions (For testing purposes)
- Text Editor (I prefer VS Code, you can use others according to you)
- Basic Knowledge about HTML, CSS, and JavaScript
Chrome Extension
We are going to develop a calculator app for our very first Chrome extension. If you know how to make a calculator for a web app, the tutorial will be easy for you. Now, You only need to know "How to setup the extension?"
manifest.json
Every app needs a manifest—a JSON-formatted file named manifest.json that describes the app. This file will helps your app to manage permission, storage, manifest version, landing pages, name, icons, and many more.
Here is the code for manifest
{
    "manifest_version" : 2,
    "name" : "Calculator",
    "version" : "1.0",
    "description" : "Calculate Anywhere",
    "icons" : {
        "128" : "img/icons128.png",
        "48" : "img/icons48.png",
        "16" : "img/icons16.png"
    },
    "browser_action" : {
        "default_icon" : "img/icons16.png",
        "default_popup" : "popup.html"
    },
    "content_security_policy": "script-src 'self' 'unsafe-eval'; object-src 'self'"
}
Explanation
manifest_version: You are defining the version of manifest that you are going to use. We are currently using 2, but recently Google had launched version 3.
name: It is the name of your app. Currently, we are calling it "Calculator."
description: As the name tells, you will describe your extension here. Few sentences for describing the extension is enough. For Now, we are giving it "Calculate Anywhere."
icons: You need to provide src for the icon of your extension. You need to give the source for different sizes of the icon.
-
browser_actions :
We use browser_action to put the extension to the toolbar, which is right to the address bar. The browser action has an icon, a tooltip, a badge, and a popup.- default_icon: Source for the image of the icon.
- default_popup: It is the source to the landing page of the extension. It has to be in HTML format. You can name it according to you. For me, it is "popup.html."
content_security_policy: It is declared to allow some function that chrome extension considered miscellaneous. I have used eval() function to calculate the equation that I highly don't recommend using for commercial purposes. You can use a separate function for calculation purposes.
We need only this much for our calculator extension. Let's move to the next destination that is popup.html
popup.html, popup.js, and style.css
Now we are in the comfort zone. We can write HTML as you write. I am not going to stretch the HTML, CSS, and JavaScript parts.
You can see the entire code in my Github repo here.
 surajondev
/
extension-calculator
surajondev
/
extension-calculator
Google Chrome Extension for doing the calculation
Google Chrome Extension
Introduction
Calculator
Describtion
The project is for the tutorial purpose regarding How to create google chrome extension
Read the article
Blog : Create a Chrome Extension with HTML, CSS, and JavaScript
ScreenShot

Installation
- Clone this project
git clone - Go to extenion manager in chrome
- Load the extension into the chrome
Licence
MIT LICENCE
Read Licence document for more details
Codepen Code for popup.html, style.css and popup.js
Installing Extension in the Chrome
For checking purposes, we are initially going to install the app locally into our system.
- First, visit chrome://extensions to open the extension manager
- Click the Load unpacked extension button. A file dialog appears.
- In the file dialog, choose the myapp(Directory containing manifest.json) directory. Unless you get an error dialog, you've now installed the app.
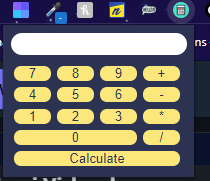
After successful installing, the extension will look like this.
Last Note
After successful installing, the extension will look like this.
If you get an error, check your code and try to solve it. If You are encountering any trouble, you can contact me here.
I hope you find this post helpful and Thank you for reading the blog post.


Top comments (6)
Baffled as to why there are so many people post tutorials like this without pointing out that the process is all but identical on Firefox (and other browsers). Most modern browsers all implement pretty much the same extension API
I'm a contributor to a popular extension. My first contribution was to add a small tweak to the manifest, and update the readme with installation instructions for Firefox. The actual code for the extension required no changes whatsoever. The extension works perfectly on both browsers
Great man, thanks for the post. Will be making wacky extensions. I think there's a one-time fee to publish on webstore
Yes ! One Time fee
Is Firefox Web Store for free or also have fee .. Also Edge and Opera Store?
Sorry for a lot of questions : )
Hi! Can I Get Chrome Web Store one time fee for free .. As I will create extension like what you have done .
Thanks for Great Article