Intro 💅
I "rescued" a 2018 mac mini(8th Gen i3, 8Gb Ram, 128SSD). My idea was to use it for my personal home recording studio. I read the ram was upgradeable but the storage is sadly soldered into the unit. iFixit awarded the new Mac mini a repairability score of 6/10, with 10 being the easiest to repair, topping the latest MacBook Air, MacBook, MacBook Pro, iMac, and iMac Pro, and trailing only the 2013 Mac Pro. Read the original article here.
"The new Mac mini earned its higher repairability score thanks to its straightforward disassembly with no tough adhesive or proprietary pentalobe screws and user-upgradeable RAM. However, it didn't earn a perfect score due to the soldered-down CPU, storage, and ports, impacting repairs and upgrades."
So, it made sense to find an external SSD and run operations from there. Just logic pro x takes 70 Gb with all the samples etc. By the time i got everything running at minimum, i only had like 15 Gb left. So here's what i did:
Working it out 🤹♀️
What you will need 🧐
- External SSD Hard drive. (I won't suggest brands or capacity leaving that to what you find fit for yourself)
- A Mac!
Getting the job done 🤓
- First of all, go to disk utility and format your new hard drive. For this you have to choose either
APFSorMacOs Extended (Journaled), encryption is up to you. Just make sure you remember your password. (⚠️ THIS MEANS YOUR ENTIRE EXTERNAL HARD DRIVE CONTENT WILL BE ERASED! proceed with caution and, to be safe, use a new external hard drive) - Once you have formatted your hard drive, restart your Mac, then press and hold
Command(⌘)+Rimmediately after you see the Apple logo. Your Mac starts up frommacOS Recovery. - When you see the macOS Utilities window, choose
Utilities > Startup Security Utility from the menu bar. - When you're asked to authenticate, click
Enter macOS Password, then choose an administrator account and enter its password. - You will see something like this:
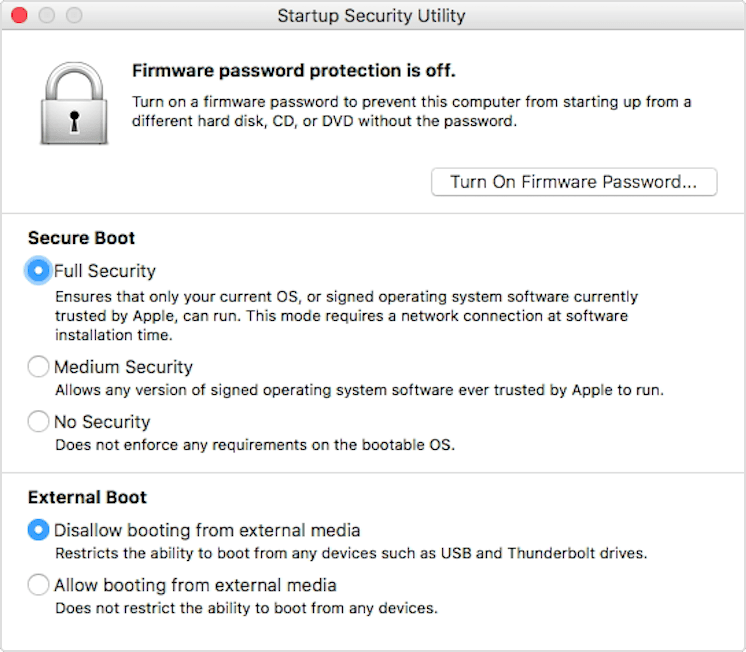
- Select
Allow booting from external media
We are almost done. Don't restart anything yet. Go back to the first screen and click on reinstall macOS:

- Accept all terms and conditions, and you will be prompted to choose the hard drive where you want to install the operating system on. Click on it and install. The machine will restart a few times.
- You will eventually end up at your regular login screen. If you are in the machine where you will be booting your external hard drive from, you have two options to boot. You can press the
optionkey every time you turn on your computer, and select what hard drive to boot from, or you can switch permanently to your external hard drive.
If you want your machine to always boot from the external hard drive:
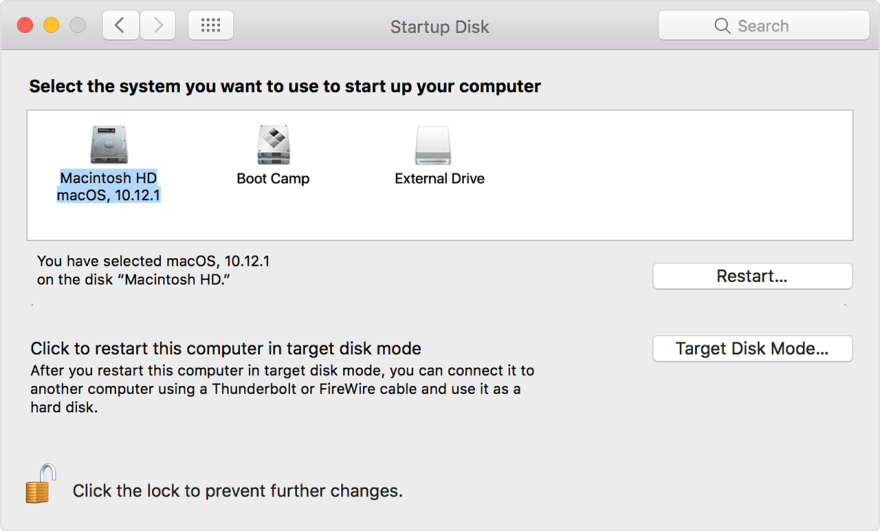
- Choose
Apple()menu>System Preferences, then clickStartup Disk. - Click the lock icon and enter your administrator password.
- Select your startup disk, then restart your Mac.
That's all folks! 🐷
Enjoy all your extra storage space!. Remember that you can always switch back to your original startup disk!
Cheerio!
20th Nov, 2020:
@DarkCisum on twitter added the following information:
Hi. I've been following your guide on booting a Mac Mini from an external SSD.

Just thought, maybe it could be helpful for others, in the Disk Utility one needs to "View > Show All Devices" in order to be able to select the disk itself
Thank you very much!!


Oldest comments (1)
Its a good idea to use an external hard drive for the latest mac mini's given their soldered ssd. Using a soldered in SSD for memory cache doesn't sound like a good idea. Much better to use an external HDD or SSD that can be replaced.