Intro ⭐️
I wanted to build a quick and easy Amazon IVS video player mobile app for future streams and other interesting experiments. This is the first part of a series of tutorials where I will be expanding on features of this app!.
Building native mobile apps can be beginner friendly and an enjoyable experience!. For that reason I've chosen Ionic as my framework of choice because of its simplicity combined with Vue JS, a friendly javascript framework.
Wait, but what about the video part? 🤔
To continue with keeping things simple, developer friendly and approachable, let's look at a new service offered by AWS: Amazon Interactive Video Service or IVS. It's a managed live video streaming service that allows us to:
- Create channels and start streaming in minutes.
- Create engaging and interactive experiences along with ultra-low latency live video.
- Distribute video at scale to a variety of devices and platforms.
- Easily integrate into websites and applications.
Amazon IVS allows us to focus on creating our own interactive application and audience experience and we don't need to manage infrastructure or develop and configure components, making it reliable and cost-effective.
Amazon IVS supports RTMPS streaming. RTMPS is the secure version of RTMP (Real Time Messaging Protocol), which runs over TLS. RTMP is an industry standard for transmitting video over a network.
So we are using Ionic-Vue + Amazon IVS to create a mobile player app!
Tutorial repo: https://github.com/alphacentauri82/ivs-ionic-vue
Twitch stream: https://www.youtube.com/watch?v=CeKTr83LmiY
Let's get it started 🎵
⚡️ Pre-requisites:
- NodeJS + NPM: Ionic has amazing instructions to set up/install
- Ionic CLI
- Amazon IVS
- VideoJS
Installing Ionic CLI
Install the Ionic CLI with npm:
npm install -g @ionic/cli
If there was a previous installation of the Ionic CLI, it will need to be uninstalled due to a change in package name.
npm uninstall -g ionic
npm install -g @ionic/cli
Creating our App
Make sure you're in your desired folder for this project and then run:
ionic start hello-ivs tabs --type vue --capacitor
An Ionic-Vue application will be created. Note we used the flag tabs to use a starter template with "Tabs". We also added Capacitor to give native functionality.
This starter project comes with three pre-designed pages and best practices for Ionic development - with the common building blocks already implemented, we can easily add more features!.
As this process continues, you will be asked if you want to create an Ionic account, if you type "Y + Enter" it will take you to https://ionicframework.com/signup and if you type "No + Enter" it will continue its process smoothly.
Now that the project is created, let's get in our project folder:
cd hello-ivs
🎊 ...And it's time to celebrate our first achievement!, we have a full starter app to add our player to! 🎊
Hands On! 🛠
Open your IDE/editor of choice and you should see the following structure:

Let's go to the /src folder:

There are 4 folders and 3 files. Let's go through what we see:
- Components: This is where our components are stored, it will serve us to create our child component where we will have our video player.
- Router: Defines the specific routes of our application.
- Theme: This is where we define all styles and the look of our app.
- Views: This is where we structure our app views.
Let's cd to the default component:
cd src/components/ExploreContainer.vue
And delete line #4 - Let's replace it with
<p>Hello IVS!</p>
It's time to see our "Hello IVS" App and make sure everything works so let's run"
ionic serve
It will take a few seconds to build and then we can see a web preview. We can resize it to simulate different mobile devices in the browser:
Web Preview

Mobile
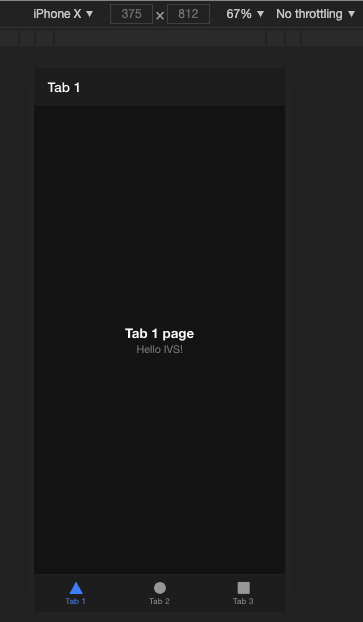
Since we don't need Tabs in this first version of the application we will delete the other two and leave a single tab for now.
To do that, we need to edit Tabs.vue in the /views folder, and in the <template> block, delete from line #10 to #18 leaving just a single tab like this:
<template>
  <ion-page>
    <ion-tabs>
      <ion-tab-bar slot="bottom">
        <ion-tab-button tab="tab1" href="/tabs/tab1">
          <ion-icon :icon="triangle" />
          <ion-label>Tab 1</ion-label>
        </ion-tab-button>
      </ion-tab-bar>
    </ion-tabs>
  </ion-page>
</template>
Let's save our file and our app will reload displaying this:

Adding Video to our App 🎥
Stop the presses! Let's hit ctrl + c In our terminal. We have to install a few dependencies to continue developing our project.
First of all, let's install VideoJS. At the time of making this tutorial, to make sure it works with Amazon IVS we need to install version 7.6.6:
npm i video.js@7.6.6
And then proceed to install Amazon IVS
npm i amazon-ivs-player
Creating the video player 🔥
Let's edit our ExploreContainer component located in the src/components folder.
- Let's import our dependencies. We do this in the
<script>block, but first deletelang="ts"since we won't be using Typescript. From line #8 it should look like this:
<script>
import videojs from 'video.js';
import { registerIVSTech } from 'amazon-ivs-player';
import 'video.js/dist/video-js.css';
And to make things more consistent, let's rename our default ExploreContainer component to VideoPlayer, edit line #13 and the script tag should look like this:
<script>
import videojs from 'video.js';
import { registerIVSTech } from 'amazon-ivs-player';
import 'video.js/dist/video-js.css';

export default {
  name: 'VideoPlayer',
  props: {
    name: String
  }
}
</script>
Before anything else, we also have to rename the file to VidePlayer.vue and then proceed to modify our parent component Tab1.vue and add the correct name. For this we edit src/views/Tab1.vue. Our file should look like this:
<template>
  <ion-page>
    <ion-header>
      <ion-toolbar>
        <ion-title>Live Stream</ion-title>
      </ion-toolbar>
    </ion-header>
    <ion-content :fullscreen="true">
      <ion-header collapse="condense">
        <ion-toolbar>
          <ion-title size="large">Live Stream</ion-title>
        </ion-toolbar>
      </ion-header>
      <VideoPlayer />
    </ion-content>
  </ion-page>
</template>

<script>
import { IonPage, IonHeader, IonToolbar, IonTitle, IonContent } from '@ionic/vue';
import VideoPlayer from '@/components/VideoPlayer.vue';
export default  {
  name: 'LiveStream',
  props: {
    autoplay: Boolean
  },
  components: { VideoPlayer, IonHeader, IonToolbar, IonTitle, IonContent, IonPage }
}
</script>
Now let's head to the router folder and in index.ts delete the lines that define the routes of the tabs that we no longer need. so the file should look like this:
import { createRouter, createWebHistory } from '@ionic/vue-router';
import { RouteRecordRaw } from 'vue-router';
import Tabs from '../views/Tabs.vue'

const routes: Array<RouteRecordRaw> = [
  {
    path: '/',
    redirect: '/tabs/tab1'
  },
  {
    path: '/tabs/',
    component: Tabs,
    children: [
      {
        path: '',
        redirect: '/tabs/tab1'
      },
      {
        path: 'tab1',
        component: () => import('@/views/Tab1.vue')
      }
    ]
  }
]

const router = createRouter({
  history: createWebHistory(process.env.BASE_URL),
  routes
})

export default router
Now we can add our data to be able to effectively use Amazon IVS in src/components/VideoPlayer.vue, the file from line #13 should look like this:
export default {
    name: 'VideoPlayer',
    props: {
      name: String
    },
    data: () => ({
      player: null,
      videoSource: process.env.VUE_APP_PLAYER_URL,
      videoOptions: {
        autoplay: true,
        controls: true,
        techOrder: ["AmazonIVS"],
        width: "800"
      },
    }),
Let's stop to explain a few things:
- player: Variable that will store the properties of video.js to use Amazon IVS objects.
- videoSource: This is the environment variable that will allow us to connect to a test stream. In this case we will pass a player URL.
- videoOptions: This is the object that we will use to have control over the Amazon IVS technology layer.
After defining our data we are going to follow the life cycle of a component in Vue, we are going to use the mounted() hook to start it after all the elements have loaded.
mounted() {
    // register the tech with videojs
    console.log(`wasmWorker: ${this.createAbsolutePath('/assets/amazon-ivs-wasmworker.min.js')}`)

    registerIVSTech(videojs,  {
      wasmWorker: this.createAbsolutePath('/assets/amazon-ivs-wasmworker.min.js'),
      wasmBinary: this.createAbsolutePath('/assets/amazon-ivs-wasmworker.min.wasm'),
    });

    // Init the player
    this.player = videojs(this.$refs.videoPlayer, this.videoOptions, () => {
      console.log('Player is ready to use!');
      // play the stream
      this.player.src(this.videoSource);
    })
  },
- registerIVSTech: Is the object we declare to consume the Amazon IVS service.
- Videojs: Is the object provided by Video.js.
- options: Options for the Amazon IVS technology layer.
The supported options are:
- wasmWorker: URL where amazon-ivs-wasmworker.min.js is located.
- wasmBinary: URL where amazon-ivs-wasmworker.min.wasms is located.
These files are located in node_modules/amazon-ivs-player/dist/. We need to copy and paste them into the public/assets folder to use the IVS player.
Then we use the beforeUnmount hook in order to have a conditional that allows us to show if the player instance is being consumed or if not the instance is destroyed.
beforeUnmount() {
    // Destroy the player instance
    if(this.player) {
      this.player.dispose();
    }
  },

  methods: {
    createAbsolutePath(assetPath) {
      console.log( document.URL );
      return new URL(assetPath, document.URL).toString();
    },
  }
The createAbsolutePath method allows us to create a specific path, with this method we can consume the files stored in public/assets.
Let's create our container and reference VideoPlayer to be able to receive the video with video.js like this. Let's go back to the beginning of the file, in the <template> block and replace the contents of everything contained in <div> like this:
<template>
  <div id="container">
    <video ref="videoPlayer" class="video-js"></video>
  </div>
</template>
And then style it! - Let's edit the style block in line #61:
<style scoped>
#container {
  display: flex;
  justify-content: center;
  align-content: center;
  text-align: center;
  position: absolute;
  left: 0;
  right: 0;
  top: 50%;
  transform: translateY(-50%);
}
</style>
And finally let's create a .env (dot env) file and save it in the root folder of the project with the following information.(For now, we are going to pass a player URL from one of the sample players in the Amazon IVS Demos Repository.
VUE_APP_PLAYER_URL='https://fcc3ddae59ed.us-west-2.playback.live-video.net/api/video/v1/us-west-2.893648527354.channel.DmumNckWFTqz.m3u8'
🎉 Celebration 🎉
Let's save our work and run:
ionic serve
you should see a result similar to this:

We will continue to develop more features in this same application so stay tuned for more!!!


Top comments (1)
Thank you, this is a great development, I'm looking forward to further instalments. A couple of small corrections, the files Tab1.vue and Tabs.vue in your instructions above are actually named Tab1Page.vue and TabsPage.vue in the starter project.