Once you have the full customer onboarding flow in place and you're correctly giving access to paid services and features, you'll inevitably start to hear support requests where customers want to update payment methods on file, upgrade and downgrade between plans, view billing history, and more. We call this “customer lifecycle management.”
The two primary options for supporting billing management are to build it yourself or to use the Stripe customer portal. Similar to Stripe Checkout, the customer portal is a page hosted by Stripe where you redirect existing customers with active subscriptions. From the portal, they can do things like update their payment methods and upgrade, cancel, upgrade, or pause their subscriptions. The customer portal is configurable by the API or via settings in the Stripe Dashboard.
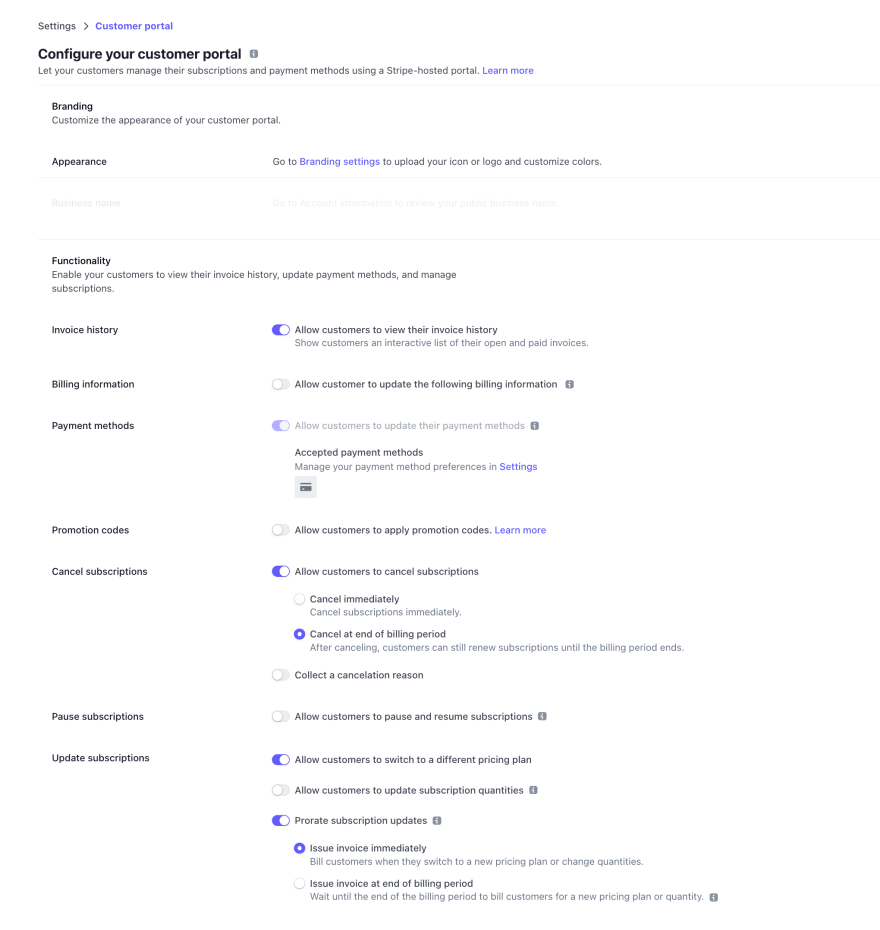
I highly recommend implementing the customer portal instead of the significant investment of implementing all of the billing management features by hand. The customer portal is feature rich, localized in many languages, and will only continue to get better. You would need to invest development time for each of those changes if you decide to build all your billing management from scratch.
The fastest way to integrate is with a single API call to create a customer portal session which will return a URL that you can redirect customers to. The most basic session only requires that we pass the customer's ID (which we created during onboarding, remember?):
session = Stripe::BillingPortal::Session.create({
  customer: 'cus_F6sbKqBiA0Ms4g',
})
redirect_to session.url, allow_other_hosts: true, status: :see_other
Handling changes with webhooks
When customers make changes to their subscriptions in the customer portal, it’s important that our application reflects those changes. In the previous article about provisioning access to a SaaS using webhooks, we discussed several webhook event types that are important to handle for giving access. You’ll also want to ensure that you’re handling the customer.subscription.deleted webhook event which represents the customer’s cancellation of a subscription. In this case, we find the Subscription in the database by ID and update its status to the one for the webhook event payload: canceled.
def handle_subscription_deleted(event)
  subscription = event.data.object
  sub = Subscription.find_by(stripe_id: subscription.id)
  sub.update!(
    status: subscription.status,
  )
end
Configuring portal sessions
By default, any customer portal session you create will use your Stripe Dashboard’s customer portal settings. You can also create portal configurations to individualize the portal experience for different customers.
For instance, you may want to offer customers on legacy plans the option to upgrade to a higher tier of a legacy plan, but require that new customers use a default set of tiers with different prices. One solution would be to create a custom portal configuration for the legacy users that includes a list of legacy products and prices in the features.subscription_update.products array.
Given the ID of a customer portal configuration object, you can create new customer portal sessions by passing in the config to modify the features seen by the customer using that portal session.
config = Stripe::BillingPortal::Configuration.create({
  features: {
    customer_update: {
      allowed_updates: ['email', 'tax_id'],
      enabled: true,
    },
    invoice_history: {enabled: true},
    payment_method_update: {enabled: true},
    subscription_update: {
      enabled: true,
      default_allowed_updates: ['quantity', 'price'],
      products: [{
        product: 'prod_MBsdZlqD3StDZo', # Legacy product
        prices: [
          'price_1LTUryCZ6qsJgndJl0mhzex1', # Legacy monthly
          'price_1LXWGHCZ6qsJgndJBOEgbbxs', # Legacy annual
        ],
      }],
    },
  },
  business_profile: {
    privacy_policy_url: 'https://example.com/privacy',
    terms_of_service_url: 'https://example.com/terms',
  },
})

portal_session = Stripe::BillingPortal::Session.create({
  customer: 'cus_La7iFhdBoBP29t',
  configuration: config.id
})

redirect_to portal_session.url, allow_other_host: true, status: :see_other
What customers see
Depending on the configuration, customers will see a two-panel UI showing their current plan, payment method, billing information and actions they can take.

Next steps
If you’ve made it this far in the series, nice work! You now have all the fundamental building blocks for launching a recurring SaaS application with Stripe. We’d love to hear your feedback about the integration patterns and best practices outlined in the series. Please drop me a line to let me know what you’re building: @cjav_dev on Twitter.
About the author

CJ Avilla (@cjav_dev) is a Developer Advocate at Stripe, a Ruby on Rails developer, and a YouTuber. He loves learning and teaching new programming languages and web frameworks. When he’s not at his computer, he’s spending time with his family or on a bike ride 🚲.


Oldest comments (1)
Hey CJ! As a no code entrepreneur, I really appreciate your helpful videos!
For days I have been struggling with how to customize the Stripe customer portal. The Stripe docs do not help me, as it's all a foreign language that I am slowly trying to piece together.
Do you have any videos or material that dive a little deeper into your example given in the 'Configuring portal sessions' portion of this article? The use example you gave is almost identical to what I'm trying to do.
To create different portal configurations within the Stripe dashboard seems like it should be such a basic feature, but it's not. I am pulling my hair out trying to figure out how customize my API link to give different types of users access to different products. Any help would be enormously appreciated, I can even pay to have someone show me how to do this. Thank you!
EDIT: Something important to note:
I am implementing the customer portal in Bubble using the Bubble API connector plugin