
This tutorial is a rebuild of the MDN "Local Library" Express (Nodejs) tutorial with modern web tools. We develop a web app that might be used to manage the catalog for a local library.
The main goal of this tutorial is to see how easy to create a backend with Strapi for your App in a few minutes from a user-friendly admin panel and let modern frontend tools like NextJS, NuxtJS, GatsbyJS handle the rendering of your content.
Our final goal is to have a working copy of the expressjs local library tutorial powered by StrapiJS, NextJS, MongoDB, use-react-form, SWR, and Geist-UI.
Prerequisites
Note: it's better to create a Github account first and use it to register for other services except for MongoDB. This saves you a lot of time when deploying the App.
For you to be able to follow along with this tutorial, you'll need the following:
- Node.js and npm (yarn) installed on your machine.
- A Github account
- Heroku account for deployment
- MongoDB installed on your local machine, MongoDB Cloud account for when we deploy our App
- Vercel account for deploying our NextJS App
- Basic React knowledge
What you'll learn
You'll learn how to setup Strapi locally for development, create API endpoints for your content, how to use MongoDB with Strapi and deploy it to Heroku with environment variables, customize default Strapi controllers.
On the frontend part, you'll learn how to use NextJS to create dynamic and static pages for your content, perform CRUD operation, handling forms with use-form-hook, add styling with Geist UI, deploy the frontend to Vercel.
What you need to know
You’ll need to know how to create Strapi App and connect it to MongoDB locally. The development of our App in 2 stages:
Installing MongoDB on our machine, creating a NextJS App, and make API calls to create, read, update and delete our content from our Strapi backend.

When you create the Strapi App, by default, all the content types you create are inaccessible to public users. You need to edit permissions to allow non-authenticated users to access your API endpoints.
NextJS has a file-based routing system where each page automatically becomes a route based on its file name. For example, a page at pages/books will be located at /books, pages/index.js at /, and pages/books/index.js is equivalent to pages/books.js.
The route /catalog/books/update/[id].js is a dynamic route. The id determines the Book that will be on the update page.
Setup
To install MongoDB on your local machine. Follow the ultimate guide to MongoDB for a step-by-step installation. After installing, run MongoDB and get database info.
    // 1
    brew services start mongodb-community@4.4

    //2 run the following command to use the mongo shell.
    mongo

    //3 To print the name of databases run
    show dbs
You will be presented with information such as below depending on the databases you have in your installation.

By default, MongoDB creates three databases. The one we're going to use is "local" to escape extra steps that are not necessary to continue our goal.
Next, install Strapi and Create a new project using the command below:
yarn create Strapi-app Strapi-local-library
Choose your installation type: select Custom (manual settings), and select your default database client: select mongo and complete the questions with the following info.

To verify that our App uses the correct database, start Strapi with yarn develop or npm run develop wait till it finishes building, then back to mongo shell and run the following command
    > use local
    > show collections
Strapi will automatically open a new tap on your web browser on http://localhost:1337/
you'll be invited to create a new admin user.
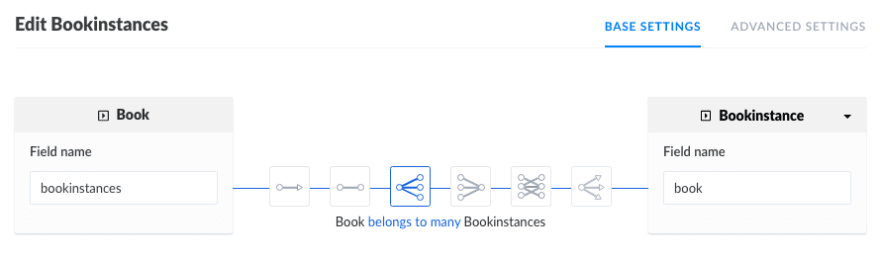
After logging in, you need to create a Book, Author, Genre, and BookInstance collections. The following image describes the relation between our content types and the fields that are necessary for each type.

Let’s explain the different collections that we have created. We can translate the image like this:
- The
Authorhas manyBooks.Bookhas oneAuthor -
Bookhas andbelongsto manyGenres,Genrehas and belong to manyBooks -
Bookhas manyBookInstances,BookInstancehas oneBook
This will help us later to define Relations in Strapi for our Content-Types. To keep the size of the tutorial as low as possible, I'll only cover the creation of the Author and the Book content types, and you can follow the same steps to finish the rest at this stage.
We have our Strapi App running and connected to a local MongoDB database.
Creating the Frontend
Create a NextJS app using any of the commands below:
    npx create-next-app project-name
    # or
    yarn create next-app project-name
When it finishes installing, you will end up with a project with a folder structure similar to the following screenshot.

Next, let’s install third-party packages that will help us create our project successfully. Below is the list and description of each library.
-
useSWRis a React Hooks library for data fetching. We'll need it to fetch data on the client side. -
luxonfor formatting dates. -
react-hook-formfor forms handlingyarn add swr luxon react-hook-form
Next, in the root folder, create config.next.js file and add to it the following code.
    module.exports = {
       async redirects() {
         return [
           {
             source: '/',
             destination: '/catalog',
             permanent: true,
           },
         ]
       },
     }
Next, We will create the env.local file and add the following variable.
NEXT_PUBLIC_API_ENDPOINT = "<http://localhost:1337>"
Adding content
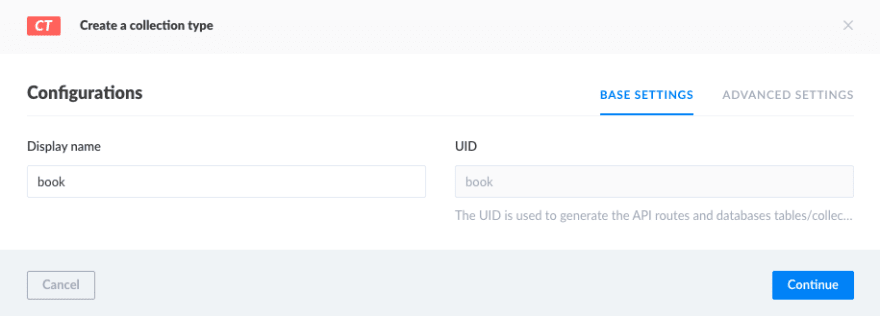
Before we start working on the front end, let's add some content. in the admin panel, navigate to the content-types builder and click create new collection type button, enter the Display name book as shown below, and hit Continue.
Select the Text field for the book title and click Add another field

Do the same thing for summary (long text) and ISBN (short text). For the author field, we need to create the Author content-type first. Follow previous steps to create the Author, Genre, and BookInstance content types and add a relation field for the Book.


This will automatically add the field Book to Author, Genre, and BookInstance content-types.
add some Books and Authors of your choice, or you can copy from the express-local-library tutorial.
If we try to access our API endpoint, we'll get the following message:
    {
      "statusCode":403,
      "error":"Forbidden",
      "message":"Forbidden"
    }
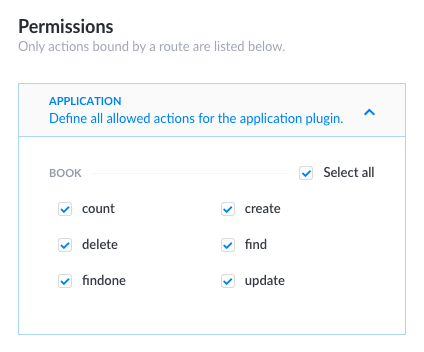
Navigate to the following link [http://localhost:1337/admin/settings/users-permissions/roles](http://localhost:1337/admin/settings/users-permissions/roles), under public > permission > application tap check Select all options for all content types and save.
Displaying, editing contents
Next, we'll implement our booklist page. This page needs to display a list of all books in the database along with their author, with each book title being a hyperlink to its associated book detail page.
Book list page:
Create pages/catalog/books/index.js file and add the following code to it:
    import Head from 'next/head'
    import Link from 'next/link'
    import { Card, Grid } from '@geist-ui/react'
    export default function Books({data, notFound}) {
      return (
        <div>
          <Head>
            <title>Book list</title>
            <link rel='icon' href='/favicon.ico' />
          </Head>
          <section className="main-section">
            <h1>
             Books
            </h1>
            {notFound ? <div>not found</div> :
            <Grid.Container gap={1}>{
                data.map((book) => {
                   return(
                     <Grid key={book.id}>
                      <Card>
                        <Link style={{ width: '100%'}} href="/catalog/books/details/[id]" as={`/catalog/books/details/${book.id}`} >
                          <a>
                              <h4>{book.title}</h4>
                          </a>
                        </Link>
                        <p>author: {book.author.family_name} {book.author.first_name}</p>
                      </Card>
                     </Grid>
                   )
                })
             }</Grid.Container>
            }
          </section>
        </div>
      )
    }

    export async function getServerSideProps(context) {
      const res = await fetch(`${process.env.NEXT_PUBLIC_API_ENDPOINT}/books/?_sort=updated_at:DESC`)
      const data = await res.json()

      if (!data) {
        return {
          notFound: true,
        }
      }

      return {
        props: {data}, // will be passed to the page component as props
      }
    }
We use the method provided by NextJS getServerSideProps to fetch a list of books and return it as props to our Books page component as data. Then we iterate through the list of books and render the book title and the Author.
About the Head and Link components:
- The
Headact as the document head tag - The
Linkis for navigating between routes - For more details about the
Linkcomponent andgetServerSidePropsmethod, see the NextJS documentation at https://NextJS.org/docs/getting-started
Book detail page
The Book detail page needs to display the information for a specific Book (identified using its id field value) and information about each associated copy in the library (BookInstance). Wherever we display an author, genre, or bookInstance, these should be linked to the associated detail page for that item.
    //pages/catalog/books/details/[id].js

    import { Button, Divider, Loading, Modal, Note } from '@geist-ui/react'
    import Link from 'next/link'
    import { useRouter } from 'next/router'
    import useBook from '@/hooks/useBook'

    const Book = () => {
     const router = useRouter()
     const { book, isError, isLoading } = useBook(router.query.id)
      return (
        <section className="main-section">
          {
          isError ? "an error occured !" : isLoading ? <Loading /> :
          <div>
             <div>
                <h2>Title:</h2><p>{book.title}</p>
             </div>
             <div>
                <h2>ISBN:</h2><p>{book.ISBN}</p>
             </div>
             <div>
                <h2>Author:</h2> <p>{book.author.family_name} {book.author.first_name}</p>
             </div>
             <div>
                <h2>Summary:</h2><p>{book.summary}</p>
             </div>
             <div>
                <h2>Genre:</h2>
                <div>
                   {
                   book.genres.length > 0 ? book.genres.map(({name, id}) => {
                      return(
                         <div key={id}>
                            <p>{name}</p>
                         </div>
                      )
                   })
                   :
                   'this book dont belong to any genre'
                   }
                </div>
             </div>
             <div>
                <h2>Copies:</h2>
                <ul>
                   {
                   book.bookinstances.length > 0 ? book.bookinstances.map(({imprint, status, id}) => {
                      return(
                         <li key={id}>
                            <span> {imprint} </span>
                            <span className={status}> [ {status}  ]</span>
                         </li>
                      )
                   })
                   :
                   'there are no copies of this book in the library'
                   }
                </ul>
             </div>
          </div>
          }
        </section>
      )
    }

    export default Book
About the UseRouter and useBook hooks:
-
useRouterhook comes with NextJS. It allows us to access the router object inside any function component in our App. - From the router object, we can access the query property that contains our book id
router.query.id, then we use the book id to fetch a specific book using our customuseBookhook -
useBookhook is a custom hook that receives anidandinitialBookobject as parameters and returns a book object matching thatid.
    // hooks/useBook.js

    import useSWR from 'swr'
    import Fetcher from '../utils/Fetcher'

    function useBook (id, initialBook) {
       const { data, error } = useSWR(`${process.env.NEXT_PUBLIC_API_ENDPOINT}/books/${id}`, Fetcher, { initialData: initialBook })

       return {
         book: data,
         isLoading: !error && !data,
         isError: error
       }
     }
     export default useBook
useBook hook is built on top of SWR, a React Hooks library for data fetching. For more information about how to use it with Next.js, refer to the official docs https://swr.vercel.app/docs/with-NextJS.
Create book page
For this page we need to get and display available Author and Genre records in our Book form.
    import { useState } from 'react'
    import Head from 'next/head'
    import { useRouter } from 'next/router'
    import { Button, Loading, Spacer } from '@geist-ui/react'
    import useAuthors from '@/hooks/useAuthors'
    import useGenres from '@/hooks/useGenres'
    import { useForm } from "react-hook-form"

    export default function CreateBook() {
       const router = useRouter()
       const { authors, isError: isAuthorError, isLoading: authorsIsLoading } = useAuthors({initialData: null})
       const { genres, isError: isGenreError, isLoading: genresIsLoading } = useGenres()
       const { register, handleSubmit } = useForm({mode: "onChange"});

       async function createBook(data){
          const res = await fetch(
             `${process.env.NEXT_PUBLIC_API_ENDPOINT}/books`,
             {
               body: JSON.stringify({
                title: data.title,
                author: data.author,
                summary: data.summary,
                genres: data.genre,
                ISBN: data.ISBN,
               }),
               headers: {
                 'Content-Type': 'application/json'
               },
               method: 'POST'
             }
          )
          const result = await res.json()
          if(res.ok){
            router.push(`/catalog/books/details/${result.id}`)
          }
       }
      return (
        <div>
          <Head>
            <title>Create new Book</title>
            <link rel="icon" href="/favicon.ico" />
          </Head>
          <section className="main-section">
            <h1>
             New Book
            </h1>
            {
             isAuthorError || isGenreError ? "An error has occurred."
             : authorsIsLoading || genresIsLoading ? <Loading />
             :
            <form id="Book-form" onSubmit={handleSubmit(createBook)}>
               <div>
                <label htmlFor="title">Title</label>
                <input type="text" name="title" id="title" {...register('title')}/>
               </div>
               <Spacer y={1}/>
               <div>
                <label htmlFor="author">Author</label>
                <select type="text" name="author" id="author" {...register('author')}>
                {authors.map((author) => {
                   return(
                      <option key={author.id} value={author.id}>
                         {author.first_name + " " + author.family_name}
                      </option>
                   )
                })}
                </select>
               </div>
               <Spacer y={1}/>
               <div>
                <label htmlFor="summary">Summary</label>
                <textarea name="summary" id="summary" {...register('summary')}/>
               </div>
               <Spacer y={1}/>
               <div>
                 {genres.length > 0 ?
                   genres.map((genre) => {
                     return(
                       <div key={genre.id}>
                          <input
                            type="checkbox"
                            value={genre.id}
                            id={genre.id}
                            {...register("genre")}
                          />
                        <label htmlFor={genre.id}>{genre.name}</label>
                      </div>
                     )
                   })
                  : null
                 }
               </div>
               <Spacer y={1}/>
               <div>
                <label htmlFor="ISBN">ISBN</label>
                <input type="text" name="ISBN" id="ISBN" {...register('ISBN')}/>
                {ISBNError &&
                <div style={{
                  fontSize:"12px",
                  padding:"8px",
                  color: "crimson"}}>
                    book with same ISBN already exist
                </div>}
               </div>
               <Spacer y={2}/>
               <Button htmlType="submit" type="success" ghost>Submit</Button>
            </form>
          }
          </section>
        </div>
      )
    }
This page's code is structured as the following:
First, we create the form with the required fields for creating an Author. Then we use the useForm hook to register the fields and handle the form submission.
Then we fetch the Genres and Authors to pre-populate our inputs (checkbox, select). The last step is to call the function createBook to handle the API call to create a new Book and redirect the user to the book detail page.
Update Book page
Updating a book is much like that for creating a book, except that we must populate the form with values from the database.
    import { useEffect } from 'react'
    import Head from 'next/head'
    import { Button, Loading, Spacer } from '@geist-ui/react'
    import { withRouter } from 'next/router'
    import useGenres from '@/hooks/useGenres'
    import useAuthors from '@/hooks/useAuthors'
    import useBook from '@/hooks/useBook'
    import { useForm } from "react-hook-form"

    function UpdateBook({ router, initialBook }) {
      const { id } = router.query
      // fetching book and genres to populate Author field and display all the genres.
      const {genres, isLoading: genresIsLoading, isError: genresIsError} = useGenres()
      const {authors, isLoading: authorsIsLoading, isError: AuthorsIsError} = useAuthors({initialData: null})
      const { book, isError, isLoading } = useBook(router.query.id ? router.query.id : null, initialBook)

      // register form fields
      const { register, handleSubmit, reset } = useForm({mode: "onChange"});

      useEffect(() => {
        const bookGenres = book.genres.map((genre) => {
          let ID = genre.id.toString()
          return ID
        })
        reset({
          title: book.title,
          author: book.author.id,
          summary: book.summary,
          ISBN: book.ISBN,
          genre: bookGenres
        });
      }, [reset])

      // API Call Update Book
      async function updateBook(data){
        const res = await fetch(
            `${process.env.NEXT_PUBLIC_API_ENDPOINT}/books/${id}`,
            {
              method: 'PUT',
              headers: {
                'Content-Type': 'application/json'
              },
              body: JSON.stringify({
              title: data.title,
              author: data.author,
              summary: data.summary,
              genres: data.genre,
              ISBN: data.ISBN,
              })
            }
        )
        router.push(`/catalog/books/details/${id}`)
      }
      return (
        <div>
          <Head>
            <title>Update Book</title>
            <link rel="icon" href="/favicon.ico" />
          </Head>
          <section className="main-section">
            <h1>
             Update Book
            </h1>
            {
              genresIsError || AuthorsIsError ? "an error occured" : genresIsLoading || authorsIsLoading ? <Loading /> :
            <form id="Book-update-form" onSubmit={handleSubmit(updateBook)}>
               <div>
                <label htmlFor="title">Title</label>
                <input type="text"  id="title" {...register("title")}/>
               </div>
               <Spacer y={1}/>
               <div>
                <label htmlFor="author">Author</label>
                <select type="text"  id="author" {...register("author")}>
                  {authors.map((author) => {
                    return(
                        <option key={author.id} value={author.id}>
                          {author.first_name + " " + author.family_name}
                        </option>
                    )
                  })}
                </select>
               </div>
               <Spacer y={1}/>
               <div>
                <label htmlFor="summary" >Summary</label>
                <textarea id="summary" {...register("summary")}/>
               </div>
               <Spacer y={1}/>
               <div>
                <label htmlFor="ISBN">ISBN</label>
                <input type="text" id="ISBN" {...register("ISBN")}/>
               </div>
               <Spacer y={1}/>
               <div>
                 {genres.length > 0 ?
                   genres.map((genre) => {
                     return(
                       <div key={genre.id}>
                          <input
                            type="checkbox"
                            value={genre.id}
                            id={genre.id}
                            {...register("genre")}
                          />
                        <label htmlFor={genre.id}>{genre.name}</label>
                      </div>
                     )
                   })
                  : null
                 }
               </div>
               <Spacer y={2}/>
               <Button auto htmlType="submit" type="success" ghost>Submit</Button>
            </form>
            }
          </section>
        </div>
      )
    }

    export default withRouter(UpdateBook)

    export async function getStaticPaths() {
      const res = await fetch(`${process.env.NEXT_PUBLIC_API_ENDPOINT}/books`)
      const books = await res.json()
      const paths = books.map((book) => ({
        params: { id: book.id.toString() },
      }))

      return { paths, fallback: false }
    }

    export async function getStaticProps({ params }) {
      const res = await fetch(`${process.env.NEXT_PUBLIC_API_ENDPOINT}/books/${params.id}`)
      const initialBook = await res.json()
      return {
        props: {
          initialBook,
        },
      }
    }
This page's code structure is almost the same as for creating a book page, the differences are:
- The route is dynamic
- Because we are using the
getStaticPropsmethod, the page is pre-rendered with Static Generation (SSG). - This time we're using the reset method that
useFormhook gives us to populate our form fields within theuseEffecthook
Delete book page
We'll be adding the delete functionality in the book detail page, open the pages/catalog/books/details/[id].js file and update it with the following code
    ...
    const Book = () => {
    ...
            const [toggleModal, setToggleModal] = useState(false)
            const handler = () => setToggleModal(true)
               const closeHandler = (event) => {
                  setToggleModal(false)
               }
               async function DeleteBook() {
                  const res = await fetch(`${process.env.NEXT_PUBLIC_API_ENDPOINT}/books/${router.query.id}`,
                  {
                     method:"DELETE",
                     headers: {
                        'Content-Type' : 'application/json'
                     },
                     body: null
                  })
                  setToggleModal(false)
                  router.push(`/catalog/books`)
               }
              return (
                            <section className="main-section">
          {
                  isError ? "an error occured !" : isLoading ? <Loading /> :
                  <div>
                                    ...
                       <Divider />
           <Button style={{marginRight:"1.5vw"}} auto onClick={handler} type="error">Delete book</Button>
           <Link href={`/catalog/books/update/${book.id}`}>
              <a>
                 <Button auto type="default">Update book</Button>
              </a>
           </Link>
           <Modal open={toggleModal} onClose={closeHandler}>
              {book.bookinstances.length > 0 ?
              <>
              <Modal.Title>
                 <Note type="warning">delete the following copies before deleting this book</Note>
              </Modal.Title>
              <Modal.Content>
                 <ul>
                    {book.bookinstances.map((copie) => {
                       return(
                          <li key={copie.id}>{copie.imprint}, #{copie.id}</li>
                       )
                    })
                    }
                 </ul>
              </Modal.Content>
              </>
              :<>
              <Modal.Title>CONFIRM DELETE BOOK ?</Modal.Title>
              <Modal.Subtitle>This action is ireversible</Modal.Subtitle>
              </>
              }
              <Modal.Action passive onClick={() => setToggleModal(false)}>Cancel</Modal.Action>
              <Modal.Action disabled={book.bookinstances.length > 0} onClick={DeleteBook}>Confirm</Modal.Action>
           </Modal>
                    </div>
          }
        </section>
      )
    }

    export default Book
Here we're adding the delete functionality to the detail page by adding a delete button toggle a modal component.
In the modal, we'll check if the Book has at least one BookInstance. We'll prevent the user from deleting this Book and showing a list of BookInstances that must be deleted before deleting the Book. If the Book has no BookInstances, we call the DeleteBook function when the user confirms.
Backend customization
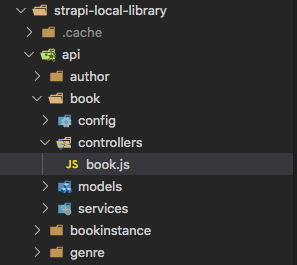
For more information about backend customization, I recommend reading the official Strapi docs link. Open Strapi App in visual studio code and open the book controller file.
Add the following code and save:
    // api/book/controllers/book.js

    const { sanitizeEntity } = require('Strapi-utils');

    module.exports = {
      async delete (ctx) {
        const { id } = ctx.params;
        let entity = await Strapi.services.book.find({ id });
        if(entity[0].bookinstances.length > 0) {
            return ctx.send({
              message: 'book contain one or more instances'
          }, 406);
        }
        entity = await Strapi.services.book.delete({ id });
        return sanitizeEntity(entity, { model: Strapi.models.book });
      },

      async create(ctx) {
        let entity;
        const { ISBN } = ctx.request.body
        entity = await Strapi.services.book.findOne({ ISBN });
        if (entity){
            return ctx.send({
              message: 'book alredy existe'
          }, 406);
        }
        if (ctx.is('multipart')) {
          const { data, files } = parseMultipartData(ctx);
          entity = await Strapi.services.book.create(data, { files });
        } else {
          entity = await Strapi.services.book.create(ctx.request.body);
        }
        return sanitizeEntity(entity, { model: Strapi.models.book });
      },
    };
In this file, we're overriding the default delete route by checking if the Book has at least one bookInstance we respond with a 406 not Acceptable error and a message, else we allow to delete the Book.
For the create route, we are checking if a book with the same ISBN already exists. We respond with a 406 not Acceptable error and a message. Else we allow creating a new book.
Deployment
Deploy Strapi app
To deploy Strapi app, we will create and host our MongoDB instance on the cloud.
Create a database on MongoDB cloud
Assuming you have a MongoDB account, I recommend following the official tutorial on creating a New Cluster on the MongoDB website. After creating a new cluster, navigate to clusters > your cluster name > collections and click on

You can choose any name for your database. After creating the database, under SECURITY > Database access, create a new user and make sure to save the password for later uses, and the next step is to click on connect.

Lastly, choose to connect your application, you'll get the database connection string

We will use this string to connect our Strapi App to the database.
Create a new App on Heroku
Login to Heroku and click on the top right corner

After creating the App, go to setting > config vars and click Reveal Config Vars
add config vars as follow.

All Config Vars are related to the database information.
- You can extract the DATABASE_HOST variable from the database connection string following the pattern shown in the picture above.
- DATABASE_NAME is the name of the MongoDB database you created earlier.
- Same for DATABASE_PASSWORD and DATABASE_USERNAME.
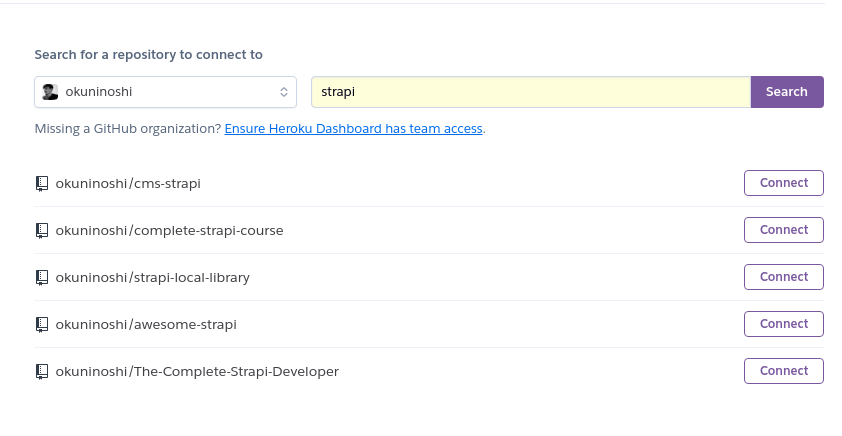
Now we can deploy our Strapi App directly from the Heroku dashboard, go to deploy tap, and choose Github as the following
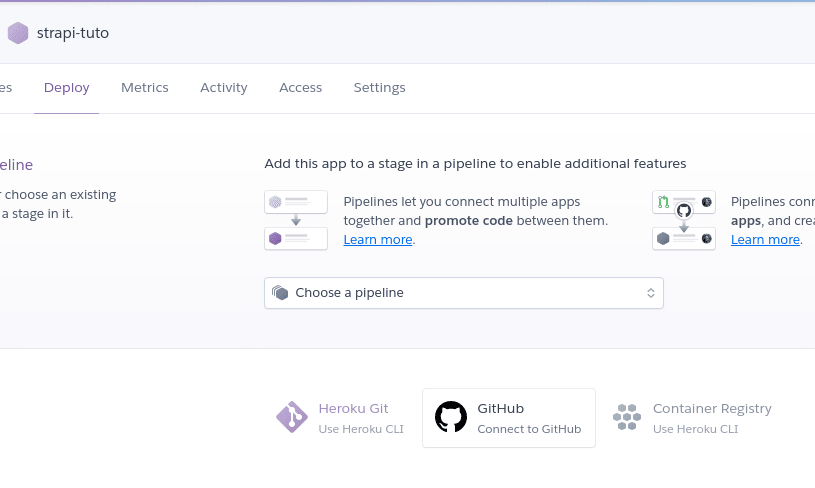
Choose the right GitHub repo and click on Connect.
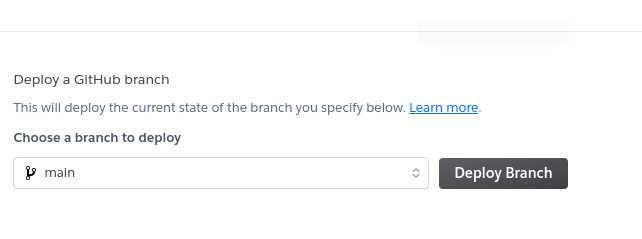
After Heroku completes connecting to the repository, deploy the App.
Deploy NextJS app
Connect to your Vercel account, select projects, tap and click on New Project, then import the repo you want to deploy. You'll be redirected to the project configuration page.

Add the following Environment Variable to your Vercel account.
    VARIABLE_NAME = NEXT_PUBLIC_API_ENDPOINT
    VALUE = https://your-app-name.herokuapp.com
Next, click the deploy button.
That's the end of this tutorial on Rebuild the MDN express local library website with Strapi and NextJS.
Source Code:
NextJS - https://github.com/okuninoshi/next-local-library.git
Strapi - https://github.com/okuninoshi/Strapi-local-library.git
Conclusion
In this tutorial, we learned how to install Strapi with MongoDB locally and customize our API endpoint to our needs.
We also learned how to create a NextJS app and communicate with our API to perform CRUD operation with NextJS built-in functionality and use environment variables to deploy our Strapi and NextJS application to Heroku and Vercel.
Next, I propose to extend this App by adding Authentication and user registration with the NextAuth package. I recommend this article by Osmar Pérez.


Top comments (1)
Threw me a bit off. Skipping the utils.Fetcher, useAuthors and useGenres parts really made the whole experience more stressful.