
This article explains how to create a React-Native app with Strapi as the backend
Update tutorial author: Chigozie Oduah
Strapi is a headless CMS that allows you to easily build customizable backend services. You can integrate Strapi applications with any type of frontend and can deploy the application to the cloud.
This tutorial guides you through the process of creating a simple React-native to-do app with Strapi as your backend. You will be able to create, edit, and delete to-dos on a per-user basis by interacting with the Strapi's REST API.
Note: This tutorial assumes that you already have an instance of Strapi up and running and created a test user. If you don’t, read the Getting Started guide.
The sample app is available on Github.
Setting up the Backend
Firstly, we’ll need to create a Strapi project with the command below:
npx create-strapi-app@latest strapi-backend
After creating the project, Strapi will automatically start a development server. We can always run the development server ourselves by opening the root folder in the terminal and running the yarn develop command:
yarn develop
We’ll need to create a new “todo” content type. For that, we need to access our Content-Type Builder and click on + Create new collection type.
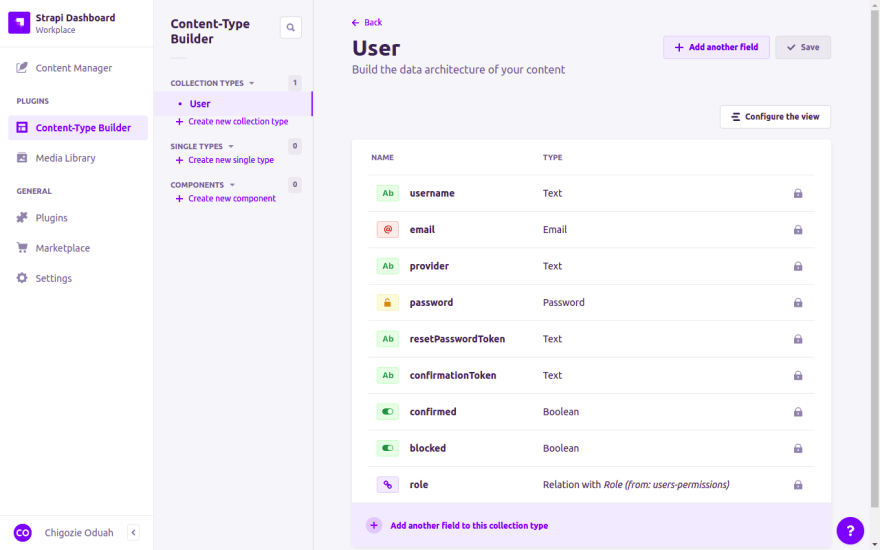
Now that we have successfully created our new Content-Type, we need to add some fields to it:
-
title(Text, Short, required): The title of the TODO. -
description(Text, Long, required): A quick summary of the TODO. -
finished(Boolean, default: false): If the TODO was finished. -
owner(Relation, required): The User (User-Permissions) that the TODO belongs to.
When you successfully have added the fields to your Content-Type, it should look like this:


After saving the changes, we need to register the endpoints for the ToDo collection. The endpoints allows our react-native app to interact with the collection. To register the endpoints we need to:
- Navigate to Settings → Users & Permission plugin → Roles.
- Click on Authenticated.
- Toggle the Todo dropdown under Permissions.
- Tick Select All.
- Click Save.
Creating the Mobile App
Now that we have our API set up, we can concentrate on our mobile app. I suggest checking out React native’s Getting Started guide if you aren’t familiar with React-native. We’ll have to initialize a new React-native project by running the React-native CLI.
react-native init TodoApp
Running this command will create a new directory with the specified app name that will be the root of your project. In the base directory of your project, you’ll have to create the following folder structure:
src
 |-- app
      |-- controllers
      |-- models
      |-- views
 |-- components
 |-- redux
       |-- actions
       |-- reducers
 |-- screens
Now that we have our project initialized, our structure optimized, and our backend running, we can add some packages to our app. We’ll use a predefined list of packages I found. There may be better alternatives, but you are free to decide this for yourself!
The Interface
-
react-native-paper: A set of components following Google’s Material Design guidelines -
react-native-vector-icons: Used by react-native-paper to display a gigantic set of icons that fit your needs. -
react-navigation: A library for creating in-app navigation and handling navigation intents. It also provides integration with react-native-paper by providing a material themed bottom tab bar. -
react-native-gesture-handler: Required by react-navigation to work properly.
State Management
-
redux: Redux is a library for handling global state and modification. -
react-redux: Provides the components needed for redux to work with react-native. -
redux-persist: Enables you to save and persist your state locally on the device. It is especially handy for authentication flows. -
async-storage: Asynchronous on-device storage
To add the packages, install them with yarn:
yarn add react-native-paper react-native-vector-icons react-navigation redux react-redux redux-persist @react-native-community/async-storage react-native-gesture-handler
Creating the Models and Controllers
Before getting to the interface of the app, we’ll create a model for our TODO. To do so, create a new file in ./src/app/models/TodoModel.js. Since this file contains the model for the Content-Type we have created earlier, the fields need to be exactly the same.
- Create a
./src/app/models/TodoModel.jsfile containing the following code:
    // TodoModel.js

    /**
     * TODO Model as defined in Strapi
     */

    import {edit, save, dismiss} from '../controllers/TodoController';

    class TodoModel {
      constructor(user, title, description, finished = false, id = undefined) {
        this.user = user;
        this.title = title;
        this.description = description;
        this.finished = finished;
        this.id = id;
        // save function adds id property later
      }

      async save() {
        // save the todo to Strapi
        const id = await save(this);

        // should no id be returned throw an error
        if (!id) {
          throw new Error('Todo could not be saved');
        }

        // set id and return true
        this.id = id;
        return true;
      }

      async edit() {
        if (!this.id) {
          throw new Error('Cannot edit TODO before it was saved.');
        }

        const edited = await edit(this);

        // check if the edit returned false
        if (!edited) {
          throw new Error('Todo could not be edited.');
        }

        return true;
      }

      async dismiss() {
        if (!this.id) {
          throw new Error('Cannot delete TODO before it was saved.');
        }

        const dismissed = await dismiss(this);

        // check if the dismiss returned false
        if (!dismissed) {
          throw new Error('Todo could not be deleted.');
        }

        return true;
      }
    }

    export default TodoModel;
- Do the same for our
UserContent-Type from the User-Permissions plugin in Strapi. Create a file in./src/app/models/UserModel.jscontaining the following code:
    // UserModel.js

    /**
     * User model as defined in Strapi
     */

    import {login, logout} from '../controllers/UserController';

    class UserModel {
      constructor(identifier, password) {
        this.identifier = identifier;
        this.password = password;
      }

      async login() {
        const result = await login(this);

        if (!result) {
          throw new Error('Unable to login user.');
        }

        return true;
      }

      async logout() {
        const result = await logout(this);

        if (!result) {
          throw new Error('Unable to logout user.');
        }

        return true;
      }
    }

    export default UserModel;
Now that we have coded our models, you may notice that we imported a file we haven’t created yet, so let’s create the two needed files:
./src/app/controllers/UserController.js./src/app/controllers/TodoController.js
These file are our controllers where we hold our app logic that will be executed when we call our model functions.
    // TodoController.js

    import {store} from '../../redux/Store';

    /**
     * if you have an instance of Strapi running on your local
     * machine:
     *
     * 1. Run `adb reverse tcp:8163 tcp:8163` (only on android)
     *
     * 2. You have to change the access IP from localhost
     * to the IP of the machine Strapi is running on.
     */
    const url = 'http://localhost:1337/todos';

    /**
     * add a todo to Strapi
     */
    export const save = async todo => {
      const requestBody = JSON.stringify({
        title: todo.title,
        description: todo.description,
        finished: todo.finished,
        user: todo.user.id,
      });

      const requestConfig = {
        method: 'POST',
        headers: {
          Authorization: `Bearer ${store.getState().jwt}`,
          'Content-Type': 'application/json',
        },
        body: requestBody,
      };

      const response = await fetch(url, requestConfig);

      const json = await response.json();

      if (json.error) {
        return null;
      }

      return json._id;
    };

    /**
     * add a todo to Strapi
     */
    export const edit = async todo => {
      const requestBody = JSON.stringify({
        title: todo.title,
        description: todo.description,
        due: todo.due,
        finished: todo.finished ? 1 : 0,
        user: todo.user.id,
      });

      const requestConfig = {
        method: 'PUT',
        headers: {Authorization: `Bearer ${store.getState().jwt}`},
        body: requestBody,
      };

      const response = await fetch(`${url}/${todo.id}`, requestConfig);
      const json = await response.json();

      if (json.error) {
        return false;
      }

      return true;
    };

    /**
     * delete a todo from Strapi
     */
    export const dismiss = async todo => {
      const response = await fetch(`${url}/${todo.id}`, {
        headers: {Authorization: `Bearer ${store.getState().jwt}`},
      });

      const json = response.json();

      if (json.error) {
        return false;
      }

      return true;
    };
Now, the second controller:
    // UserController.js

    import {saveUser, deleteUser} from '../../redux/actions/UserActions';

    /**
     * if you have an instance of Strapi running on your local
     * machine:
     *
     * 1. Run `adb reverse tcp:8163 tcp:8163` (only on android)
     *
     * 2. You have to change the access IP from localhost
     * to the IP of the machine Strapi is running on.
     */
    const url = 'http://192.168.0.57:1337';

    /**
     * @param {UserModel} user
     */
    export const login = async user => {
      const requestConfig = {
        method: 'POST',
        headers: {
          'Content-Type': 'application/json',
        },
        body: JSON.stringify({
          identifier: user.identifier,
          password: user.password,
        }),
      };

      try {
        const response = await fetch(`${url}/auth/local`, requestConfig);
        const json = await response.json();

        if (json.error) {
          return false;
        }

        saveUser(json.jwt, json.user);

        return true;
      } catch (err) {
        alert(err);
        return false;
      }
    };

    /**
     * @param {UserModel} user
     */
    export const logout = async user => {
      deleteUser();
    };
As seen, we call our redux store at the end of the UserController.login() and UserController.logout(). It will make more sense in a few moments.
Creating the Redux Store
To be able to update our UI, we need to create a Redux store. This store will hold our user data and be persisted if modified. Amazing, right?
Steps
Create the following files:
./src/redux/Store.js./src/redux/reducers/UserReducer.js./src/redux/actions/UserActions.js
Now that we have created the files, we can start creating our store logic. The logic for each store identity is held in their so-called reducer.
The reducer can receive an action; this action has a type and an optional payload that you can define on a per-request basis. We’ll need two types of actions that’ll be USER_SAVE and USER_DELETE that symbolize respective user log in -/out’s. We will not implement USER_DELETE though.
    // UserReducer.js

    const defaultState = {
      jwt: null,
      user: null,
    };

    /**
     * This is a reducer, a pure function with (state, action) => state signature.
     * It describes how an action transforms the state into the next state.
     *
     * The shape of the state is up to you: it can be a primitive, an array, an object,
     * or even an Immutable.js data structure. The only important part is that you should
     * not mutate the state object, but return a new object if the state changes.
     *
     * In this example, we use a `switch` statement and strings, but you can use a helper that
     * follows a different convention (such as function maps) if it makes sense for your
     * project.
     */
    const UserReducer = (state = defaultState, action) => {
      switch (action.type) {
        case 'USER_SAVE': {
          return {
            ...state,
            ...{jwt: action.payload.jwt, user: action.payload.user},
          };
        }

        case 'USER_DELETE': {
          return defaultState;
        }

        default:
          return defaultState;
      }
    };

    export default UserReducer;
To call this reducer, we will access the previously created UserActions.js file. That holds two actions: saveUser() and deleteUser().
    // UserActions.js

    import {store} from '../Store';

    // The only way to mutate the internal state is to dispatch an action.
    // The actions can be serialized, logged or stored and later replayed.
    export const saveUser = (jwt, user) => {
      store.dispatch({
        type: 'USER_SAVE',
        payload: {
          jwt,
          user,
        },
      });
    };

    export const deleteUser = () => {
      store.dispatch({type: 'USER_DELETE'});
    };
And lastly, we have to code our Store.js file. This file not only includes the reducer but also provides the persistence via the previously installed redux-persist library.
    // Store.js

    import {createStore} from 'redux';
    import {persistStore, persistReducer} from 'redux-persist';
    import AsyncStorage from '@react-native-community/async-storage';

    import rootReducer from '../redux/reducers/UserReducer';

    const persistConfig = {
      key: 'root',
      storage: AsyncStorage,
    };

    const persistedReducer = persistReducer(persistConfig, rootReducer);

    // Create a Redux store holding the state of your app.
    // Its API is { subscribe, dispatch, getState }.
    const createdStore = createStore(persistedReducer);
    const createdPersistor = persistStore(createdStore);

    export const store = createdStore;
    export const persistor = createdPersistor;
Just one more step and your app is redux-ready! Add the PersistorGate and Provider components to your App.js file.
    // App.js

    import React from 'react';
    import {PersistGate} from 'redux-persist/integration/react';
    import {Provider} from 'react-redux';
    import {store, persistor} from './src/redux/Store';

    const App = () => {
      return (
        <Provider store={store}>
          <PersistGate loading={null} persistor={persistor} />
        </Provider>
      );
    };

    export default App;
Building the Navigation
To build our screens, we'll use the previously-installed react-navigation package. We’ll have to create a bunch of files; hope you are ready to get your hands dirty!
Screens
./src/screens/Overview.js./src/screens/Login.js
Navigation
./src/components/navigation/Authentication.js
Once created, fill all Screen files with mock up content so you can distinguish what screen you are currently on.
    // Overview.js & Login.js

    import React from 'react';
    import {View, StyleSheet} from 'react-native';
    import {Text} from 'react-native-paper';

    const SCREEN_NAME = props => {
      return (
        <View style={styles.base}>
          <Text style={styles.text}>SCREEN_NAME</Text>
        </View>
      );
    };

    const styles = StyleSheet.create({
      base: {
        flex: 1,
        alignContent: 'center',
        justifyContent: 'center',
      },
      text: {
        textAlign: 'center',
      },
    });

    export default SCREEN_NAME;
Note: Replace
SCREEN_NAMEwith the name of the screen.
Building the Navigation’s Logic
Open up the file Authentication.js created in the last step and create a new SwitchNavigator via the createStackNavigator() method. We use the SwitchNavigator in combination with redux to redirect the user to the login page or the overview page depending on his authentication state.
    // Authentication.js

    import React from 'react';

    // navigation components
    import {createSwitchNavigator, createAppContainer} from 'react-navigation';

    import Login from '../../screens/Login';
    import Overview from '../../screens/Overview';
    import {store} from '../../redux/Store';

    const Authentication = () => {
      const [route, setRoute] = React.useState(
        store.getState().jwt ? 'Overview' : 'Login',
      );

      const Navigator = createAppContainer(
        createSwitchNavigator(
          {
            Login: {
              screen: Login,
            },
            Overview: {
              screen: Overview,
            },
          },
          {
            initialRouteName: route,
          },
        ),
      );

      // on mount subscribe to store event
      React.useEffect(() => {
        store.subscribe(() => {
          setRoute(store.getState().jwt ? 'Overview' : 'Login');
        });
      }, []);

      return <Navigator />;
    };

    export default Authentication;
Including the Navigation into Our App
Import the navigation file into your App.js file and render it as a component. Also, add the Provider component of react-native-paper
    // App.js

    import React from 'react';
    import {Provider as PaperProvider} from 'react-native-paper';
    import {PersistGate} from 'redux-persist/integration/react';
    import {Provider} from 'react-redux';
    import {store, persistor} from './src/redux/Store';
    import Authentication from './src/components/navigation/Authentication';

    const App = () => {
      return (
        <Provider store={store}>
          <PersistGate loading={null} persistor={persistor}>
            <PaperProvider>
              <Authentication />
            </PaperProvider>
          </PersistGate>
        </Provider>
      );
    };

    export default App;
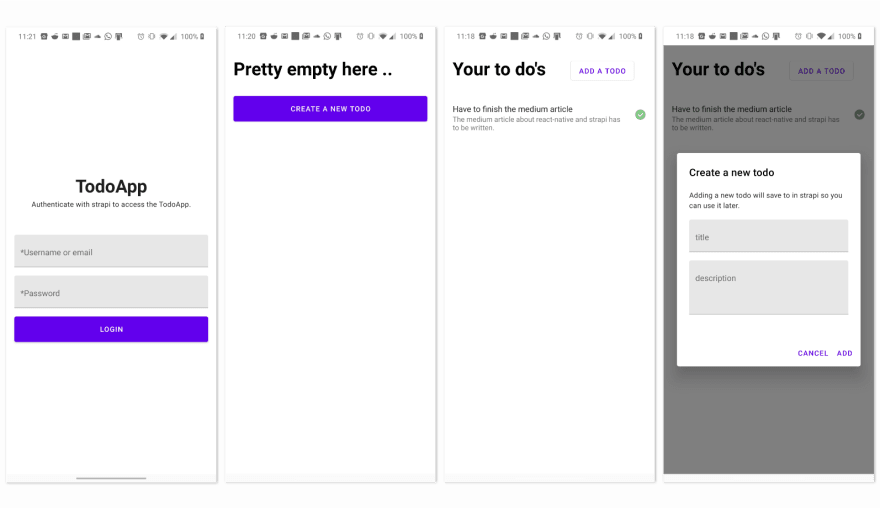
Now run your project and take a look at your device/emulator and you should see the following screen:

Coding and Styling the Login Screen
Our mockup screen is amazing but we need to add some functionality to it.
    // Login.js

    import React from 'react';
    import {View, StyleSheet, StatusBar} from 'react-native';
    import {
      Headline,
      Paragraph,
      TextInput,
      Button,
      Snackbar,
      Portal,
    } from 'react-native-paper';
    import UserModel from '../app/models/UserModel';

    const Login = props => {
      const [identifier, setIdentifier] = React.useState('');
      const [password, setPassword] = React.useState('');
      const [visible, setVisible] = React.useState(false);
      const [loading, setLoading] = React.useState(false);
      const [error, setError] = React.useState(false);

      const validateInput = () => {
        let errors = false;

        if (!identifier || identifier.length === 0) {
          errors = true;
        }

        if (!password || password.length === 0) {
          errors = true;
        }

        return !errors;
      };

      const authenticateUser = async () => {
        if (validateInput()) {
          setLoading(true);
          const user = new UserModel(identifier, password);

          try {
            await user.login();
          } catch (err) {
            setError(err.message);
            setVisible(true);
            setLoading(false);
          }
        } else {
          setError('Please fill out all *required fields');
          setVisible(true);
          setLoading(false);
        }
      };

      return (
        <View style={styles.base}>
          <>
            <StatusBar backgroundColor="#ffffff" barStyle="dark-content" />
          </>

          <View style={styles.header}>
            <Headline style={styles.appTitle}>TodoApp</Headline>
            <Paragraph style={styles.appDesc}>
              Authenticate with Strapi to access the TodoApp.
            </Paragraph>
          </View>

          <>
            <View style={styles.divider} />
            <TextInput
              onChangeText={text => setIdentifier(text)}
              label="*Username or email"
              placeholder="*Username or email">
              {identifier}
            </TextInput>
          </>

          <>
            <View style={styles.divider} />
            <TextInput
              onChangeText={text => setPassword(text)}
              label="*Password"
              placeholder="*Password"
              secureTextEntry>
              {password}
            </TextInput>
          </>

          <>
            <View style={styles.divider} />
            <Button
              loading={loading}
              disabled={loading}
              style={styles.btn}
              onPress={() => authenticateUser()}
              mode="contained">
              Login
            </Button>
            <View style={styles.divider} />
            <View style={styles.divider} />
          </>

          <>
            {/**
             * We use a portal component to render
             * the snackbar on top of everything else
             * */}
            <Portal>
              <Snackbar visible={visible} onDismiss={() => setVisible(false)}>
                {error}
              </Snackbar>
            </Portal>
          </>
        </View>
      );
    };

    const styles = StyleSheet.create({
      base: {
        flex: 1,
        paddingLeft: 16,
        paddingRight: 16,
        alignContent: 'center',
        justifyContent: 'center',
        backgroundColor: '#ffffff',
      },
      divider: {
        height: 16,
      },
      headline: {
        fontSize: 30,
      },
      appDesc: {
        textAlign: 'center',
      },
      header: {
        padding: 32,
      },
      appTitle: {
        textAlign: 'center',
        fontSize: 35,
        lineHeight: 35,
        fontWeight: '700',
      },
      btn: {
        height: 50,
        paddingTop: 6,
      },
    });

    export default Login;
Try to login with a Strapi user and you’ll land directly on the overview page. Close the app, open it again, and you’ll see that you are directly accessing the overview screen. This is thanks to redux-persist loading your saved state and passing it to our SwitchNavigator in Authentication.js.
Coding and Styling the Overview Screen
Do you know what’s one of the greatest features of mobile development? Endless lists! We’re going to create a list that is created for our application. Since the length of such a list is undefined, the number of possible layouts is too.
List Component
Let's get started with our list component for which we’ll create a new ./src/components/TodoList.js file and paste the following:
    // TodoList.js

    import React from 'react';
    import {View, StyleSheet} from 'react-native';
    import {
      Text,
      IconButton,
      ActivityIndicator,
      Button,
      Portal,
      Dialog,
      Paragraph,
      TextInput,
      HelperText,
      Divider,
    } from 'react-native-paper';
    import {FlatList} from 'react-native-gesture-handler';
    import {store} from '../../redux/Store';
    import TodoView from '../../app/views/TodoView';
    import TodoModel from '../../app/models/TodoModel';

    /**
     * the footer also acts as the load more
     * indicator.
     */
    export const TodoFooter = props => {
      return (
        <>
          {props.shouldLoadMore ? (
            <View style={styles.loaderView}>
              <ActivityIndicator animating />
            </View>
          ) : null}
        </>
      );
    };

    /**
     * This is our header for the list that also
     * includes the todo.add action.
     */
    export const TodoHeader = props => {
      const [error, setError] = React.useState('');
      const [title, setTitle] = React.useState('');
      const [visible, setVisible] = React.useState(false);
      const [description, setDescription] = React.useState('');

      const createTodoFromDialog = async () => {
        if (title.length === 0 || description.length === 0) {
          setError('Title and description are required.');
          return;
        }

        const user = store.getState().user;
        const todo = new TodoModel(user, title, description);

        try {
          await todo.save();
        } catch (err) {
          setError(err.message);
        }

        props.addTodo(todo);
      };

      return (
        <View style={styles.header}>
          <Text style={styles.text}>{props.text || "Your to do's"}</Text>
          <View style={styles.buttonFrame}>
            {!props.text ? (
              <Button
                onPress={() => setVisible(true)}
                style=
                mode="outlined">
                Add a todo
              </Button>
            ) : null}
          </View>

          <Portal>
            <Dialog visible={visible} onDismiss={() => setVisible(false)}>
              <Dialog.Title>Create a new todo</Dialog.Title>
              <Dialog.Content>
                <Paragraph>
                  Adding a new todo will save to in Strapi so you can use it later.
                </Paragraph>
                <View style={styles.divider} />
                <TextInput
                  label="title"
                  placeholder="title"
                  onChangeText={text => {
                    setTitle(text);
                    setError(false);
                  }}>
                  {title}
                </TextInput>
                <View style={styles.divider} />
                <TextInput
                  label="description"
                  placeholder="description"
                  multiline={true}
                  numberOfLines={4}
                  onChangeText={text => {
                    setDescription(text);
                    setError(false);
                  }}>
                  {description}
                </TextInput>
                <HelperText type="error">{error}</HelperText>
              </Dialog.Content>

              <Dialog.Actions>
                <Button
                  onPress={() => {
                    setVisible(false);
                    setTitle('');
                    setDescription('');
                    setError('');
                  }}>
                  Cancel
                </Button>
                <Button onPress={() => createTodoFromDialog()}>Add</Button>
              </Dialog.Actions>
            </Dialog>
          </Portal>
        </View>
      );
    };

    /**
     * in case no todos were fetched on initial fetch
     * we can assume that there are none for this specific
     * user.
     */
    export const EmptyTodo = props => {
      const [error, setError] = React.useState('');
      const [title, setTitle] = React.useState('');
      const [visible, setVisible] = React.useState(false);
      const [description, setDescription] = React.useState('');

      const createTodoFromDialog = async () => {
        if (title.length === 0 || description.length === 0) {
          setError('Title and description are required.');
          return;
        }

        const user = store.getState().user;
        const todo = new TodoModel(user, title, description);

        try {
          await todo.save();
        } catch (err) {
          setError(err.message);
        }

        props.addTodo(todo);
      };

      return (
        <View style={styles.emptyBase}>
          <TodoHeader text={'Pretty empty here ..'} />
          <Button
            onPress={() => setVisible(true)}
            style={styles.btn}
            mode="contained">
            Create a new todo
          </Button>

          <Portal>
            <Dialog visible={visible} onDismiss={() => setVisible(false)}>
              <Dialog.Title>Create a new todo</Dialog.Title>
              <Dialog.Content>
                <Paragraph>
                  Adding a new todo will save to in Strapi so you can use it later.
                </Paragraph>
                <View style={styles.divider} />
                <TextInput
                  label="title"
                  placeholder="title"
                  onChangeText={text => {
                    setTitle(text);
                    setError(false);
                  }}>
                  {title}
                </TextInput>
                <View style={styles.divider} />
                <TextInput
                  label="description"
                  placeholder="description"
                  multiline={true}
                  numberOfLines={4}
                  onChangeText={text => {
                    setDescription(text);
                    setError(false);
                  }}>
                  {description}
                </TextInput>
                <HelperText type="error">{error}</HelperText>
              </Dialog.Content>

              <Dialog.Actions>
                <Button
                  onPress={() => {
                    setVisible(false);
                    setTitle('');
                    setDescription('');
                    setError('');
                  }}>
                  Cancel
                </Button>
                <Button onPress={() => createTodoFromDialog()}>Add</Button>
              </Dialog.Actions>
            </Dialog>
          </Portal>
        </View>
      );
    };

    /**
     * the main list component holding all of the loading
     * and pagination logic.
     */
    export const TodoList = props => {
      const [data, setData] = React.useState([]);
      const [limit] = React.useState(10);
      const [start, setStart] = React.useState(0);
      const [loading, setLoading] = React.useState(true);
      const [loadingMore, setLoadingMore] = React.useState(true);
      const [shouldLoadMore, setShouldLoadMore] = React.useState(true);

      /**
       * get the data from the server in a paginated manner
       *
       * 1. should no data be present start the normal loading
       * animation.
       *
       * 2. should data be present start the loading more
       * animation.
       */
      const getTodosForUser = React.useCallback(async () => {
        if (!shouldLoadMore) {
          return;
        }

        if (!loading && data.length === 0) {
          setLoading(true);
        }

        if (!loadingMore && data.length > 0) {
          setLoadingMore(true);
        }

        const url = `http://192.168.0.57:1337/todos?_start=${start}&_limit=${limit}`;
        const jwt = store.getState().jwt;
        const response = await fetch(url, {
          headers: {Authorization: `Bearer ${jwt}`},
        });
        const json = await response.json();

        if (json.length < 10) {
          setShouldLoadMore(false);
        } else {
          setStart(start + limit);
        }

        setData([...data, ...json]);
        setLoading(false);
        setLoadingMore(false);
      }, [data, limit, loading, loadingMore, shouldLoadMore, start]);

      /**
       * saves a new todo to the server by creating a new TodoModel
       * from the dialog data and calling Todo.save()
       */
      const addTodo = todo => {
        const {title, description, finished, user, id} = todo;
        setData([...data, ...[{title, description, finished, user, id}]]);
      };

      /**
       * callback method for the todo view. Deletes a todo from the list
       * after it has been deleted from the server.
       */
      const removeTodo = id => {
        setData(data.filter(item => item.id !== id));
      };

      React.useEffect(() => {
        getTodosForUser();
      }, [getTodosForUser]);

      if (loading) {
        return (
          <View style={styles.loaderBase}>
            <ActivityIndicator animating size="large" />
          </View>
        );
      }

      if (!shouldLoadMore && !loading && !loadingMore && data.length === 0) {
        return <EmptyTodo addTodo={addTodo} />;
      }

      return (
        <>
          <FlatList
            style={styles.base}
            data={data}
            ItemSeparatorComponent={() => <Divider />}
            ListHeaderComponent={() => <TodoHeader addTodo={addTodo} />}
            ListFooterComponent={() => (
              <TodoFooter shouldLoadMore={shouldLoadMore} />
            )}
            onEndReachedThreshold={0.5}
            onEndReached={() => getTodosForUser()}
            renderItem={({item, index}) => (
              <TodoView removeTodo={removeTodo} item={item} index={index} />
            )}
          />
        </>
      );
    };

    const styles = StyleSheet.create({
      base: {
        flex: 1,
        backgroundColor: '#fff',
      },
      emptyBase: {
        flex: 1,
        backgroundColor: '#fff',
      },
      text: {
        fontSize: 35,
        lineHeight: 35,
        fontWeight: '700',
        padding: 32,
        paddingLeft: 16,
      },
      header: {
        flexDirection: 'row',
        alignContent: 'center',
      },
      btn: {
        height: 50,
        paddingTop: 6,
        marginLeft: 16,
        marginRight: 16,
      },
      loaderBase: {
        padding: 16,
        alignContent: 'center',
        justifyContent: 'center',
        flex: 1,
      },
      divider: {
        height: 16,
      },
      buttonFrame: {
        justifyContent: 'center',
      },
    });
View Component
Now that we have our list set up, we are just one more step away from completing our app and that is the view that will be reused for each individual child of the data set.
Create a ./src/app/views/TodoView.js file containing the following code:
    // TodoView.js

    import React from 'react';
    import {StyleSheet, View} from 'react-native';
    import {
      List,
      Colors,
      Portal,
      Dialog,
      Paragraph,
      TextInput,
      HelperText,
      Button,
      Checkbox,
    } from 'react-native-paper';
    import TodoModel from '../models/TodoModel';
    import {store} from '../../redux/Store';

    export const TodoView = props => {
      const {
        title: passedPropsTitle,
        description: passedPropsDesc,
        finished: passedPropsFinished,
        id,
      } = props.item;

      const [passedTitle, setPassedTitle] = React.useState(passedPropsTitle);
      const [passedDesc, setPassedDesc] = React.useState(passedPropsDesc);
      const [passedFinished, setPassedFinished] = React.useState(
        passedPropsFinished,
      );
      const [error, setError] = React.useState('');
      const [title, setTitle] = React.useState(passedTitle);
      const [visible, setVisible] = React.useState(false);
      const [description, setDescription] = React.useState(passedDesc);
      const [finished, setFinished] = React.useState(passedFinished);

      const editTodoFromDialog = async () => {
        if (title.length === 0 || description.length === 0) {
          setError('Title and description are required.');
          return;
        }

        const user = store.getState().user;
        const todo = new TodoModel(user, title, description, finished, id);

        try {
          await todo.edit();
        } catch (err) {
          setError(err.message);
          return;
        }

        setPassedTitle(title);
        setPassedDesc(description);
        setPassedFinished(finished);
        setVisible(false);
      };

      const deleteTodoFromDialog = () => {
        const user = store.getState().user;
        const todo = new TodoModel(user, title, description, finished, id);

        try {
          todo.dismiss();
        } catch (err) {
          setError(err.message);
          return;
        }

        setVisible(false);
        props.removeTodo(id);
      };

      return (
        <>
          <List.Item
            onPress={() => {
              setVisible(true);
            }}
            title={passedTitle}
            description={passedDesc}
            right={pprops => {
              if (passedFinished) {
                return (
                  <List.Icon
                    {...pprops}
                    color={Colors.green300}
                    icon="check-circle"
                  />
                );
              }

              return null;
            }}
          />

          <Portal>
            <Dialog visible={visible} onDismiss={() => setVisible(false)}>
              <Dialog.Title>Edit your todo</Dialog.Title>
              <Dialog.Content>
                <Paragraph>
                  Editing your todo will also change it in Strapi.
                </Paragraph>

                <View style={styles.divider} />

                <TextInput
                  label="title"
                  placeholder="title"
                  onChangeText={text => {
                    setTitle(text);
                    setError(false);
                  }}>
                  {title}
                </TextInput>

                <View style={styles.divider} />

                <TextInput
                  label="description"
                  placeholder="description"
                  multiline={true}
                  numberOfLines={4}
                  onChangeText={text => {
                    setDescription(text);
                    setError(false);
                  }}>
                  {description}
                </TextInput>

                <HelperText type="error">{error}</HelperText>
                {error.length > 0 ? <View style={styles.divider} /> : null}

                <View
                  style={{
                    flexDirection: 'row',
                    alignContent: 'center',
                  }}>
                  <Checkbox
                    status={finished ? 'checked' : 'unchecked'}
                    onPress={() => {
                      setFinished(!finished);
                    }}
                  />
                  <Paragraph style=>
                    Finished
                  </Paragraph>
                </View>
              </Dialog.Content>

              <Dialog.Actions>
                <Button onPress={() => deleteTodoFromDialog()}>delete</Button>
                <View style=/>
                <Button
                  onPress={() => {
                    setVisible(false);
                    setError('');
                  }}>
                  Cancel
                </Button>
                <Button onPress={() => editTodoFromDialog()}>Save</Button>
              </Dialog.Actions>
            </Dialog>
          </Portal>
        </>
      );
    };

    const styles = StyleSheet.create({
      divider: {
        height: 16,
      },
    });

    export default TodoView;
Finally, include the Views into the Overview screen created earlier.
    // Overview.js

    import React from 'react';
    import {StatusBar} from 'react-native';
    import {TodoList} from '../components/lists/TodoList';

    const Overview = props => {
      return (
        <>
          <StatusBar backgroundColor="#ffffff" barStyle="dark-content" />
          <TodoList />
        </>
      );
    };

    export default Overview;
Summary
We created a mobile app that supports creating, editing, deleting to-dos on a user basis and can display them in a paginated list that is always up to date with the data on the server and thus synchronized across devices.
[


Oldest comments (0)