
Introduction
Strapi is an open-source headless CMS. A headless CMS is a backend content management system (CMS) that makes content available via RESTful APIs or GraphQL APIs. Strapi is 100% Javascript, fully customizable, and developer-first.
Strapi enables you to build your applications without having to worry about the backend. You can integrate any frontend framework of your choice with Strapi. In this article, we will create a quiz desktop application with Electron, Next.js, and Strapi.
Goal
This tutorial will help you get started with building desktop applications with Next.js and Strapi. This tutorial will show you how to create a backend for a quiz application using Strapi and create a quiz desktop application using Next.js and TailwindCSS.
Prerequisites
To follow this article, you should have Node.js installed on your computer. The installed Node.js must be version 12.x and above so that you can install Strapi.
Setting up Strapi
First of all, we are going to set up our Strapi application. We are going to be using Strapi templates to set up our Strapi application. Strapi templates are Strapi applications that contain pre-built collection types and single-types suited for the appropriate use case and data type. In this tutorial, we will use the quiz template here.
Run the command below to create the project directory in your preferred folder:
    mkdir quiz-app
    cd quiz-app
Run the command below to create a Strapi application with the quiz template:
    npx create-strapi-app backend --quickstart --template https://github.com/malgamves/strapi-template-quiz
    /** OR **/
    yarn create strapi-app backend --quickstart --template https://github.com/malgamves/strapi-template-quiz
The above command creates a strapi backend folder called backend/ using the quiz template URL specified with the --template flag. The command automatically runs the strapi application when it’s done creating the strapi backend folder. This command automatically opens a new browser tab at http://localhost:1337/admin/auth/register-admin.

Fill in the relevant information and click “LET’S START.” It will take you to the admin panel, where we can already see the content types created by the template and the sample data in them.

The template already helped create the “Questions” content type. In addition to that, we are going to create a “Quizzes” content type. The “Quizzes” content type has a one-to-many relationship with the “Questions” content type.


We are going to create 3 fields in the “Quizzes” content-type:
- Title: The field type is “Short Text”.
- Description: The field type is “Rich Text”.
- Questions: The field type is “Relation.” We will use a one-to-many relation to link the “Questions” content type and the “Quiz” content type.

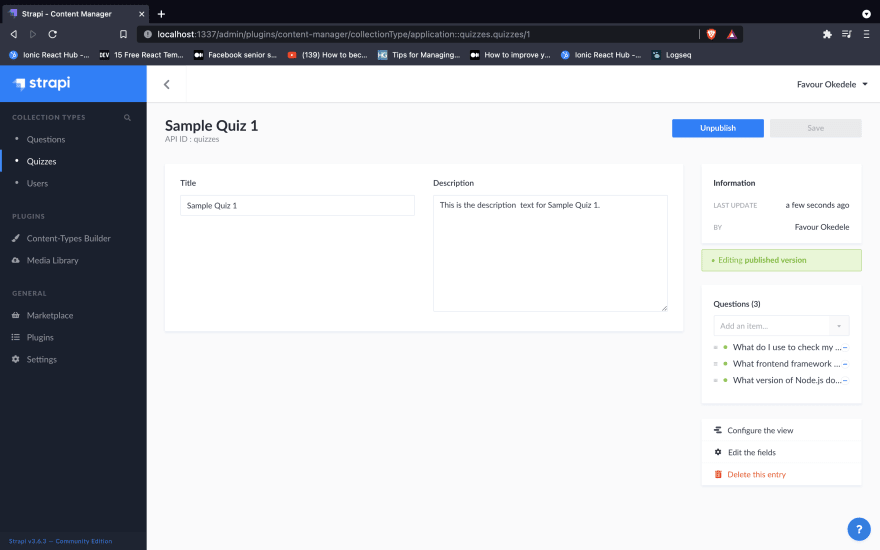
At this point, the “Quizzes” content type dashboard should look like the screenshot below

Next, click on the green “Save” button. This action will restart the server and implement the /quizzes endpoint. You should now be able to see “Quizzes” under “Collection Types” in the navigation panel.
Click on “Add New Quizzes” to add sample quiz data.

Fill in all the required fields, click save and click on publish.
You can add more sample quizzes if you want.
Next, we have to make the /quizzes endpoint public to access the published data. From the navigation panel, navigate to Settings>Roles>Public.

Under “Quizzes” in the “Permissions” section, click on “findone” and “find.” Click on Save. We have just done what we have just done will allow unauthenticated users to get all quizzes or get just one quiz with the quiz id. You can go to https://localhost:1337/quizzes on your web browser to see all the quiz data saved.
Next, we are going to build the desktop application.
Building the Application
We will use Nextron to build the desktop application. Nextron enables us to build desktop applications with Next.js. We will use TailwindCSS to help add styles to the desktop application.
Execute the commands below to create the Nextron application.
    npx create-nextron-app desktop-app
    cd desktop-app
    npm install
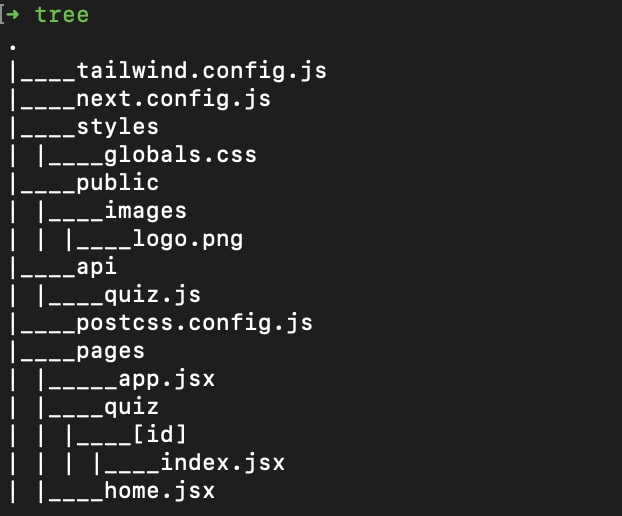
The folder structure in the desktop-app/ directory should look like the screenshot below:

Delete the files in the renderer/pages/ directory. Next, we will set up TailwindCSS. Execute the commands to install and setup TailwindCSS config files:
    npm install -D tailwindcss@latest postcss@latest autoprefixer@latest
    cd renderer
    npx tailwindcss init -p
The renderer/ folder contains the Next.js files we are going to use to build the desktop application. The above commands install the required libraries and generate tailwind.config.js and postcss.config.js files in the renderer/ folder.
We are going to set up TailwindCSS in our application. Create a folder called styles/ in the renderer/ folder. Create a file called globals.css in the renderer/styles/ folder and copy the code below inside:
    @tailwind base;
    @tailwind components;
    @tailwind utilities;
Next, create a file called _app.jsx in the renderer/pages folder and copy the following code inside:
    import '../styles/globals.css'
    function MyApp({ Component, pageProps }) {
        return <Component {...pageProps} />
    }
    export default MyApp
Note that you must import the globals.css file in the _app.jsx file for TailwindCSS to work.
Next, we will write functions to call the quiz APIs. Create a folder called api/ in the renderer/ folder. Create a file called quiz.js in the renderer/api folder and copy the following code inside:
    const QUIZ_URLS = {
        get: 'http://localhost:1337/quizzes',
    };
    export const getAll = async () => {
        const res = await fetch(QUIZ_URLS.get);
        return await res.json();
    };
    export const getById = async (id) => {
        const res = await fetch(`${QUIZ_URLS.get}/${id}`);
        return await res.json();
    };
The above code contains functions to get a quiz by id and get all quizzes.
Next, we are going to create the home page. It is the page that will get displayed by default when you start the desktop application. Create a file called home.jsx in the renderer/pages directory and copy the following code inside:
    import Link from "next/link";
    import {getAll} from "../api/quiz";

    function getCards(data) {
        return data.map((quiz) => (
            <div
                key={quiz.id}
                className="quiz border shadow-md p-3 flex-initial flex flex-col rounded-md space-y-3 mr-2 w-2/6"
            >
                <div className="name text-2xl">{quiz.title}</div>
                <div className="description text-sm">{quiz.description}</div>
                <div className="questions text-sm">{quiz.questions.length} questions</div>
                <div>
                    <Link href={`/quiz/${quiz.id}`}>
                        <a className="start-button px-2 py-1 rounded border border-green-500">
                            Start
                        </a>
                    </Link>
                </div>
            </div>
        ));
    }
    export default function IndexPage({quizzes}) {
        return (
            <div className="home container font-sans px-4">
                <div className="header text-3xl font-bold my-8">Quiz App</div>
                <div className="home-body flex flex-wrap">
                    {getCards(quizzes)}
                </div>
            </div>
        );
    }
    export async function getStaticProps() {
        const quizzes = await getAll();
        return {
            props: {
                quizzes,
            }
        }
    }
From the above code, we can see that we are using TailwindCSS classes to style the page. The getStaticProps function calls the function to get all quizzes and passes it to the IndexPage component as props.
Next, we will create a page for taking the quizzes. We will make use of Next.js dynamic routing to achieve this. In the pages/ directory, create the folders /quiz/[id]/ and create a file called index.jsx in the quiz/[id] folder.
The folder structure created will enable us to create a route for urls like /quiz/:id where id is the quiz id. Copy the following code into the quiz/[id]/index.jsx file:
    import {useState} from "react";
    import {useRouter} from "next/router";
    import {getAll, getById} from "../../../api/quiz";

    const getQuestion = (questions, index) => {
        return questions[index];
    };

    export async function getStaticProps({params}) {
        const quiz = await getById(params.id);
        return {
            props: {
                quiz,
            }
        }
    }

    export async function getStaticPaths() {
        const quizzes = await getAll();
        const paths = quizzes.map(quiz => ({params: {id: `${quiz.id}`}}));
        return {
            paths,
            fallback: false
        }
    }

    const Quiz = ({quiz}) => {
        const router = useRouter();
        const [index, setIndex] = useState(0);
        const [correctAnswers, setCorrectAnswers] = useState(new Set());
        const question = getQuestion(quiz.questions, index);

        const hasNext = () => {
            return index < quiz.questions.length - 1;
        };

        const isCorrectlyAnswered = () => {
            return correctAnswers.has(index);
        };

        const nextQuestion = () => {
            if (!hasNext()) {
                finishQuiz();
            } else {
                setIndex(index + 1);
            }
        };

        const hasPrev = () => {
            return index > 0;
        };

        const prevQuestion = () => {
            if (index !== 0) {
                setIndex(index - 1);
            }
        };

        const finishQuiz = () => {
            alert(`Your score is ${correctAnswers.size}`);
            router.push("/home");
        };

        const checkOption = (option) => {
            if (option.isCorrect && !isCorrectlyAnswered()) {
                correctAnswers.add(index);
                setCorrectAnswers(correctAnswers);
            } else if (!option.isCorrect && isCorrectlyAnswered()) {
                correctAnswers.delete(index);
                setCorrectAnswers(correctAnswers);
            }
            nextQuestion();
        };

        return (
            <div className="container font-sans px-4">
                <div className="text-3xl font-bold my-8">{quiz.title}</div>
                <div className="flex flex-col rounded-md shadow-md w-full py-4 px-4 mb-4">
                    <div className="font-bold">Question {index + 1}</div>
                    <div>{question.questionText}</div>
                </div>
                <div className="flex flex-initial flex-wrap justify-between text-center gap-4">
                    {question.answerOptions.map((option) => (
                        <button
                            key={option.id}
                            onClick={() => checkOption(option)}
                            className="block md:w-5/12 w-full option rounded-md shadow-md p-2"
                        >
                            {option.answerText}
                        </button>
                    ))}
                </div>

                <div className="flex gap-x-4 mt-10 justify-center">
                    {hasPrev() ? (
                        <p className="px-2 button rounded border border-green-500">
                            <button onClick={prevQuestion}>Previous</button>
                        </p>
                    ) : null}

                    {hasNext() ? (
                        <p className="px-2 button rounded border border-green-500">
                            <button onClick={nextQuestion}>Next</button>
                        </p>
                    ) : null}
                </div>
            </div>
        );
    };

    export default Quiz;
From the above code, we can see that the API call is made in the *getStaticProps* function. getStaticProps is given params, which contains id. We then use the id passed to make an API request to the Strapi backend to get specific quiz data.
The getStaticPaths function is required if a page has dynamic routes and uses getStaticProps. The getStaticPaths function defines a list of paths that have to be rendered to HTML at build time.
In the Quiz function, we use the useRouter hook to redirect users to the home page when the quiz is done. The useState hooks store the index of the current question being displayed and store a set of the correct questions answered.
To keep track of the score, we used the set logic instead of storing and updating a score state variable. We did this because storing the score without knowing the questions answered will enable users to add to their score by answering a question more than once.
When the user is done with the quiz, the user gets alerted of their score and redirected to the home page. We are done building the application. The file structure in the renderer/ folder should look like the screenshot below.
Running the Application
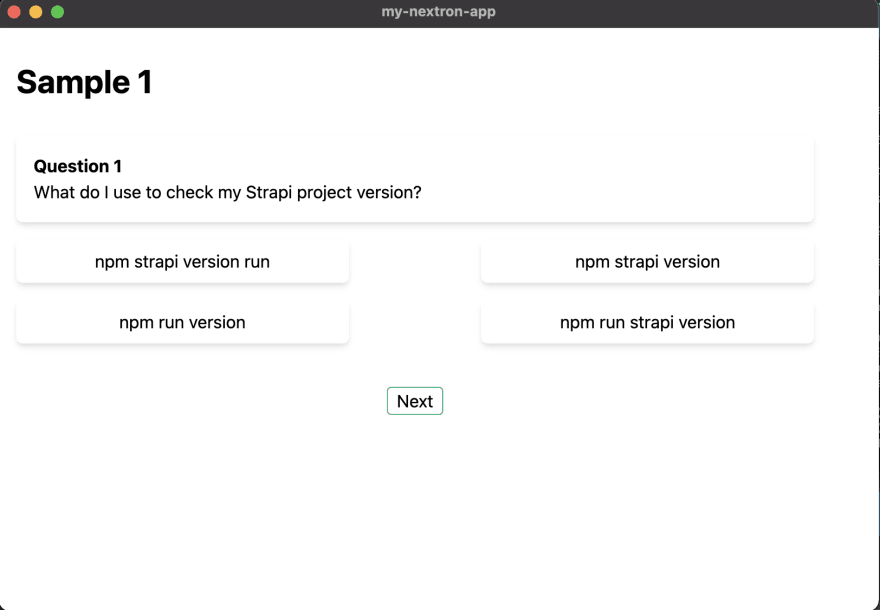
Run the command yarn dev to run the application. The screenshots below show a user taking a sample quiz created earlier.
The homepage below is the page the application defaults to on startup. The page makes an API request to the Strapi backend to get all the published quizzes.

This page shows a question. This is the first question directed after you click on the Sample 1 quiz.
You can go from one question to the other with the Next and Previous buttons. The set logic implemented earlier makes sure that a user can not game the system by answering the same question correctly more than once.
The score gets displayed when the quiz ends. Once the user clicks OK, the user gets redirected to the home page shown earlier.

Conclusion
In this article, we built a quiz desktop application with Next.js and Strapi. You can extend the application by persisting the result and adding user management. You can find the application code here.


Top comments (0)