
Learn how to use Strapi while building a forum app and implement user authentication and authorization in it.
Author: Victory Tuduo
While programming, programmers encounter various challenges, which make them solicit help to solve these problems. Forums provide a tech community that can assist with these problems. We will be building a forum site with NextJs on the Front-end and Strapi for content management.
Goals
This tutorial will cover building a forum website and providing user authentication and authorization on the site.
Prerequisites
To fully grasp this tutorial, you need:
- Node.js installed
- Knowledge of NextJs
What is Strapi?
Strapi is an open-source headless CMS built on Node.js. Strapi enables developers to create and manage the content of their applications. Strapi provides users with an admin panel that is used to manage the user's content. Content can be created with tables as in a traditional database. What's more? Strapi provides functionality to integrate APIs and allows collaborative access to content to enable multiple users to access and manage stored data.
Strapi Setup
To set up our Strapi backend, we will first create a directory for our project:
mkdir forumapp
This creates a folder for our project strapi-forum. Next, we move into this folder:
cd forumapp
Then, we install Strapi:
npx create-strapi-app@latest forum-backend --quickstart
The command above sets up Strapi for our app with all dependencies required. Here, forum-backend is the name of our project folder. The --quickstart option sets up Strapi with a sqlite database.
Once the process is complete, it runs strapi develop and opens up an administrator panel on localhost. If you open up your browser to the URL, you will get a form.

Fill out your details in the form and click on "Let's start." It will sign you in and navigate you to the dashboard.

Collection and Field Setup
In this section, we will create our collection to contain the post and comments for our forum application.
- Click on the "Create your first content type" button. It opens up a page to create our content. There is a modal where you can enter the name of your collection. Here, we will create a collection called
strapi-forum.

- Then, click on "Continue". Another modal appears where you set the field for your collection type. Click on "Text", then add the text fields.

- Add "Title" in the text field and click on "Add another field". Repeat the process for two additional fields, but we will use "Rich text" instead this time.

We now have five fields: the title, answers, questions, username and answername for our forum posts.
- Click on the "Save" button. Now, in the Collection type sidebar, we see the "Strapi forums" collection.
- Click on “content manager” from the left navigation menu, then click on the “Create new entry” button:

- You'll get a page where you can create an entry for the Forum app. Enter any text into these fields, then click on the
saveandpublishbuttons.
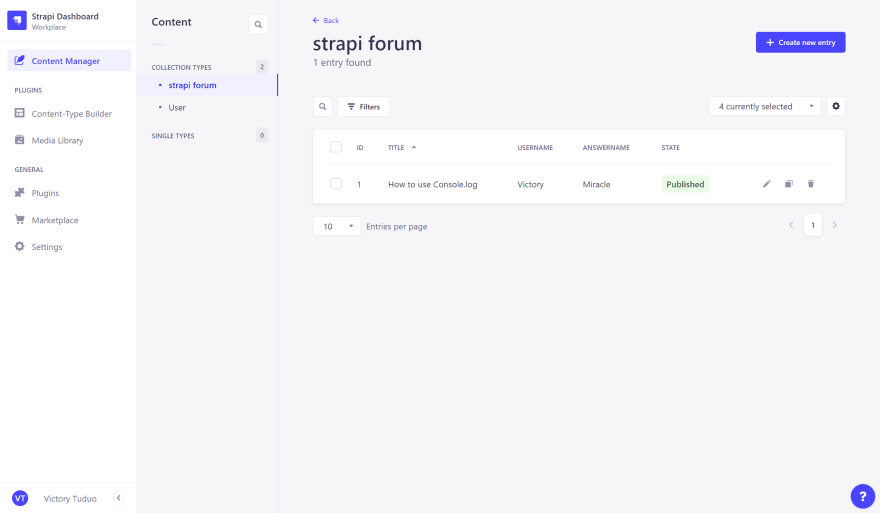
The new entry will be added to the "Strapi Forums" collection.
- To enable our app to allow access to content without authorization, you must go to Settings then Roles.

- Click on “Public”.

- Click on Select all then Save.
Fetching the Collection
You can fetch the data from the CollectionCollection with an API tester. Enter the URL: http://localhost:1337/api/strapi-forums. Send a request, and you'll get the response from Strapi:

Building our Frontend
We will build the front-end of our forum application with Next.js. Next.js is an open-source framework built on Node.js to allow React applications to be rendered on the server-side.
To install Next.js:
npx create-next-app forum
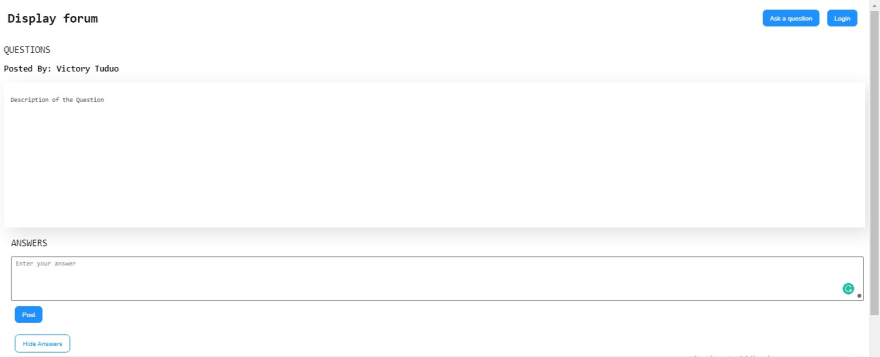
The above command installs the Next.js framework in a project folder forum. Our finished app will have two pages: one to display the forum and the other to post new questions. The images below show what our app will look like:
The display forum page:
Post a new question page:

In the forum project folder, our app structure will look like this:
┣ 📂pages
 ┃ ┣ 📂api
 ┃ ┃ ┗ 📜hello.js
 ┃ ┣ 📂Components
 ┃ ┃ ┣ 📜Displayforum.js
 ┃ ┃ ┗ 📜Uploadforum.js
 ┃ ┣ 📜index.js
 ┃ ┣ 📜upload.js
 ┃ ┗ 📜_app.js
 ┣ 📂public
 ┃ ┣ 📜favicon.ico
 ┃ ┗ 📜vercel.svg
 ┣ 📂styles
 ┃ ┣ 📜globals.css
 ┃ ┗ 📜Home.module.css
Here, our index.js file is our display form page, and it makes use of the component Displayforum.js while the upload.js file serves as our page for posting new questions. It contains the component Uploadforum.js. All our styles are in Home.module.css.
In Index.js we have the following codes:
    import styles from "../styles/Home.module.css";
    import Displayforum from "./Components/Displayforum";
    export default function Home() {
      return (
        <div className={styles.container}>
          <Displayforum />
        </div>
      );
    }
Here, we have added the Displayforum component to our page. In Displayforum.js, we have:
    import React, { useState } from "react";
    import style from "../../styles/Home.module.css";
    import Link from "next/link";
    function Displayforum() {
      const [show, setShow] = useState(false);
      return (
        <div>
          <div className={style.topcont}>
            <h1 className={style.heading}>Display forum</h1>
            <div>
              <Link href="/upload">
                <button>Ask a question</button>
              </Link>
              <button>Login</button>
            </div>
          </div>
          <h2 className={style.subheading}>Questions</h2>
          <div className={style.userinfo}>
            <p>Posted By: Victory Tuduo</p>
          </div>
          <div className={style.questioncont}>
            <p className={style.question}>Description of the Question</p>
          </div>
          <div className={style.answercont}>
            <h2 className={style.subheading}>Answers</h2>
            <div className={style.inputanswer}>
              <form>
                <textarea type="text" placeholder="Enter your answer" rows="5" />
                <button>Post</button>
              </form>
            </div>
            <button className={style.showanswer} onClick={() => setShow(!show)}>
              {show ? "Hide Answers" : "Show Answers"}
            </button>
            {show ? (
              <div className={style.answers}>
                <div className={style.eachanswer}>
                  <p className={style.username}>Miracle</p>
                  <p className={style.answertext}>Try doing it Like this</p>
                </div>
              </div>
            ) : null}
          </div>
        </div>
      );
    }
    export default Displayforum;
This component handles the layout of our display forum page. We also have a button here that directs the user to the page to upload new questions. Meanwhile, in upload.js we have the following:
    import React from "react";
    import Uploadforum from "./Components/Uploadforum";
    function upload() {
      return (
        <div>
          <Uploadforum />
        </div>
      );
    }
    export default upload;
Here, we simply added an import for the Uploadforum component into our page. In Uploadforum.js file we have a simple form to create new questions:
    import React from "react";
    import style from "../../styles/Home.module.css";
    import Link from "next/Link";
    function Uploadforum() {
      return (
        <div className={style.uploadpage}>
          <div className={style.topcont}>
            <h1>Ask a question</h1>
            <Link href="/">
              <button>Forum</button>
            </Link>
          </div>
          <div className={style.formcont}>
            <form className={style.uploadform}>
              <input type="text" placeholder="Enter your title" maxLength="74" />
              <textarea type="text" placeholder="Enter your description" rows="8" />
              <button>Submit Question</button>
            </form>
          </div>
        </div>
      );
    }
    export default Uploadforum;
Finally, we have the following styles in Home.module.css:
    .container {
      min-height: 100vh;
      padding: 0 0.5rem;
      height: 100vh;
      font-family: monospace;
    }
    /* display forum page */
    .topcont {
      display: flex;
      justify-content: space-between;
      align-items: center;
      padding: 5px 8px;
    }
    .topcont button,
    .inputanswer button,
    .formcont button,
    .showanswer {
      border: none;
      color: #fff;
      background: dodgerblue;
      border-radius: 8px;
      padding: 10px 15px;
      outline: none;
      margin: 8px;
    }
    .topcont button:hover {
      cursor: pointer;
      transform: scale(1.2);
    }
    .heading {
      font-weight: bold;
    }
    .subheading {
      font-weight: 500;
      text-transform: uppercase;
    }
    .userinfo {
      font-size: 18px;
      font-weight: 600;
    }
    .questioncont {
      min-height: 300px;
      padding: 15px 14px;
      box-shadow: 12px 12px 36px rgba(0, 0, 0, 0.12);
    }
    .answercont {
      min-height: 300px;
      padding: 5px 3px 5px 15px;
    }
    .answers {
      height: 300px;
      overflow-x: scroll;
    }
    .inputanswer {
      margin-bottom: 8px;
    }
    .inputanswer textarea {
      width: 100%;
      resize: none;
      padding: 5px 8px;
    }
    .showanswer {
      border: 1px solid dodgerblue;
      background: #fff;
      color: dodgerblue;
      transition: 0.4s ease-in-out;
    }
    .showanswer:hover {
      background: dodgerblue;
      color: #fff;
    }
    .eachanswer {
      border-radius: 15px;
      background: #e7e7e7;
      padding: 8px 15px;
      margin-bottom: 10px;
    }
    .username {
      font-weight: bold;
      text-transform: uppercase;
    }
    .answertext {
      font-family: Montserrat;
      font-size: 14px;
      font-weight: 500;
    }
    /* upload a question page */
    .uploadpage {
      min-height: 100vh;
    }
    .formcont {
      min-width: 100vw;
      display: flex;
      justify-content: center;
      align-items: center;
    }
    .uploadform {
      display: flex;
      flex-direction: column;
      min-width: 500px;
      padding-top: 10px;
    }
    .uploadform input,
    .uploadform textarea {
      resize: none;
      width: 100%;
      margin: 8px;
      padding: 5px;
    }
All of this makes up the layout of our pages.
Getting Data from Strapi
In this phase, we will fetch the data from Strapi as the next step.
Setting up Our Fetch Request
In this section, we will fetch our data from Strapi and display it in our app. We will be using Axios to perform our fetch operations.
We will install this via CLI:
npm install axios
Create a file index.js in the API folder. Here, we will set up our fetch request:
    import axios from "axios";
    const url = "http://localhost:1337/api/strapi-forums";
    export const readForum = () => axios.get(url);
Above, we added import for axios, the URL to fetch our data, and exported functions to read and create data from our forum. We’ll import these functions into our app in our index.js file:
import { readForum, createQuestion } from "./api";
Fetching Data from Strapi
We will fetch the data from Strapi in our index.js file and pass it to Displayforum.js component to display it:
    import { react, useState, useEffect } from "react";
    ...
    const [question, setQuestions] = useState({});
      const [response, setResponse] = useState([]);
      useEffect(() => {
        const fetchData = async () => {
          const result = await readForum();
          setResponse(result.data.data);
        };
        fetchData();
      }, []);
Here, we fetched our data from Strapi and assigned it to response with the React useState hook. We have a useEffect function that makes the request when our component mounts. Now, we pass this response down to our Displayforum component.
<Displayforum response={response} />
Displaying Data from Strapi
To display our data in our Displayforum.js file, we will map our responses and render our components. We will handle this in the Displayforum component:
    //...
    function Displayforum({ response }) {
    //...
      {response.map((response, index) => (
      <div key={index}>
      <h2 className={style.subheading}>{response.attributes.Title}</h2>
      <div className={style.userinfo}>
      //...
       <p className={style.answertext}>Try doing it Like this</p>
              </div>
            </div>
          ) : null}
        </div>
      </div>
      ))}
Here, we wrapped up our components to map through response and display this component as many times as the number of responses. To display our Strapi data, we simply reference it. We can get our Username with this code:
response.attributes.Username
We can now add this to our component and display it:
    <p>Posted By: {response.attributes.Username}</p>
    ...
    <p className={style.question}>{response.attributes.Questions}</p>
    ...
To display our answers, we will map through the Answers content returned by Strapi:
    {response.attributes.Answers.map((answers, i) => (
      <div className={style.eachanswer} key={i}>
        <p className={style.username}>{response.attributes.Answername}</p>
        <p className={style.answertext}>{answers}</p>
      </div>
    ))}
We have successfully added the data from our CollectionCollection to our front-end to view this in the browser. Run the following command in the CLI:
npm run dev
In your browser, you will have an output similar to the image below:

After this, we will add functionality to add new questions to Strapi.
Adding Data to Strapi
In our Uploadforum.js file, we will add functionality to upload the contents of the form to Strapi. First, we will create two state variables to store the text from our inputs.
    import { React, useState } from "react";
    ...
    const [name, setName] = useState("");
    const [description, setDescription] = useState("");
Then we set these variables to the value of our form input.
    <input
        type="text"
        placeholder="Enter your title"
        maxLength="74"
        value={name}
        onChange={(e) => setName(e.target.value)}
    />
    <textarea
        type="text"
        placeholder="Enter your description"
        rows="8"
        value={description}
        onChange={(e) => setDescription(e.target.value)}
    />
Also, we will add a function to send these variables when we click our button.
    <button  onClick={(e) => {
          e.preventDefault();
        sendData();
      }}
    }>Submit Question</button>
We will create a sendData function above the return statement to handle sending the newly-created questions to Strapi.
    const sendData = () => {
    };
For our create functionality we will import the createQuestion function we defined in our api folder.
import axios from "axios";
Then we pass in our data to this function.
    const url = "http://localhost:1337/api/strapi-forums";
    const sendData = () => {
      axios.post(url, {
        data: {
          Title: name,
          Questions: description,
        },
      });
We can now upload new questions to our Strapi collection. We will add the Username when we cover user authentication.
Next up, we will add functionality to answer questions in our Displayforum component.
Adding New Answers
We will repeat the same method as we did with our Upload Question functionality for the add answer functionality, but with a minor difference. In your Displayforum component, add the following code:
    import axios from "axios";
    //...
    const [answer, setAnswer] = useState("")
    const [id, setId] = useState("");
    const [a, formerArray] = useState([]);
We will store the input from the textarea in answer. We will use the id variable to reference the collection we want to add the answer to.
Then in our form textarea:
     <textarea
      type="text"
      placeholder="Enter your answer"
      rows="5"
      value={answer}
      onChange={(e) => {
        formerArray(response.attributes.Answers);
        setAnswer(e.target.value);
        setId(response.id);
      }}
    />
    <button
      onClick={(e) => {
        submitAnswer();
      }}
    >
    }}>Post</button>
Then in the submitAnswer function:
    const submitAnswer = () => {
        try {
          axios.put(`http://localhost:1337/api/strapi-forums/${id}`, {
            Answers: [...a, answer],
          });
        } catch (error) {
          console.log(error);
        }
      };
With this, we can now add answers through our form to our collection.
User Authentication with NextAuth
This section will use Nextauth, a NextJs package for authentication, to implement Google login for our application. We will also set up protected routes so that only authenticated users can create questions and view them.
To install next-auth, run:
npm i next-auth
For our authentication, we will make use of JWT token . JWT is a standard used to create access tokens for an application. We will create a file to handle user authentication. To do this, create a folder named auth in your api folder and within it, create a file [...nextauth].js with the following code in it:
    import NextAuth from "next-auth"
    import GoogleProvider from "next-auth/providers/google"


    export default NextAuth({
      secret: process.env.SECRET,
      providers: [
        GoogleProvider({
          clientId: process.env.GOOGLE_ID,
          clientSecret: process.env.GOOGLE_SECRET,
          authorizationUrl: 'https://accounts.google.com/o/oauth2/v2/auth?prompt=consent&access_type=offline&response_type=code',
        }),
      ],
    })
The code above sets up our Google Authentication for our app. To use it, we need to wrap up our application in _app.js with the Google Provider component:
    ...
    import { SessionProvider } from "next-auth/react"
    function MyApp({ Component, pageProps }) {
      return (
        <SessionProvider session={pageProps.session}>
          <Component {...pageProps} />
        </SessionProvider>
      );
    }
    export default MyApp;
Next, we will modify our Displayforum component in to return to our component if the user is authenticated, else it returns a button that leads to an authentication page:
    import {signIn, signOut, useSession} from 'next-auth/react'
    //...
    const { data: session } = useSession()
We will use useSession to know if our user has been authorized. If there is session, we will return the rest of the component and if there is no session we will render a button to sign in to access the app.
    return(
    <div>
    {!session && (
                <>
                  <h1>Sign in to access forum</h1>
                  <button onClick={() => signIn()}>Sign In</button>
                </>
              )}
        {session && (
         <>
         {/*rest of our app*/}
         </>
         )}
        </div>
We will also set our button to Sign out:
    //...
    <Link href="/upload">
      <button>Ask a question</button>
    </Link>
    <button onClick={() => signOut()}>Signout</button>
    //...
To make use of Google authentication in our app, we will require access credentials from Google Cloud console. To get this, navigate in your browser to Google Cloud.

Click on OAuth Client ID and Fill out the fields on the new page that opens.

Finally, set the redirect URL to: http://localhost/api/auth/callback/google
To use the credentials in the […nextauth].js file, you can create a .env file and set up your environmental variables:
    GOOGLE_CLIENT_ID: id
    GOOGLE_CLIENT_SECRET: secret
    secret: any string
Next, we will set up our Uploadforum.js component on our upload page as a protected route so that unauthorized users can’t access the route. To do this, in upload.js add the following code:
import { getSession, useSession } from 'next-auth/react'
Then at the bottom:
    export async function getServerSideProps(context) {
      const session = await getSession(context);
      if (!session) {
        context.res.writeHead(302, { Location: '/' });
        context.res.end();
        return {};
      }
      return {
        props: {
          user: session.user,
        }
      }
    }
    export default Upload;
Now, if you run the app with npm run dev in CLI, we have Google authentication implemented. Also we can’t access the /upload path without logging in.
Adding Username to Collection
Now that we have added authentication to our app, we can add the username received from the Google Login as the Answername field when we answer a question:
        //...
    axios.put(`http://localhost:1337/api/strapi-forums/${id}`, {
          Answers: [...a, answer],
          Answername: session.user.name,
        });
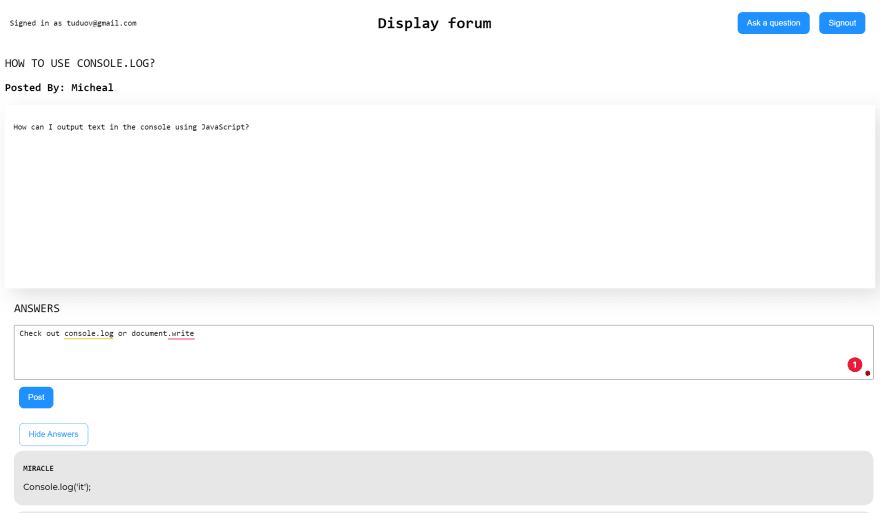
Now, if I add a new answer to the form:

When I click on the Post button, I get:

The answer has been added and the Answername field has been set to my user.name form our session.
Finally, we will also add the username when posting a question to our collection. We will do this in our upload.js file:
const { data: session } = useSession();
Then we pass the value of session to our Uploadforum Component:
<Uploadforum session={session} />
We can now use session data in our Uploadforum component:
    function Uploadforum({session}) {
    //...
     axios.post(url, {
          data: {
            Title: name,
            Questions: description,
            Answers: [],
            Username: session.user.name,
          },
        });
Any new questions added now take the Username field to be the username received from session. If we add new answers, since the Answername is a field, it overwrites the previous data and all the answers use the same name. To fix this, we will simply modify our Answers field of type JSON to contain both the answers and the username of the person providing the answers.

Then, we can get this data and display it in our Displayforum component:
    <div className={style.answers}>
      {response.attributes.Answers.map((answers, i) => (
        <div className={style.eachanswer} key={i}>
          <p className={style.username}>{answers[0]}</p>
          <p className={style.answertext}>{answers[1]}</p>
        </div>
      ))}
answer[0] is the name of the user, while answers[1] is the answer.

Finally, we will modify the code to add new answers:
    ...
     axios.put(`http://localhost:1337/api/strapi-forums/${id}`, {
            Answers: [...a, [session.user.name, answer]],
        });
        } catch (error) {
          console.log(error);
We can now add new answers to our questions without overwriting previous data.
When I click on post I get a new answer:

Conclusion
We have come to the end of this tutorial. In this tutorial, we learned how to use Strapi CMS and connect it to NextJ's front-end. In this process, we built a forum site and implemented user authentication and authorization on it.
Resources
The source code used in this tutorial can be found in the GitHub repo: Forum Application.


Top comments (0)