
Author: Sumit Kharche
This article has been updated to v4 by Mark Munyaka.
Learn how to create a simple but blazing-fast blog app using Blazor WebAssembly, Tailwind CSS, and Strapi. You will use Strapi, the leading open-source headless CMS, to store your posts and Blazor to build your front-end.
Prerequisites
Before you can jump into this content, you need to have a basic understanding of the following:
- Strapi - get started here.
- Node.js
- Blazor
- C#
- Shell (Bash)
The following software should be installed:
- .NET SDK. Version 6 at the time of writing
- Node v14.x.x or v16.x.x. Download Node from the Download | Node.js page. I used Node v16.14.2.
- npm or yarn. npm ships with your Node installation. If you prefer yarn, install it as an npm package. Check Installation | Yarn.
For a full rundown of all the requirements needed to run a Strapi app, check out the Hardware and Software requirements.
Introduction
What is Blazor?
Blazor is a web framework from Microsoft which allows you to create a web application using C# and HTML. If you are a developer using C# and want to build a blazing-fast web application, you should check out Blazor.
Blazor is a free, open-source web framework that enables developers to create web apps using C# and HTML.
Blazor lets you build interactive web UIs using C# instead of JavaScript. Blazor apps are composed of reusable web UI components implemented using C#, HTML, and CSS.
Both client and server code are written in C#, allowing you to share code and libraries. Blazor can run your client-side C# code directly in the browser using WebAssembly. Because it's real .NET running on WebAssembly, you can re-use code and libraries from server-side parts of your application.
In this article, you will use Blazor Web Assembly to build the client side of the blog app.
What is Strapi?
Strapi is the leading open-source headless CMS based on Node.js to develop and manage content using Restful APIs and GraphQL.
With Strapi, we can scaffold our API faster and consume the content via APIs using any HTTP RESTful client or GraphQL-enabled front-end.
Back-end Setup
Step 1: Scaffold a Strapi project
Open up your terminal and create an empty project directory to store your project. This folder will serve as the root folder. The front-end and back-end code will be stored in subdirectories. I will name my project directory purplerhino.
$ mkdir purplerhino
Change the directory to the project directory purplerhino.
$ cd purplerhino
Enable source control for your project by initializing a git repository.
/purplerhino $ git init
Create a Strapi app.
/purplerhino $ npx create-strapi-app backend --quickstart
The command above will scaffold a new Strapi project in a directory named backend. The quickstart flag sets up your Strapi app with an SQLite database.
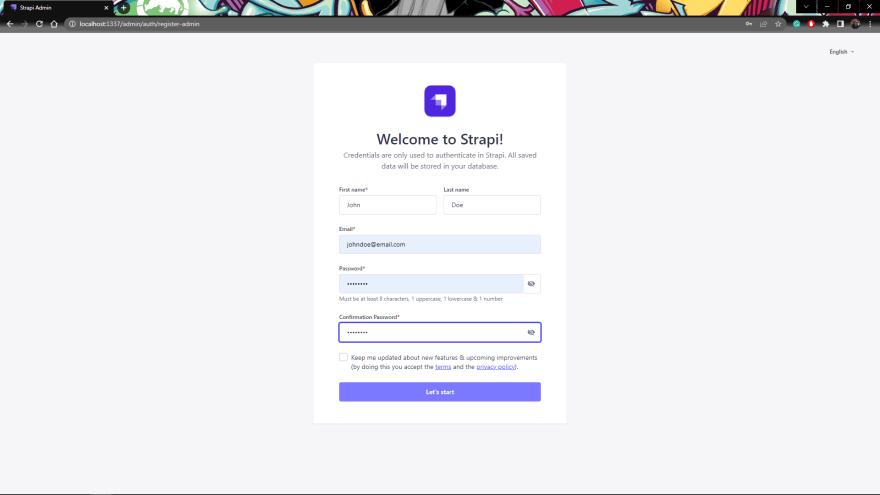
After successful installation, the Strapi app starts automatically. Open the Strapi Admin Registration interface from your web browser at localhost:1337/admin. Create the admin user for your Strapi application and click Let's Start.
Step 2: Build the Posts collection
Next, we will create a content-type that will store the details of each post.
We will create the content-type named posts containing the following fields: title, content, author, and image.
- Click Content-Type Builder on the left side of the page.
- Select + Create New Collection Type still at the left side of the page and fill in Post as the display name.
- Click on Continue to create a new Post collection.
We need to fill the Post collection with lots of post data. You can achieve this in two ways: using the Admin UI and using Strapi-generated API.
We will use the Admin UI to create a post.
- Click on Continue, which will present you with another modal to select fields for your Collection Type.
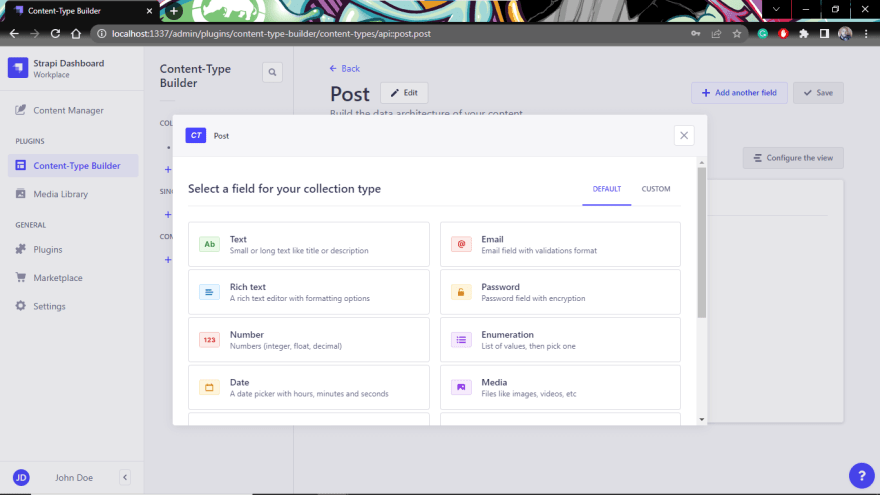
- Select
Textand fill intitlein the Text field. - Click on
+ Add another field, selectRich Text, and name itcontent. - Click on
+ Add another fieldand selectMediafield and name itimage. - Select
+ Add another fieldonce again and selectTextfield and name itauthor. - After adding all the required fields, click on ✓ Save to save the collection and wait for your Strapi server to restart.

- Click on Content Manager on the left of your dashboard. Under COLLECTION TYPES, select Post.
- Next, click on + Create new entry and add a few posts to your Posts collection. Click on Save and ✓ Publish for each post you add.

Step 3: Make Strapi API public
After creating the Posts collection successfully, it's time to allow public access to the collection because access will be denied if we try to access it with our public HTTP client.
- Click on Settings on the sidebar.
- In the USERS & PERMISSIONS PLUGIN section, click on Roles.
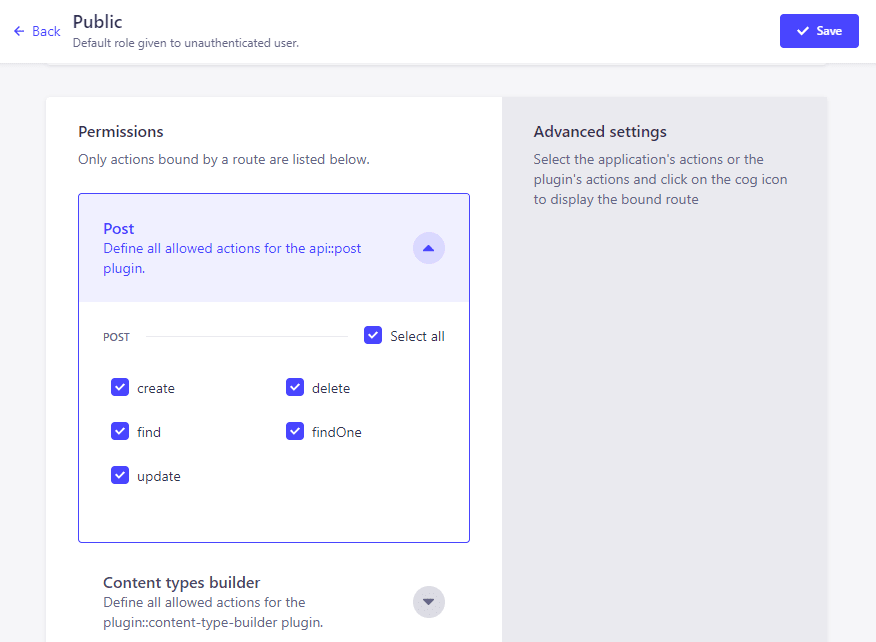
- On the Roles page, click on Public.

- Scroll down to the Permissions section:
- Select Post and check the Select all checkbox. This makes all the endpoints accessible to the public at localhost:1337/api/post
- Click on ✓ Save
Step 4: Install and enable the Transformer plugin
We will need to transform the JSON from the API request to work with our Blazor front-end. To do that, we will use Transformer by @ComfortablyCoding.
- Stop your Strapi server by pressing
Ctrl + Con your keyboard. - Install Transformer in the root folder of your Strapi app.
/purplerhino/backend $ npm install strapi-plugin-transformer
- Create a
plugins.jsfile in theconfigfolder to configure your plugin.
/purplerhino/backend $ touch config/plugins.js
- Add this configuration to
./config/plugins.js.
module.exports = ({ env }) => ({
 'transformer': {
    enabled: true,
    config: {
      prefix: '/api/',
      responseTransforms: {
        removeAttributesKey: true,
        removeDataKey: true,
      }
    }
  },
});
This configuration will provide an API response that will work with the setup of your Blazor front-end app.
- Rebuild your Strapi app and start your server for the changes to take effect.
/purplerhino/backend $ yarn build
/purplerhino/backend $ yarn develop
Front-end Setup
Step 5: Setting up the Blazor project
Let's set up our Blazor front-end app using the .NET command-line interface (CLI) to execute commands.
Open up your terminal and run the following commands:
/purplerhino $ dotnet new blazorwasm -o frontend
/purplerhino $ cd frontend
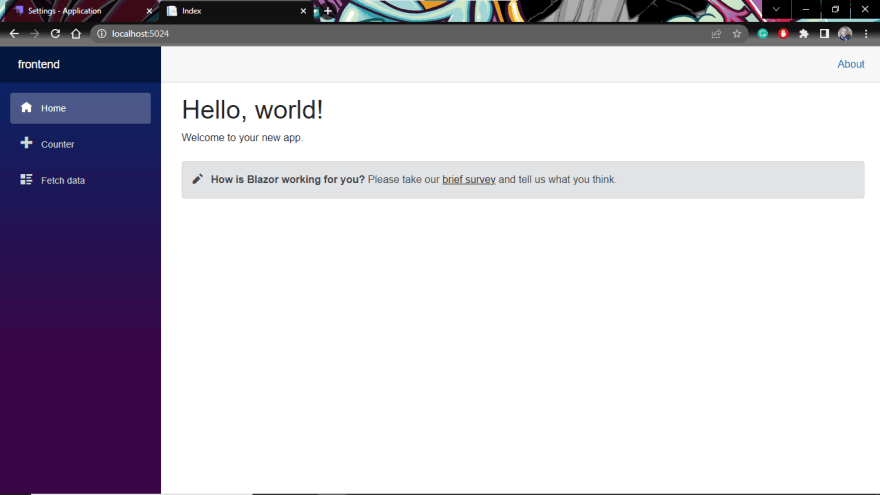
/purplerhino/frontend $ dotnet run
Open localhost:5024 in your browser to see the Blazor frontend app.
Step 6: Integrate Strapi API with Blazor App
Your Blazor project is now set; the next step is to create the blog front-end.
To access the posts, you will have to use the Strapi API URL, which is localhost:1337/api.
In the frontend/wwwroot folder, create a file called appsettings.json to store the Strapi API URL.
/purplerhino/frontend $ touch wwwroot/appsettings.json
Add the following code to appsettings.json:
{
    "AppSettings": {
    "STRAPI_API_URL": "http://localhost:1337"
    }
}
Create a folder called Models and create a file called AppSettings.cs inside it.
/purplerhino/frontend $ mkdir Models
/purplerhino/frontend $ touch Models/AppSettings.cs
Add the following code to Models/AppSettings.cs:
// ./Models/AppSettings.cs

namespace frontend.Models
{
    public class AppSettings
    {
        public string STRAPI_API_URL { get; set; }
    }
}
Now open the Program.cs file and the code below. This is required to read the data from the appsettings.json file from anywhere in the application.
// ./Program.cs

using Microsoft.AspNetCore.Components.WebAssembly.Hosting;
using Microsoft.Extensions.Configuration;
using Microsoft.Extensions.DependencyInjection;
using frontend.Models;
using System;
using System.Net.Http;
using System.Threading.Tasks;

namespace frontend
{
    public class Program
    {
        public static async Task Main(string[] args)
        {
            var builder = WebAssemblyHostBuilder.CreateDefault(args);
            builder.RootComponents.Add<App>("#app");

            builder.Services.AddScoped(sp => new HttpClient { BaseAddress = new Uri(builder.HostEnvironment.BaseAddress) });

            await builder.Build().RunAsync();
        }

        public static void ConfigureServices(IServiceCollection services)
        {
            // Example of loading a configuration as configuration isn't available yet at this stage.
            services.AddSingleton(provider =>
            {
                var config = provider.GetService<IConfiguration>();
                return config.GetSection("App").Get<AppSettings>();
            });
        }
    }
}
You have just set up the integration of the Strapi API with the Blazor app. The next step is to create a component for your blog application.
Step 7: Display all blog posts on the home page
We use Tailwind CSS to style our awesome blog. So open the index.html file in the wwwroot folder and add this HTML snippet within the <head></head> section.
<link href="https://unpkg.com/tailwindcss@^2/dist/tailwind.min.css" rel="stylesheet">
Now open the Pages/Index.razor file and replace the existing code with the code below to show all the posts fetched from Strapi into your client app:
@* ./Pages/Index.razor *@

@page "/"
@inject HttpClient Http
@using Microsoft.Extensions.Configuration;
@using Models
@inject IConfiguration Configuration

@if (allPosts == null)
{
    <p><em>Loading...</em></p>
}
else
{
    <section class="text-gray-600 body-font">
    <div class="container px-5 py-4 mx-auto">
        <div class="text-center mb-20">
            <h1 class="sm:text-3xl text-2xl font-medium title-font text-gray-900 mb-4">Strapi Blazor Blog App</h1>
            <p class="text-base leading-relaxed xl:w-2/4 lg:w-3/4 mx-auto text-gray-500s">British History - From the Anglo-Saxon era to present day Britain.</p>
            <div class="flex mt-6 justify-center">
                <div class="w-16 h-1 rounded-full bg-indigo-500 inline-flex"></div>
            </div>
        </div>
        <div class="flex flex-wrap -m-3">
            @foreach (var post in allPosts.data)
                {
                    <div class="xl:w-1/4 md:w-1/2 p-4">
                        <div class="bg-gray-100 p-6 rounded-lg">
                            <img class="h-40 rounded w-full object-cover object-center mb-6" src="@post.Image.Url"
                        alt="content">
                            <h2 class="text-lg text-gray-900 font-medium title-font mb-4">@post.Title</h2>
                            <NavLink href="@($"post/{post.Id.ToString()}")">
                                <a class="text-indigo-500 inline-flex items-center">
                                    Read More
                                    <svg fill="none" stroke="currentColor" stroke-linecap="round" stroke-linejoin="round"
                                stroke-width="2" class="w-4 h-4 ml-2" viewBox="0 0 24 24">
                                        <path d="M5 12h14M12 5l7 7-7 7"></path>
                                    </svg>
                                </a>
                            </NavLink>
                        </div>
                    </div>
                }
            </div>
        </div>
    </section>
}


@code {
    private PostList allPosts = null;
    public string strapi_api_url;

    protected override async Task OnInitializedAsync()
    {
        strapi_api_url = Configuration["AppSettings:STRAPI_API_URL"];
        var url = "{STRAPI_API_URL}/api/posts?populate=*";
        allPosts = await Http.GetFromJsonAsync<PostList>(url.Replace("{STRAPI_API_URL}", strapi_api_url));
        if (allPosts.data != null)
        {
            foreach (var post in allPosts.data)
            {
                post.Image.Url = strapi_api_url + post.Image.Url;
            }
        }
    }

    public class Post
    {
        public int Id { get; set; }
        public string Title { get; set; }
        public string Content { get; set; }
        public string Author { get; set; }
        public Image Image { get; set; }
    }

    public class Image
    {
        public string Url { get; set; }
    }

    public class PostList
    {
        public List<Post> data { get; set; }
    }

}
Here's a brief explanation of what the code does:
- The top section from
@pageto@injectis a list of all librariesIndex.razorneeds to use to fetch data from the Strapi API. - The next section
@if (allPosts == null)down to</section>}is the HTML required to render the posts from the Strapi API. The@foreachwill loop through all the posts and retrieve theimage,title, andidof each post and display each post on its card. - The
@codesection is C# code.Post,Image, andPostListare classes that we will use to map the JSON data from the API response.allPostsis an instance ofPostList. The JSON data from theurlwill be parsed intoallPostsusing theHttp.GetFromJsonAsync()function. The@foreachloop will retrieve the URLs of each post's image.
Update the Shared/NavMenu.razor file to remove the extra menu from the sidebar. Replace the existing code with the following code:
@* ./Shared/NavMenu.razor *@

<header class="text-gray-600 body-font">
    <div class="container mx-auto flex flex-wrap p-5 flex-col md:flex-row items-center">
        <a class="flex order-first lg:order-none lg:w-1/5 title-font font-medium items-center text-gray-900 lg:items-center lg:justify-center mb-4 md:mb-0">
            <img src="/blazor_strapi_logo.png" alt="logo" style="height:60px" />
            <span class="ml-3 text-3xl">StrapiBlazorBlog</span>
        </a>
    </div>
</header>
Update Shared/MainLayout.razor file as below:
@* ./Shared/MainLayout.razor *@

@inherits LayoutComponentBase

<div>
<NavMenu />

<div>
    @Body
</div>
</div>
Now run the application and navigate to localhost:5024 in your browser.
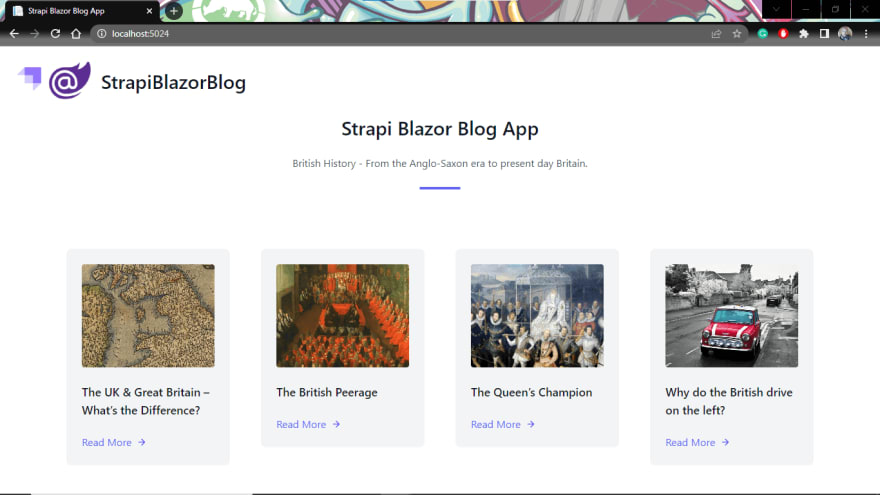
Wow 👌 We successfully displayed all our posts on the home page.
Step 8: Display a single blog post
We have managed to display all the posts on one page, but each post doesn't have its page, and the Read more button on the home page doesn't work too. Let's fix this.
Create a file called PostDetails.razor in the Pages folder.
/purplerhino/frontend $ touch Pages/PostDetails.razor
Add the following code to PostDetails.razor:
@* ./Pages/PostDetails.razor *@

@page "/post/{Id}"
@inject HttpClient Http
@inject NavigationManager NavigationManager
@using System.Text.Json.Serialization
@using Microsoft.Extensions.Configuration;
@using Models
@inject IConfiguration Configuration

@if (postDetails == null)
{
    <p><em>Loading...</em></p>
}
else
{
    <section class="text-gray-700 body-font">
        <div class="container mx-auto flex px-5 pb-24 items-center justify-center flex-col">
            <h1 class="title-font sm:text-4xl text-3xl mb-4 font-medium text-gray-900">@postDetails.Data.Title</h1>
            <img class=" mb-10 object-cover object-center rounded" alt="hero" src="@postDetails.Data.Image.Url" style="height:400px;width:900px">
            <div class=" w-full">
                <div class="mb-8 leading-relaxed">@((MarkupString)postDetails.Data.Content)</div>
            </div>
            <div class="p-2 w-full">
                <button class="flex mx-auto text-white bg-indigo-500 border-0 py-2 px-8 focus:outline-none hover:bg-indigo-600 rounded text-lg" @onclick="NavigateToIndexComponent">Back</button>
            </div>
        </div>
    </section>
}

@code {
    [Parameter] public string Id { get; set; }

    private PostSingle postDetails = null;

    public string strapi_api_url;

    protected override async Task OnInitializedAsync()
    {

        strapi_api_url = Configuration["AppSettings:STRAPI_API_URL"];
        var url = "{STRAPI_API_URL}/api/posts/{Id}?populate=*";
        url = url.Replace("{STRAPI_API_URL}", strapi_api_url);
        url = url.Replace("{Id}", Id);
        postDetails = await Http.GetFromJsonAsync<PostSingle>(url);

        if (postDetails.Data != null)
        {
            postDetails.Data.Image.Url = strapi_api_url + postDetails.Data.Image.Url;
        }
    }

    private void NavigateToIndexComponent()
    {
        NavigationManager.NavigateTo("");
    }

    public class PostSingle
    {
        public Data Data { get; set; }
    }
     public class Data
    {
        public int Id { get; set; }
        public string Title { get; set; }
        public string Content { get; set; }
        public string Author { get; set; }
        public Image Image { get; set; }
    }

    public class Image
    {
        public string Url { get; set; }
    }

}
Here's a brief explanation of what the code does.
-
@page "/post/{Id}"refers to the URL of the page to be rendered based on the Id of the post -
@if (postDetaills == null)to</section>is the markup for rendering the page and uses the post'stitle,imageandcontentretrieved from the Strapi API. -
@codesection contains the classes to populate the data from the Strapi API just like inIndex.razor, except that the API request is for a single post, not all the posts.
Now rerun the app and click on the Read More button for any post. You will see the full blog post on its own page.

Here’s a short video demo of how the blog will look like:
Step 9: Deploy the blog app
The Strapi backend API and our Blazor frontend app working, and the next step is to deploy your application. Among the options available, you can deploy Strapi API on Heroku. To deploy a Blazor WebAssembly app on Netlify, check out "How to Deploy a Blazor App on Netlify".
Conclusion
This article demonstrated how to build a simple blog application using Blazor as the front-end and Strapi as the back-end. Strapi has lots of integration with other frameworks. Check out the Strapi blog for more interesting tutorials showcasing Strapi's capabilities.
You can download the source code implementation from Github. Let me know if you have any comments, queries, or suggestions. The Strapi Team is always available to assist you.


Latest comments (0)