
Author: Samuel Umoren
Most firms strive to retrieve and store data faster. It is because no one wants an application that lags. When there's a lot of data in the database, it becomes challenging to fetch data from the database swiftly, which may cause your application to lag. To avoid this, most software firms cache data.
Caching is the process of storing data in a temporary storage area so that retrieving data is relatively more accessible and faster.
The idea of caching aims to increase data retrieval performance by reducing the need to access the underlying slower storage layer. By trading off capacity for speed, a cache typically stores a subset of data transiently, in contrast to databases whose data are usually complete and durable.
Strapi REST Cache Plugin caches incoming GET requests on the Strapi API based on query params and model ID. This plugin allows you to either cache your data on your application's memory with InMemory cache, with Redis, a third-party database or Couchbase cache. The cache is automatically busted every time a PUT, POST, or DELETE request comes in.
This article will explore the Strapi REST Cache Plugin and how to cache data in our Strapi application.
Prerequisites
Before you can jump into this content, you need to:
- Have basic knowledge of JavaScript,
- Have basic knowledge of Nodejs,
- Download and install Node.js, and
- Have basic knowledge of how Strapi works.
Why is Caching Necessary?
Just as I emphasized in my opening statement, time is of great essence when dealing with data. Most software store their data in a database, which may have different storage layers. Because of the different layers of storage in the database and how large the data is, it becomes difficult to retrieve data faster. Although users must have accessed the same information earlier, it doesn't get displayed more quickly when they re-access them.
To make fetching data easier, developers use a caching system. A caching system is a high-speed data storage layer, which stores a batch of data from the database. Whenever a user retrieves information from the database, the data is stored in a cache to increase data retrieval performance instead of accessing data from the different storage layers whenever a user requests them.
The cache doesn't contain all of the data in the database, just a fraction of the data. In most cases, data previously accessed by the users. Below are some importance of caching and why most software firms incorporate it into their application:
- Caching helps to improve the performance of an application since the retrieval of data is faster and more efficient.
- Caching reduces the load in your backend database as your application's frontend doesn't always have to send a request to your backend whenever a user requests data. It prevents poor performance or even crashes in times of spikes.
- Caching eliminates database hotspots that occur due to users frequently asking a subset of data.
Strapi REST Cache Plugin Installation and Setup
For the purpose of this article, we will be using a Strapi template. Run this command on your terminal to install nextjs blog strapi starter
npx create-strapi-starter my-project next-blog
This command creates two folders:
- Backend: The Strapi backend
- Frontend: The frontend with Next.js
- Go to the backend folder and open the folder with your preferred code editor.
cd backend
- Open your terminal and install the following packages:
    yarn add strapi-plugin-rest-cache strapi-plugin-redis strapi-provider-rest-cache-redis
    #or
    npm install strapi-plugin-rest-cache strapi-plugin-redis strapi-provider-rest-cache-redis
strapi-plugin-rest-cache
This plugin provides a way to cache HTTP requests in order to improve performance. The cache content is stored by a provider, which can be either an in-memory provider, a redis connection, a file system, or any other custom provider.
strapi-plugin-redis
This is the universal redis connector we will need for our redis cache provider package. We will be using the LRU-based response cache for our REST API.
Briefly, let’s describe how an LRU based response cache works. This cache converts an API request, such as api.posts.get({ article: 'How to fix a bug '}) into two caches:
- A cache of ids returned by that particular query
- A global cache of data objects
The aim of this is that when you run api.posts.get({ id: 1 }), and if the previous query had already populated a post with id 1, you will get an immediate response rather than making another server round-trip.
strapi-provider-rest-cache-redis
This provider package stores the cache content.
Storage Engine Configuration
The strapi-plugin-rest-cache provides us with three storage options for configuring caching with strapi. They are:
- In-Memory Cache
- Redis Cache
- Couchbase Cache
For the purpose of this post, we’ll be using the redis cache. We’ve already installed the plugin and the cache provider in the previous section. Before we move on to configure redis as the storage engine, make sure you install and start redis server using any of the links below:
Start your redis server with redis-server, you should get something like this:

Redis default port is 6379, we will use this in our configuration. Create a plugins.js file in the config folder and add these lines of code:
    //config/plugin.js

    module.exports = {
        // Step 1: Configure the redis connection
        // @see https://github.com/strapi-community/strapi-plugin-redis
        redis: {
            config: {
                connections: {
                    default: {
                        connection: {
                            host: '127.0.0.1',
                            port: 6379,
                            db: 0,
                        },
                        settings: {
                            debug: false,
                        },
                    },
                },
            },
        },
        // Step 2: Configure the redis cache plugin
        "rest-cache": {
            config: {
                provider: {
                    name: "redis",
                    options: {
                        max: 32767,
                        connection: "default",
                    },
                },
                strategy: {

                    enableEtagSupport: true,
                    logs: true,
                    clearRelatedCache: true,
                    maxAge: 3600000,
                    contentTypes: [
                        // list of Content-Types UID to cache
                        "api::category.category",
                        "api::article.article",
                        "api::global.global",
                        "api::homepage.homepage",
                        {
                            contentType: "api::category.category",
                            maxAge: 3600000,
                            hitpass: false,
                            keys: {
                                useQueryParams: false,
                                useHeaders: ["accept-encoding"],
                            },
                            maxAge: 18000,
                            method: "GET",
                        }
                    ],
                },
            },
        },
    };
Let’s break the code above to smaller chunks. Firstly, the plugins.js handles the plugins we will be adding to our Strapi app.
    module.exports = {
      redis:{
       config: {
                  connections: {
                      default: {
                          connection: {
                              host: '127.0.0.1',
                              port: 6379,
                              db: 0,
                          },
                          settings: {
                              debug: false,
                          },
                      },
                  },
              },
      }

    }
Here, we configured the redis connection. We specified that our redis server is started at port 6379 and we also set debug to false, by default, it’s true.
    "rest-cache": {
        config: {
            provider: {
                name: "redis",
                options: {
                    max: 32767,
                    connection: "default",
                },
            },
    }
Here, we are configuring the rest-cache. We start by specifying that redis is going to be the storage engine and we set max to 32767. Max denotes the maximum number of entries that the cache can take in. By default, this number is set to 32767.
    strategy: {
        enableEtagSupport: true,
        logs: true,
        clearRelatedCache: true,
        maxAge: 3600000,
        contentTypes: [
            "api::category.category",
            "api::article.article",
            "api::global.global",
            "api::homepage.homepage",
        ],
    },
Here, we went on to specify some extra settings using the rest-cache strategy object. Let’s go through what each of these settings do.
Max Age
The maxAge tells us the time after which a cache entry will be considered invalid. This time is usually represented in milliseconds. The default maxAge in the strapi-plugin-rest-cache is 3600000 milliseconds.
Enable Etag Support
Etag (entity tag) headers are identifiers for a specific version of data. ETags prevents updates of a resource that could be simultaneous from overwriting each other. By default, the property enableEtagSupport is set to false.
Logs
strapi-plugin-rest-cache logs output in your console. For instance, when we first ran our project after configuring the middleware, we got the output below.
![]()
By default, the property log is set to true. If you set the property to false, you won't get an output in your console concerning the plugin.
clearRelatedCache
As the name suggests, it clears related cache content from memory. By default, it’s set to false.
contentTypes
These are the Strapi content types we are configuring. All the settings above will be applied to these content types.
Configuring a Single Content Type
You can configure the properties of each content type individually. For developers with a lot of content types, this is always helpful.
For instance, you'll want to configure the maxAge property individually since the content types will be accessing different types of resources. To configure content types properties individually, put the property of interest into the content type property as shown below.
      contentTypes: [
          // list of Content-Types UID to cache
          "api::category.category",
          "api::article.article",
          "api::global.global",
          "api::homepage.homepage",
          {
              contentType: "api::category.category",
              hitpass: false,
              keys: {
                  useQueryParams: false,
                  useHeaders: ["accept-encoding"],
              },
              maxAge: 18000,
              method: "GET",
          }
      ],
Here, we modified the maxAge for the category content type and added some more properties. Now, go ahead and start the strapi development server with
    yarn develop --watch-admin
    #or
    npm run develop --watch-admin
Sign up or log in to the Strapi admin and head to plugins. You will see that our plugins were installed successfully

Then, navigate to the Content Manager tab and you will be presented with a screen like this:
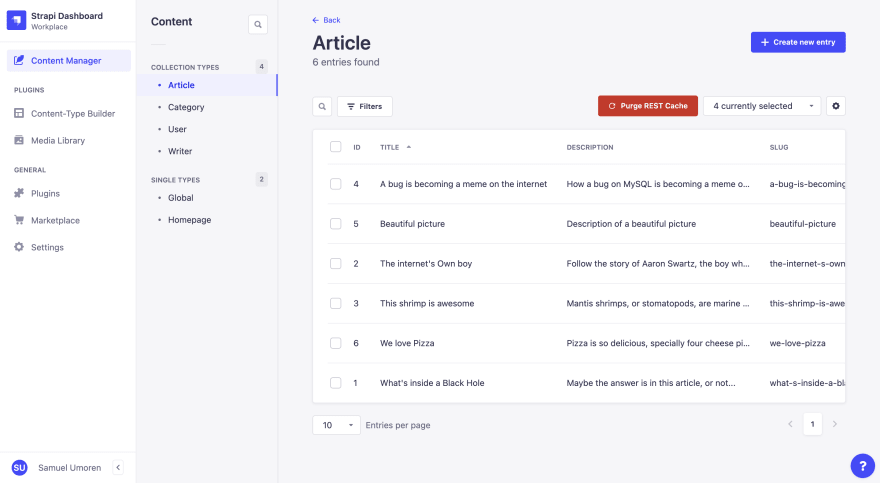
A Purge REST Cache button has appeared! This enables you to clear the cache from the admin dashboard.
Caching and Authentication
The Strapi plugin rest cache was designed for public route casing. If a private route with authorization header is connected to the cache, public users can access the route without authentication and they won’t be asked for bearer token. This is because the cache runs before the user-permissions plugin; hence, the route’s content is cached without authentication.
Conclusion
In this article, we have explored caching in Strapi with the strapi-plugin-rest cache. We first discussed caching and why it is necessary to add caching to your application. Next, we looked at the strapi-plugin-rest cache and installed and set it up in our working environment. Then we explored the different configurations and properties for the strapi-plugin-rest cache.


Oldest comments (0)