
This tutorial was updated to v4 by Mark Munyaka.
An application's ability to offer content to users in their localities gradually becomes a necessary functionality for greater user engagement and retention due to the enormous variety of languages spoken by users worldwide in various locations.
The Strapi i18n plugin enables application administrators to store data in many locales and provide it to users within those locales, assisting in developing this capability.
We will learn more about the i18n plugin in this article.
Goal
This article aims to help you understand what Internationalization is and how to implement it in a Strapi application.
To keep this article focused on its primary goal, we will not create a new Strapi application but instead, use this Strapi eCommerce template.
The demo application will be an eCommerce store to sell courses with localized content. The Strapi i18n plugin will serve localized content from two locales to the front-end built with Gatsby.
After finishing the application, it should be similar to this:
If you want to try out the finished app of this tutorial before going through the article, clone the GitHub repo.
What you will learn
This article will help you understand what Internationalization is and how to implement it in a new or existing Strapi application.
If you are new to Strapi, Strapi is easy to learn and feature-rich headless content management system (CMS) with support for PostgreSQL, MongoDB, SQLite, MySQL, and MariaDB. Check out the Strapi: Quickstart guide.
Prerequisites
To follow along with this tutorial, you need some knowledge of the following:
- JavaScript
- Node.js
- GraphQL
- Shell (Bash)
Install this software:
- Node v14.x.x or v16.x.x. Download Node from the Download | Node.js page. I used Node v16.14.2.
- npm or yarn. npm ships with your Node installation. If you prefer yarn, install it as an npm package. Check Installation | Yarn. I used yarn v1.22.15.
For a full rundown of all the requirements needed to run a Strapi app, check out the Hardware and Software requirements.
Introduction
So far, you have seen the word Internationalization reoccur all over this article. Let's take a deep dive to understand Internationalization.
According to the W3C definition, internationalization is "the design and development of a product, application or document content that enables easy localization for various target audiences that vary in culture, region, or language."
You often find Internationalization shortened to i18n, with "i" and "n" representing the first and last letters. In contrast, 18 represents the total number of letters when "i" and "n" are subtracted.
While Internationalization refers to designing a product for various target audiences, localization can be narrowed to adapting a product, application, or document content to meet the language, cultural needs, and other requirements of a specific target market (a locale).
One important thing to note is that the application of Internationalization and localization, as defined above, varies across different products as each product has its target audience across other localities with differing cultural requirements.
You will find the word locale used in various parts of this article. A locale refers to the language used to create the content.
For developers managing the content of their application using Strapi, the i18n plugin provides admins with the means of localizing the content served to their end-users.
Backend Setup
Step 1: Create Strapi Project
For this tutorial, we'll use the eCommerce template developed by Rémi from the Strapi Team. We will connect a Gatsby app to it for fetching the pre-stored data.
Note:
For this tutorial, we will use yarn as the package manager. You can, however, use npm if preferred.
In your terminal, create an empty project directory to store your project. This folder would serve as the root folder. The front-end and back-end code will be stored in subdirectories. I will name my project directory bluedolphin.
$ mkdir bluedolphin
Change the directory to the project directory bluedolphin.
$ cd bluedolphin
Enable source control for your project by initializing a git repository.
/bluedolphin $ git init
Create a strapi application with the eCommerce template.
/bluedolphin $ yarn create strapi-app backend --quickstart --template @strapi/template-ecommerce@1.0.0 ecommerce
This command creates your Strapi app in the folder named backend. The --quickstart flag sets up your Strapi app with an SQLite database. The --template flag retrieves the specific template to install in your app. In this case, we retrieved the strapi-template-ecommerce, hosted by Strapi on GitHub.
After a successful installation, the CLI would automatically start the Strapi application.
Open the Strapi Admin Registration interface from your web browser at http://localhost:1337/admin. Create the admin user for your Strapi application and click Let's Start.

The eCommerce template you just cloned contains the following:
- Three prebuilt collection types:
- Categories
- Users
- Products
- Entries (sample data) for the collection types above
- Media assets
To view the entries for each collection type, select Content Manager from the left-hand side menu of your dashboard. You can also see the media assets by clicking on the Media Library under PLUGINS.

Feel free to modify the existing data. They provide a good starting point for building this project.
Step 2: Set up the GraphQL plugin
Stop the Strapi development server by pressing Ctrl plus C on your keyboard.
Next, install the GraphQL plugin to add GraphQL support to this Strapi app.
/bluedolphin $ cd backend
/bluedolphin/backend $ yarn strapi install graphql
After installing the plugin, you can start your Strapi server.
/bluedolphin/backend $ yarn develop
You can access your project's GraphQL playground at http://localhost:1337/graphql to write queries and mutations for working with the existing data.
Step 3: Configure Strapi Internationalization (i18n) Plugin
The Internationalization plugin gives Strapi application admins the feature to create, manage and distribute localized content across different languages, also known as locales.
Rather than automatically translate delivered content, the i18n plugin allows developers to fetch the right content based on the user's locale.
Note:
The i18n plugin ships by default with Strapi applications running on version 4.x.x. Please refer to the installation section of the plugin documentation.
By default, the i18n plugin has English (en) as the default locale. However, more locales and their respective content can be added using the admin panel or the Strapi Content API.
We will add one more locale to the Categories content-type.
Using the Admin panel, navigate to the Settings page of your Strapi application, then click on the Internationalization option within the Global Settings.
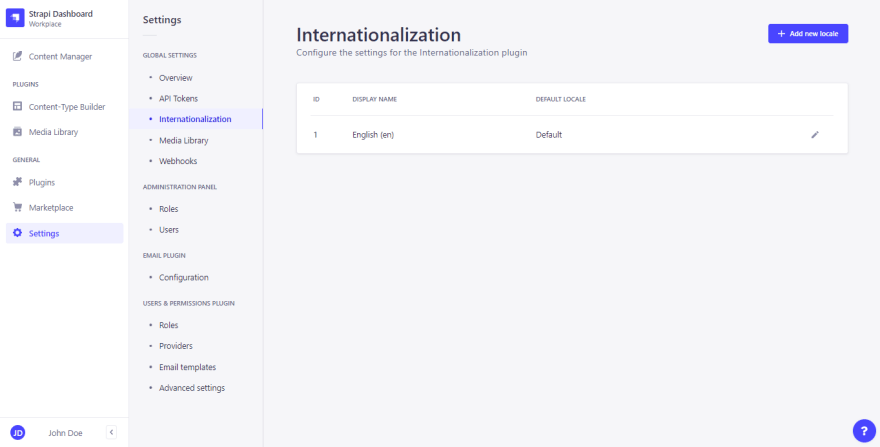
Step 4: Add A New Locale
- Locate and click the + Add new locale button at the top right corner to open the Add new locale modal.
- Using the Locales dropdown, select a new locale.
> Note:
> This tutorial will be using the
French (fr)locale. You can, however, use any other locale if you prefer. - Select
French (fr)in the Locales drop-down, and the Locale display name will be automatically updated toFrench (fr). - Click on ✓ Save.

If you successfully added the French (fr) locale you should see it listed under English (en) in the list of locales.
Step 5: Enable Content-Type Localization
By default, the content types within the cloned eCommerce template do not have localization enabled.
- Click on Content-Types Builder in your Strapi dashboard.
- Select the content type to be localized. Start with the Category content-type.
- Click the edit pencil icon of the chosen content type to open the Edit Category modal.
- Click the Advanced Settings tab from the edit modal, then enable localization using the checkbox at the bottom of the modal.
- Click on Finish and wait for your Strapi server to restart.
- Next, enable localization for the Product content-type.

Step 6: Add Locale Content
As stated earlier, the i18n plugin does not automatically translate content stored with Strapi into different locales; instead, it gives admins the feature to store and deliver multiple locale entries.
We will create French (fr) locale entries for the Category and Product collection types then link the products to their respective categories to work with the i18n plugin. This should give you a working idea when implementing Internationalization with the i18n plugin in your application.
- Navigate to the Content Manager page
- Select Product under COLLECTION TYPES
Click on the first entry, e.g., Rust, to edit it.

In the Edit Product menu, go to the INTERNATIONALIZATION section on the right-hand side.
Click on the Locales drop-down and select French (fr).
In the INTERNATIONALIZATION section, click on Fill in from another locale and confirm by selecting Yes, fill in to automatically update your entry with the data from the
English (en)locale.Append the slug string with
-frso thatrustbecomesrust-fr.Translate the description for the product entry into
French (fr).Click on Save.

Using the same procedure, add
French (fr)locale content entries for the remaining products.Next, create
French (fr)locale entries for the Category collection.Link the products to their respective categories using the products drop-down in the RELATION section, then Save.
On completion, you should have a
French (fr)collection of Categories with the linked products.Navigate to the Category collection-type page to see a list of all categories created in the default English (en) locale.
Click the locale dropdown at the top-right to switch from the default
English (en)locale to the recently createdFrench (fr)locale.

The Strapi backend to your application is now set.
Frontend Setup
Step 7: Install Gatsby
Now that the backend is set, open up a new terminal and navigate to the root of your project folder bluedolphin.
$ cd /bluedolphin
Launch the Gatsby installer to create a Gatsby application with the name frontend from your terminal using the command below:
/bluedolphin $ npm init gatsby
After the installation process, run the newly created Gatsby application's development server to ensure the installation was successful.
/bluedolphin $ cd frontend
Step 8: Add Wrapper, Header, and Footer Components
Create a components folder within the src directory.
/bluedolphin/frontend $ mkdir src/components
Create a layout.js file in the components folder.
/bluedolphin/frontend $ touch src/components/layout.js
Copy and paste the following code into the layout.js file.
// ./src/components/layout.js

    import React from "react";
    import { Helmet } from "react-helmet";

    const Layout = ({ children }) => (
        <div>
        <Helmet defer={false}>
            <link
            rel="stylesheet"
            href="https://cdn.jsdelivr.net/npm/bootstrap@4.6.0/dist/css/bootstrap.min.css"
        integrity="sha384-B0vP5xmATw1+K9KRQjQERJvTumQW0nPEzvF6L/Z6nronJ3oUOFUFpCjEUQouq2+l"
            crossorigin="anonymous"
            />
        </Helmet>
        {children}
        </div>
    );

    export default Layout;
The code above creates a wrapper using React-helmet to wrap each page with styles from Bootstrap using a CDN link.
Create a header.js file in the components folder for the site's header.
/bluedolphin/frontend $ touch src/components/header.js
Add the following code to your header.js file:
    // ./src/components/header.js

    import React from "react";
    import styled from "styled-components";
    import { Link } from "gatsby";

    const Header = styled.header`
      height: 55px;
      background-color: #1a124b;
      width: 100%;
      color: white;
      display: flex;
      align-items: center;
      padding: 0 2rem;
      box-shadow: 0 2px 3px white;
      nav {
        padding-top: 10px;
        display: flex;
        justify-content: space-between;
        width: 100%;
        h5 {
          font-size: 1.1rem;
        }
      }
    `;

    const HeaderComponent = (props) => (
      <Header>
        <nav>
          <div>
            <Link to="/">
              <h5> STRAPI ECOM APP </h5>
            </Link>
          </div>

          <div>
            <p>{props.about}</p>
          </div>
        </nav>
      </Header>
    );

    export default HeaderComponent;
This creates a header that will be displayed across all pages of your Gatsby app. The title I used for the app is "STRAPI ECOM APP". The props.about will help in rendering locale-specific text using a conditional operator when the Header component is used.
Create a footer.js file in the components folder for the site's footer.
/bluedolphin/frontend $ touch src/components/footer.js
Add the following code to your footer.js file:
    // ./src/components/footer.js

    import React from "react";
    import styled from "styled-components";

    const Footer = styled.footer`
      height: 55px;
      background-color: #1a124b;
      width: 100%;
      position: fixed;
      bottom: 0;
      color: white;
      display: flex;
      align-items: center;
      justify-content: center;
      h5 {
          padding-top : 10px;
          font-size: 1.2rem;
      }
    `;

    const FooterComponent = (props) => (
      <Footer>
        <h5>
          {" "}
          Designed and built by{" "}
          <a href="https://github.com/Marktawa"> Mark Munyaka </a>{" "}
        </h5>
      </Footer>
    );

    export default FooterComponent;
This code creates a footer to be displayed across all pages on your site. The props.info will help render locale-specific text using a conditional operator when the Footer component is imported.
Step 9: Add Styling
Create a styles.js file in the src directory.
/bluedolphin/frontend $ touch src/styles.js
This stylesheet is where you would keep all CSS-in-JS styles created using styled-components.
Copy and paste the following code into styles.js.
    // ./src/styles.js

    import styled from "styled-components";

    export const Cards = styled.ul`
        display: grid;
        padding-top: 1rem;
        padding-bottom: 5rem;
        grid-template-columns: repeat(auto-fit, minmax(20rem, 1fr));
        grid-gap: 2rem 1rem;
        place-items: center;
    `;

    export const Item = styled.div`
        height: 400px;
        width: 300px;
        border-radius: 7px;
        box-shadow: 0 2px 3px #c0c0c0;
        background: #fff;
        color: #1d1b84;
        text-align: center;
        div {
        padding: 0.1rem 0.5rem;
            h4 {
                text-align: center;
                font-weight: 600;
            }
        }
    `;

    export const Button = styled.button`
        background: #1d1b84;
        border: 1px solid #1d1b84;
        color: #fff;
        border-radius: 3px;
        padding: 0.3rem 1rem;
    `;

    export const Image = styled.img`
        height: 250px;
        width: 250px;
        object-fit: contain;
    `;

    export const Flex = styled.div`
        display: flex;
        width: 100%;
        align-items: center;
        flex-direction: ${(props) => props.direction};
        justify-content: ${(props) => props.justify};
    `;

    export const Banner = styled.div`
        padding: 0.4rem 0.5rem;
        text-align: center;
        h4 {
        font-weight: 600;
        }
    `;

    export const CategoryCtn = styled.div`
        width: 20rem;
        padding: .5rem 1rem;
        background: #fff;
        margin: 1rem;
        border-radius: 5px;
        box-shadow: 0 2px 3px #c0c0c0;
    `

    export const Container = styled.div`
        background: #ebf4fd;
    `;
The styles exported in the file above would be used when creating other components.
Step 10: Configure Gatsby dependencies
Install the following extra dependencies needed for this Gatsby application:
/bluedolphin/frontend $ yarn add gatsby-source-graphql moment react-icons styled-components babel-plugin-styled-components
Modify the gatsby-config.js file in the root of your frontend folder with the code below to register the installed plugins.
    // ./gatsby-config.js

    require("dotenv").config({
      path: `.env.${process.env.NODE_ENV}`,
    })

    module.exports = {
        siteMetadata: {
        title: "i18n-frontend",
        },
        plugins: [
        "gatsby-plugin-react-helmet",
        {
            resolve: "gatsby-plugin-manifest",
            options: {
            icon: "src/images/icon.png",
            },
        },
        { resolve: `gatsby-plugin-styled-components`},
        {
            resolve: "gatsby-source-graphql",
            options: {
                // Arbitrary name for the remote schema Query type
                typeName: "STRAPI",
                // Field for the remote schema. You'll use this in your Gatsby query
                fieldName: "strapi",
                url: `${process.env.GATSBY_STRAPI_GRAPHQL_ENDPOINT}/graphql`,
            },
        },
        ],
    };
In the configuration file above, you have registered styled-components for styling the application.
Also, using the gatsby-source-graphql plugin, you configured the Gatsby application to connect with your Strapi Application using its GraphQL API endpoint stored in environment variables.
You probably don't have the GATSBY_STRAPI_GRAPHQL_ENDPOINT environment variable yet.
Create a .env.development file in the root folder of your Gatsby application.
/bluedolphin/frontend $ touch .env.development
Add the following code to .env.development.
    # ./.env.development

    GATSBY_STRAPI_GRAPHQL_ENDPOINT="http://localhost:1337"
Next, restart the Gatsby development server. Press Ctrl plus C on your keyboard to stop the server and then start it using yarn start.
    ^C
    /bluedolphin/frontend $ yarn start
This ensures the remote Strapi schema will be merged into the Gatsby application schema.
Step 11: Test GraphQL
Let's test our Gatsby application and see if it can retrieve data from the Strapi backend.
Use the GraphQL editor for your Gatsby application at http://localhost:8000/___graphql and test the GraphQL Query in the image below.
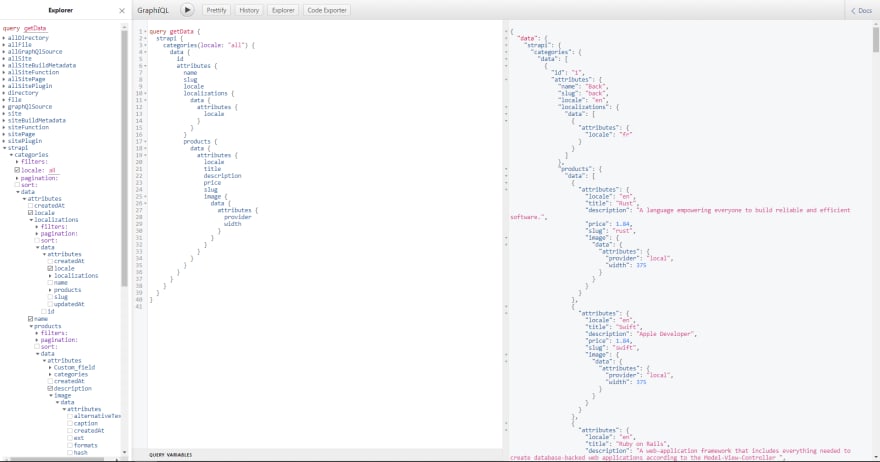
In the GraphiQL playground above, you can observe the result of the getData query executed to retrieve data from your running Strapi application. Also, the GraphiQL playground shows the Strapi fields that have been merged in the Gatsby application schema.
Now that the Strapi schema has been merged with your Gatsby application schema, you can perform GraphQL operations directly from the application.
Step 12: Fetch data from Strapi API
Create a gatsby-node.js file in the root folder of the gatsby application.
/bluedolphin/frontend $ touch gatsby-node.js
Copy and paste the code snippet below into gatsby-node.js:
    // ./gatsby-node.js

    const path = require("path");

    exports.createPages = async ({ graphql, actions }) => {
        const { createPage } = actions;

        const categoriesQuery = await graphql(`
        query getData {
            strapi {
                categories(locale: "all") {
                    data {
                        id
                        attributes {
                            name
                            slug
                            locale
                            localizations {
                                data  {
                                    attributes {
                                        locale
                                    }
                                }
                            }
                            products {
                                data {
                                    id
                                    attributes {
                                        locale
                                        title
                                        description
                                        price
                                        slug
                                        image {
                                            data {
                                                attributes {
                                                    url
                                                    provider
                                                    width
                                                }
                                            }
                                        }
                                    }
                                }
                            }
                        }
                    }
                }
            }
        }
        `);

        // Template to create dynamic pages from.
        const categoryTemplate = path.resolve(`src/pages/categories.js`);
        const homeTemplate = path.resolve(`src/pages/home.js`)

        categoriesQuery.data.strapi.categories.data.forEach(
            (category) => {
                if (category.attributes.localizations.data.length > 0) {
                    category.attributes.localizations.data.forEach((localization) => {
                        localization.attributes.locale
                        createPage({
                            path: `category/${category.id}/${localization.attributes.locale.toLowerCase()}`,
                            component: categoryTemplate,
                            context: {
                                slug: category.attributes.slug,
                                name: category.attributes.name,
                                id: category.id,
                                products: category.attributes.products,
                                locale: localization.attributes.locale,
                                localizations: category.attributes.localizations
                            },
                        });
                        createPage({
                            path: `home/${localization.attributes.locale.toLowerCase()}`,
                            component: homeTemplate,
                            context: {
                                locale: localization.attributes.locale,
                            },
                        })
                    })
                }

                createPage({
                    path: `category/${category.id}/${category.attributes.locale}`,
                    component: categoryTemplate,
                    context: {
                        slug: category.attributes.slug,
                        name: category.attributes.name,
                        id: category.id,
                        products: category.attributes.products,
                        locale: category.attributes.locale,
                        localizations: category.attributes.localizations
                    },
                });
                createPage({
                    path: `home/${category.attributes.locale}`,
                    component: homeTemplate,
                    context: {
                        locale: category.attributes.locale,
                    },
                })
            }
        );
    };
The code above fetches data from the Strapi application and creates dynamic pages with the fetched data.
You will observe the following operations below performed to retrieve data from the Strapi application from the file above:
- The
getDataquery is executed with thelocaleparameter set to fetchallcategories content-types from the Strapi API. - An iteration is made on each category contained in the returned array.
- Each time the iteration is made, a dynamic page is created using Gatsby's create page API with the
product.jscomponent as a template, passing thelocaleandidof the category into the component as props.
Note:
Thepathoption specifies theURLof each of the dynamic pages. In our use case, each dynamic page created is differentiated using the unique categoryidgenerated by Strapi.
In every iteration, we also check if the category has localized content. The Strapi Content API would return an empty array if a collection type has localization enabled but has no localized content.
If a collection type has localized content in our use case, a new dynamic page is created to display content in that locale.
Before we restart the Gatsby development server for the new changes in the gatsby-node.js file to take effect, we will create the category template and a home page to display all categories.
Step 13: Add Categories Page
Create a categories.js file in the src/pages directory.
/bluedolphin/frontend $ touch src/pages/categories.js
Copy and paste the following code into your categories.js file:
    // ./src/pages/categories.js

    import React, { useState } from "react";
    import { Cards, Item, Button, Image, Flex, Banner, Container } from "../styles";
    import { graphql, Link, navigate } from 'gatsby'

    import Header from "../components/header";
    import Footer from "../components/footer";
    import Layout from "../components/layout";

    const shrinkText = (text, length) => {
        let txt = text.split(" ");

        if (txt.length < 7) {
            return text;
        }

        return [...txt.splice(0, length), '...'].join(" ")
    };

    const Index = ({ pageContext, data }) => {
        const { name, locale, id } = pageContext;
        const [currentLang, setCurrentLang] = useState("en")
        const { categories } = data.strapi

        return (
            <Layout>
                <Header about={locale === "fr" ? "À propos" : "About" } />
                <Container>
                    <Banner>
                        <br />
                        <h4 style={{ textAlign: "center" }}>{name} ({locale === "fr" ? "Français" : "English"})</h4>

                        <p>{locale === "fr" ? " Afficher les produits en:" : " Display products in:"}
                            {categories.data[0].attributes.localizations.data.map((localization) =>
                                <Link to={`/category/${id}/${localization.attributes.locale.toLowerCase()}`} >
                                    <span style={{ padding: "0.5rem" }} > {localization.attributes.locale === "fr" ? "French" : "Anglais"} </span>
                                </Link>
                            )}
                        </p>
                    </Banner>
                    <hr />

                    <Cards>
                        {categories.data[id - 1].attributes.products.data.map((product) => (
                            <Item key={product.id}>
                                <div>
                                    <Image
                                        src={
                                            `http://localhost:1337${product.attributes.image.data.attributes.url}`
                                        }
                                    />
                                    <h5> {product.attributes.title} </h5>
                                    <p style={{ opacity: ".8" }} >{shrinkText(product.attributes.description, 4)} </p>

                                    <Flex direction="row" justify="space-between">
                                        <div>
                                            <p style={{ textAlign: "left" }}>
                                                {locale === "fr" ? ` € ${product.attributes.price}` : ` $ ${product.attributes.price}`}
                                            </p>
                                        </div>

                                        <div>
                                            <Button>{locale === "fr" ? "Acheter Maintenant" : "Buy Now"}</Button>
                                        </div>
                                    </Flex>
                                </div>
                            </Item>
                        ))}
                    </Cards>
                    <Footer info={locale === "fr" ? "Conçu et Construit par" : "Designed and Built by" } />
                </Container>
            </Layout>
        );
    };

    export const query = graphql`
        query fetchLocaleData($locale: STRAPI_I18NLocaleCode) {
            strapi {
                categories(locale: $locale) {
                    data {
                        id
                        attributes {
                            name
                            slug
                            locale
                            localizations {
                                data {
                                    attributes {
                                        locale
                                    }
                                }
                            }
                            products(sort: "id", pagination: {pageSize: 20}) {
                                data {
                                    id
                                    attributes {
                                        locale
                                        title
                                        description
                                        price
                                        slug
                                        image {
                                            data {
                                                attributes {
                                                    url
                                                    provider
                                                    width
                                                }
                                            }
                                        }
                                    }
                                }
                            }
                        }
                    }
                }
            }
        }
    `

    export default Index;
Going through the code block above, which makes up the category component, you will observe the following:
- Although the page is created dynamically using the
createPagesAPI, the component makes an extra graphQL query to fetch localized content using the locale value passed in from the createPages API when the page is created dynamically. - All available locales are displayed at the top banner, allowing users to click on the links to view the page content in another locale.
Restart your Gatsby development server for the changes to take effect:
    ^C
    /bluedolphin/frontend $ yarn start
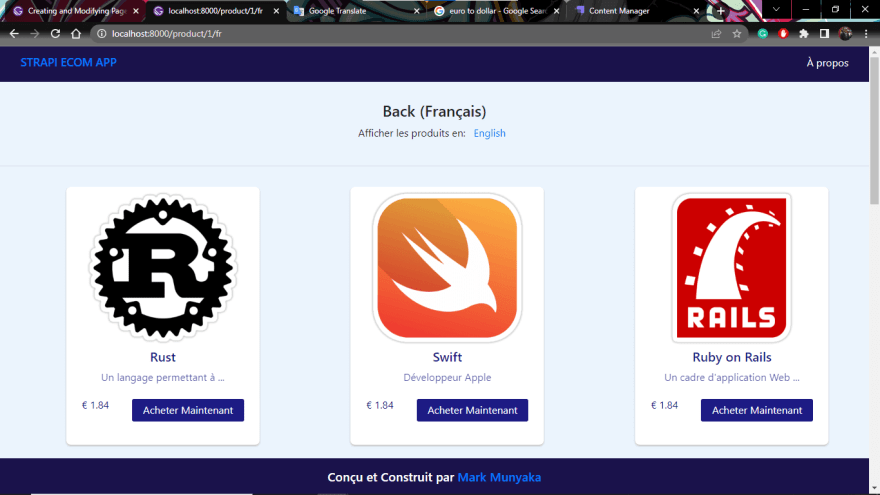
Navigate to http://localhost:8000/category/1/en, it should display the product page with an id of 1, having Back as the category name as shown below:

The image above shows all products within the Back category served in the English (en) locale. The top banner contains links to other pages containing products for the same category but in a different locale.
For example, clicking the fr link would display products in the French locale as shown below:
Step 14: Add Home Page
Next, create a home page that loads all categories with links to their products.
Create a home.js file within the src/pages directory.
/bluedolphin/frontend $ touch src/pages/home.js
Copy and paste the following code into your home.js file:
    // src/pages/home.js

    import React from "react";
    import { graphql, useStaticQuery, Link } from "gatsby";
    import { FiCalendar, FiBook } from "react-icons/fi";
    import moment from "moment";

    import {
        Container,
        Flex,
        Banner,
        Cards,
        CategoryCtn,
    } from "../styles";
    import Header from "../components/header";
    import Footer from "../components/footer";
    import Layout from "../components/layout";

    const Index = ({ pageContext }) => {
        const { locale } = pageContext;
        const { strapi } = useStaticQuery(graphql`
        query fetchAllCourses($locale: STRAPI_I18NLocaleCode) {
            strapi {
                categories(locale: $locale) {
                    data {
                        id
                        attributes {
                            name
                            createdAt
                            slug
                            locale
                            localizations {
                                data {
                                    attributes {
                                        locale
                                    }
                                }
                            }
                            products(sort: "id", pagination: {pageSize: 20}) {
                                data {
                                    id
                                }
                            }
                        }
                    }
                }
            }
        }
        `);

        return (
            <Layout>
                <Header about={locale === "fr" ? "À propos" : "About"} />
                <Container>
                    <Banner>
                        <h4> {locale === "fr" ? "MAGASIN DE COURS STRAPI" : "STRAPI COURSE STORE"} </h4>
                        <p> {locale === "fr" ? "Un Magasin De Cours Avec Prise En Charge De l'Internationalisation" : "A Course Store With Support For Internationalization"} </p>
                        {locale === "fr" ?
                            <p>
                                Afficher les catégories en:
                                <Link to={`/home/en`}> Anglais</Link>
                            </p>
                            :
                            <p>
                                Display categories in:
                                <Link to={`/home/fr`}> French</Link>
                            </p>}
                    </Banner>
                    <hr />

                    <Cards >
                        {strapi.categories.data.map((category) => (
                            <CategoryCtn key={category.id}>
                                <div>
                                    <Link to={`/category/${category.id}/${locale}`}>
                                        <h5> {category.attributes.name} </h5>
                                    </Link>
                                    <Flex
                                        direction="row"
                                        style={{
                                            opacity: ".8",
                                        }}
                                    >
                                        <div
                                            style={{
                                                marginRight: ".3rem",
                                            }}
                                        >
                                            <FiCalendar size={19} />
                                        </div>

                                        <div>{locale === "fr" ? "Ajouté" : "Added"} {moment(category.attributes.createdAt).format("MM/DD/YYYY")}</div>
                                    </Flex>
                                    <hr />
                                    <br />

                                    <Flex direction="row">
                                        <div
                                            style={{
                                                marginRight: ".3rem",
                                                display: "flex",
                                                justifyContent: "center",
                                                alignItems: "center",
                                            }}
                                        >
                                            <FiBook size={19} />
                                        </div>

                                        <div
                                            style={{
                                                display: "flex",
                                                justifyContent: "center",
                                                alignItems: "center",
                                            }}
                                        >
                                            {category.attributes.products.data.length} {locale === "fr" ? "Cours Disponibles" : "Courses Available"}
                                        </div>
                                    </Flex>
                                </div>
                            </CategoryCtn>
                        ))}
                    </Cards>
                    <Footer info={locale === "fr" ? "Conçu et Construit par" : "Designed and Built by"} />
                </Container>
            </Layout>
        );
    };

    export default Index;
The home page you have just created displays all categories with a clickable link to each one. It supports internationalization, so if you navigate to localhost:8000/home/en you'll find the English version of the page, and navigating to localhost:8000/home/fr gives you the French version.
Step 15: Test App
Restart your server for the changes to take effect:
    ^C
    /bluedolphin/frontend $ yarn start
Navigate to your Gatsby application's homepage, localhost:8000/home/en. You should see the categories fetched from your Strapi application if it works correctly.

For the French homepage version, go to localhost:8000/home/fr. Likewise, all the categories should be visible and link you to the French version of the category pages.

At this point, clicking on any categories would navigate you to the category page showing the list of products within that category.
Conclusion
Huge congrats to you.! This article taught you about Internationalization and localization and how the i18n plugin helps you achieve localization in your Strapi application regarding stored content.
We explained what localization and Internationalization are. We cloned an existing Strapi application using the eCommerce template. Then, we created a new locale and enabled localization on the current content types from the admin panel.
After this, we added entries for Products and Categories collection types in the French (fr) locale. And created a new Gatsby application to fetch localized data from the Strapi application using the GraphQL API.
The source code for this tutorial is available for you to test.
What next?
Check out some deployment guides if you want to know how to deploy this app in production. Add some more functionality to this app using plugins in the Strapi Marketplace.
You can also use Localazy instead of translating your Strapi entries manually. Check out this tutorial to get started with Localazy and Strapi.


Top comments (0)