
Introduction
In this tutorial, you will learn how to build a rating app with react and Strapi. This is relatively straightforward as we'll be able to give our ratings, reviews and also be able to display them on our webpage. First, let's take a sneak pick into React and Strapi.
What is React?
React is a library for building user interfaces. It runs on the client as a SPA(single page app) but can also build full-stack apps by communicating with a server/API. React is often referred to as a frontend "framework" because it is capable and directly comparable to a framework such as Angular or Vue.
Why should you try it out
- It structures the "view" layer of your application.
- Reusable components with their state.
- JSX-Dynamic markup.
- Interactive UIs with virtual DOM.
- Performance and testing.
- Very popular in the industry.
What is Strapi?
Strapi is an open-source CMS that allows you to build customizable APIs in any frontend application. Strapi is so easy to work with as it will enable you to build flexible APIs with unique features you'll love. You can create custom content types and relationships between the content types so that things can stay organized. It also gives you a media library where you can host your image or audio assets.
Now that we have an understanding of both. Let's get started.
Overview
- Introduction
- What is React?
- What is Strapi?
- Prerequisites
- Requirements
- Installing Strapi
- Creating the frontend
- Fetching our API
- Creating reviews
- Conclusion
Prerequisites
- Basic understanding of JavaScript
- Basic understanding of ReactJS
Requirements
- Npm
- React icons which we would install along with our react app
- Axios
Installing Strapi
We first need to go to our terminal and navigate the project folder you want Strapi to be installed. Strapi can be installed either with Yarn or NPX.
Yarn command:
yarn create strapi-app rating-app --quickstart
npx command:
npx create-strapi-app rating-app --quickstart
This will install all the needed packages for this project. After the installation, our Strapi app will automatically be launched in our browser. We should have something like this:

To finish up, create admin by signing up. Now that we've created our Strapi, let's head over to the content-type builder link.

You'll see three different headings, namely
- Collection types
- Single types
- Component
Collection types are what we're interested in. These are types that we'll have more than one of on our website. A single type would be for a unique piece of content, for example, a homepage that might have a title and about section. A component is just a collection of fields that you might use in many different types.
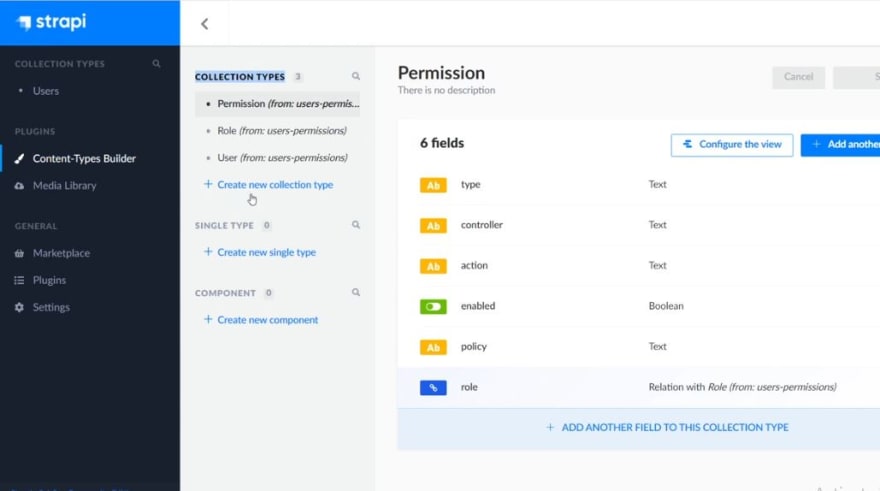
Click on collection types, give it a display name, and make sure it's singular, not plural. Strapi automatically pluralizes it. We will call our collection review.

Next, we have to define a field and field type. For our reviews, we want a title field that is of type text. Then we give the field a name called Name. It can be short text or long text. The short text is best for the title.

Click on the advanced setting and make it a required field or a unique field so that no two review titles can be the same.
Click on add another field. Now we need a rating field that will be a number, so go ahead and click the number and give this the name of Rating and then choose a number format. Ours will be an integer.

We then go to advance setting and make it required and add a minimum value of 1 and a max value that will be 5, so this field can only be a number from one to 5.
Let's add another field for the body, and that's going to be rich text to add formats into it. Click on it and give it a name called reviews we could go to the advanced and make it required, and now we could click on finish.


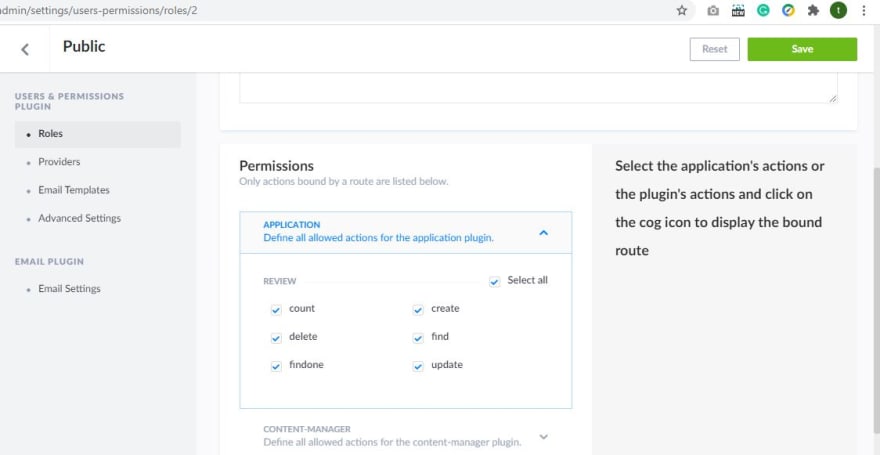
So now we have all the different fields for our content-type reviews. Click save to save our reviews. Next, we head over to settings. Navigate to Roles and click on the public. We then scroll down to permissions and click on select all.
Strapi saves and refreshes the browser. Now that it's done, we can see the content type review, and if we click on that, we can see our empty review list.
Let's click on add new reviews and then add reviews(I'll add up to 4 reviews in the list), then click on publish after filling out the fields.

So if we try to retrieve it by using the Strapi API, It sends us the data.
To start your Strapi app always run:
npm run develop
If you got it up to this part, you're a genius!!! Now let's move to the next step, which is creating the front end.
Creating the front end
As earlier stated, React would be used as our frontend. So let's go ahead and install React and all the packages we'll need. Let's open up our terminal once more and navigate the folder where we want to install react.
Run the command:
npx create react-app react-ratings
Next, navigate to the folder where we just installed React.
cd react-ratings
Next, we want to install React icons.
npm install react-icons
And lastly, let’s install Axios.
npm install axios
Now that's done, let's remove and edit the things we don't want in our react app. First of all, let's delete all the files highlighted in the image below as we won't be needing them.
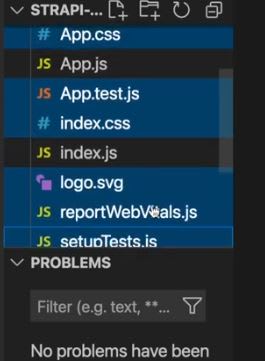
Also, we'll head to our app.js and remove the import from '.logo.svg'; the import './app.css'.

Next, we will also delete the headers in our App() function.

Next, head over to head index.js and delete the import reportWebvitals from ./reportWebvitals; the import .index.css; and reportWebvitals() . The final look of our index.js should be like this:

Now that we are done let’s start our react app:
npm start
We'll see a blank page. This means we are on the right track.
Reading and fetching our reviews.
First we create a folder in our src folder, name it api, next we create a file inside called index.js and add the following codes to it:
    import axios from 'axios';
    const url = "http://localhost:1337/reviews";
    export const readReviews = ()=>axios.get(url);
    export const createReview = newReview =>axios.post(url,newReview);
This includes explanations:
- Importing Axios to our app.
- The path to our API.
- Creating reviews(adding data to our or review API via webpage).
- Reading the reviews data.
Axios will be responsible for fetching data from our API and also adding to it. We then go back to our app.js and import the just created API folder containing the index.js to our app:
import * as api from "./api";
We also be using bootstrap so let’s copy the bootstrap link to our index.html in our public folder.
<link href="https://cdn.jsdelivr.net/npm/bootstrap@5.1.3/dist/css/bootstrap.min.css" rel="stylesheet" integrity="sha384-1BmE4kWBq78iYhFldvKuhfTAU6auU8tT94WrHftjDbrCEXSU1oBoqyl2QvZ6jIW3" crossorigin="anonymous">
Now we have everything to start building.
Fetching our API
To do this, we are going to be using the useState and the useEffect. The useState will allow us to state variables, while the useEffect will fulfill our parameters in our components when it renders.
Let’s head over app.js and write the following at the top:
    import React, { useState, useEffect } from "react";
    import { FaStar } from "react-icons/fa";
    const colors = {
      orange: "#FFBA5A",
      grey: "#a9a9a9",
    };
Under our function app() in our app.js we write this:
    const [review, setReview] = useState({});
      const [reviews, setReviews] = useState([]);
      useEffect(
        () => {
          const fetchData = async () => {
            const result = await api.readReviews();

            setReviews(result.data);
          };
          fetchData();
              },[])
                  )
Next, lets create the contents where our API will be displayed
     <section id="reviews">
            <div class="reviews-heading">
              <span>REVIEWS FROM CUSTOMERS</span>
            </div>
            <div className="container">
              <div className="row">
                  <div className="col-md-6">
                    <div class="reviews-box">
                      <div class="box-top">
                        <div class="profile">
                          <div class="name-user">
                            <strong>Temitope</strong>
                          </div>
                        </div>
                            <FaStar key={i} size={18} color={colors.orange} />
                        </div>
                      </div>
                   <div class="client-comment">lorem ipsum lorem ipsumlorem ipsumvvvlorem ipsumlorem ipsumlorem ipsumlorem ipsum </div>
                    </div>
                  </div>
              </div>
            </div>
          </section>
If you encounter an error saying jsx must have one parent element. Do not worry. We can fix this by using <React.Fragment/> or simply use the short syntax <></>.
Let's give it a styling. Create a folder under the src folder and name it styles, then create a file and name it anything you like. Add the following codes to it:
     *{
      margin: 0px;
      padding: 0px;
      font-family: poppins;
      box-sizing: border-box;
    }
    a{
      text-decoration: none;
    }
    #reviews{
      display: flex;
      justify-content: center;
      align-items: center;
      flex-direction: column;
      width:100%;
    }
    .reviews-heading{
      letter-spacing: 1px;
      margin: 30px 0px;
      padding: 10px 20px;
      display: flex;
      flex-direction: column;
      justify-content: center;
      align-items: center;
    }

    .reviews-heading span{
      font-size: 1.3rem;
      color: #252525;
      margin-bottom: 10px;
      letter-spacing: 2px;
      text-transform: uppercase;
    }
    .reviews-box-container{
      display: flex;
      justify-content: center;
      align-items: center;
      flex-wrap: wrap;
      width:100%;
    }
    .reviews-box{
      width:500px;
      box-shadow: 4px 4px 40px rgba(0,0,0,0.1);
      background-color: #ffffff;
      padding: 20px;
      margin: 15px;
      cursor: pointer;
    }

    .name-user{
      display: flex;
      flex-direction: column;
    }
    .name-user strong{
      color: #3d3d3d;
      font-size: 1.1rem;
      letter-spacing: 0.5px;
    }
    .name-user span{
      color: #979797;
      font-size: 0.8rem;
    }

    .box-top{
      display: flex;
      justify-content: space-between;
      align-items: center;
      margin-bottom: 20px;
    }
    .client-comment p{
      font-size: 0.9rem;
      color: #4b4b4b;
    }
    .reviews-box:hover{
      transform: translateY(-10px);
      transition: all ease 0.3s;
    }

    @media(max-width:1060px){
      .reviews-box{
          width:45%;
          padding: 10px;
      }
    }
    @media(max-width:790px){
      .reviews-box{
          width:100%;
      }
      .reviews-heading h1{
          font-size: 1.4rem;
      }
    }
    @media(max-width:340px){
      .box-top{
          flex-wrap: wrap;
          margin-bottom: 10px;
      }
      .reviews{
          margin-top: 10px;
      }
    }
    ::selection{
      color: #ffffff;
      background-color: #252525;
    }
Head back to app.js and import the CSS:
import "./styles/review_style.css";
Now that we've done that let's start adding API values to our contents. Under the the div class row add this code:
{reviews.map((review, i) => (
Close it before the last two divs
))}
The .map function helps us to iterate our list of data.
For our name, we go to where we wrote name (between our strong tags) and replace it with this:
{review.Name}
To display our rating, replace it with this code:
     {Array.from({ length: review.Rating }).map((i) => (
                            <FaStar key={i} size={18} color={colors.orange} />
                          ))}
Lastly, for our reviews, we change the dummy texts with:
{review.review}
If you’re confused at this stage, copy and paste this the code below and you should get right back on track.
     <section id="reviews">
            <div class="reviews-heading">
              <span>REVIEWS FROM CUSTOMERS</span>
            </div>

            <div className="container">
              <div className="row">
                {reviews.map((review, i) => ( // calling the api
                  <div className="col-md-6">
                    <div class="reviews-box">
                      <div class="box-top">
                        <div class="profile">
                          <div key={i}></div>
                          <div class="name-user">
                            <strong>{review.Name}</strong>
                          </div>
                        </div>

                        <div style={styles.stars}>
                          {Array.from({ length: review.Rating }).map((i) => (
                            <FaStar key={i} size={18} color={colors.orange} />
                          ))}
                        </div>
                      </div>
                      <div class="client-comment">{review.review}</div>
                    </div>
                  </div>
                ))}
              </div>
            </div>
          </section>
Now that we're done, we should be able to view our review API.
Creating reviews
Now let’s create a form for rating and reviewing. Write the following code in our function app() above our section displaying our reviews.
    <div style={styles.container}>
      <h2>star ratings app in react</h2>
          <div style ={styles.stars}>
          {stars.map((_, index) => {
            return(
              <FaStar
                key={index}
                size ={24}
                style={{
                  marginRight :10,
                  cursor:"pointer"
                }}
                color ={(hoverValue || currentValue)> index ? colors.orange : colors.grey}
                onClick={() => handleClick(index + 1)}
                onMouseOver={()=> handleMouseOver(index + 1)}

              />
            )
          })}
        </div>
    <div>
                <input
                  type="text"
                  placeholder="input your name"
                  required
                  style={styles.input />
              </div>

        <textarea
         placeholder="what's your feedback"
         style={styles.textarea}
        />
        <button style={styles.button}>submit</button>
          </div>
Input this code above the form just after our function app():
    const stars = Array(5).fill(0);
      const [currentValue, setCurrentValue] = React.useState(0);
      const [hoverValue, setHoverValue] = React.useState(undefined);
      const handleClick = (value) => {
        setCurrentValue(value);
      };
      const handleMouseOver = (value) => {
        setHoverValue(value);
      };
We then add an inline css to it. This should be written below just before the export default app.
    const styles = {
    container: {
        align: "center",
        display: "flex",
        flexDirection: "column",
        alignItems: "center",
        boxShadow: "0 0 20px 0 #999",
        width: "30%",
        margin: "50px auto",
        flexDirection: "column",
      },
      input: {
        borderRaduis: 5,
        width: 300,
        margin: "10px 0",
        marginDown: "15px",
        minHeight: 30,
        padding: 1,
        height: "20px",
      },
      textarea: {
        border: "1px solid #a9a9a9",
        borderRaduis: 5,
        width: 300,
        margin: "20px 0",
        minHeight: 100,
        padding: 10,
      },

      button: {
        border: "1px solid #a9a9a9",
        borderRaduis: 5,
        width: 300,
        padding: 10,
        margin: "20px 0",
      },
    };
Inside star icons(fastar), replace the onClick function we wrote with:
     onClick={() => {
                        setReview({ ...review, Rating: index + 1 });
                      }}
Next add the following inside our input tag:
    value={review.Name}
                  onChange={(e) => setReview({ ...review, Name: e.target.value })}
We will also add to text area and button. For text area:
    value={review.review}
                onChange={(e) => setReview({ ...review, review: e.target.value })}
and lastly, for button:
onClick={createReview}
Confused? Here’s the full code for the form.
     <form>
    <div style={styles.container}>
              <h2>RATE OUR SERVICE</h2>

              <div style={styles.stars}>
                {stars.map((_, index) => {
                  return (
                    <FaStar
                      key={index}
                      size={24}
                      style={{
                        marginRight: 10,
                        cursor: "pointer",
                      }}
                      color={
                        (hoverValue || currentValue) > index
                          ? colors.orange
                          : colors.grey
                      }
                      onClick={() => {
                        setReview({ ...review, Rating: index + 1 });
                      }}
                      onMouseOver={() => handleMouseOver(index + 1)}
                    />
                  );
                })}
              </div>
              <div>
                <input
                  type="text"
                  placeholder="input your name"
                  required
                  style={styles.input}
                  value={review.Name}
                  onChange={(e) => setReview({ ...review, Name: e.target.value })}
                />
              </div>

              <textarea
                placeholder="what's your feedback"
                required
                style={styles.textarea}
                value={review.review}
                onChange={(e) => setReview({ ...review, review: e.target.value })}
              />
              <button
                type="submit"
                style={styles.button}
                class="btn btn-primary"
                onClick={createReview}
              >
                submit
              </button>
            </div>
          </form>
We’re almost done. Let’s scroll up and type the following below our use effect code:
      const createReview = async () => {
      try {
          console.log(review);
          const data = await api.createReview(review);
          setReview([...reviews, data]);
        } catch (error) {
          console.log(error);
        }
      };
      let [reviewCount, setreviewCount] = useState([]);
      const setCountFxn = (no) => {
        setReview(no);
      };

          const data = await api.createReview(review);
          setReview([...reviews, data]);
        } catch (error) {
          console.log(error);
        }
      };
      let [reviewCount, setreviewCount] = useState([]);
      const setCountFxn = (no) => {
        setReview(no);
      };
Now we're done. Suppose you get an error that's because you didn't add the tag <></> like I earlier suggested(don't add if you're not getting an error).
Here's the complete code of app.js. You have to edit them to do your values.
    import React, { useState, useEffect } from "react";
    import * as api from "./api";
    import "./styles/review_style.css";
    import { FaStar } from "react-icons/fa";
    const colors = {
      orange: "#FFBA5A",
      grey: "#a9a9a9",
    };

    function App() {
      const stars = Array(5).fill(0);
      const [currentValue, setCurrentValue] = React.useState(0);
      const [hoverValue, setHoverValue] = React.useState(undefined);

      const handleClick = (value) => {
        setCurrentValue(value);
      };

      const handleMouseOver = (value) => {
        setHoverValue(value);
      };

      const handleMouseLeave = () => {
        setHoverValue(undefined);
      };
      const [review, setReview] = useState({});
      const [reviews, setReviews] = useState([]);
      useEffect(
        () => {
          const fetchData = async () => {
            const result = await api.readReviews();
            // console.log(result);
            setReviews(result.data);
          };
          fetchData();


        },

        []
      );
      const createReview = async () => {
        try {
          console.log(review);
          const data = await api.createReview(review);
          setReview([...reviews, data]);
        } catch (error) {
          console.log(error);
        }
      };
      let [reviewCount, setreviewCount] = useState([]);
      const setCountFxn = (no) => {
        setReview(no);
      };
      return (
        <>
          <form>
            <div style={styles.container}>
              <h2>RATE OUR SERVICE</h2>

              <div style={styles.stars}>
                {stars.map((_, index) => {
                  return (
                    <FaStar
                      key={index}
                      size={24}
                      style={{
                        marginRight: 10,
                        cursor: "pointer",
                      }}
                      color={
                        (hoverValue || currentValue) > index
                          ? colors.orange
                          : colors.grey
                      }
                      onClick={() => {
                        setReview({ ...review, Rating: index + 1 });
                      }}
                      onMouseOver={() => handleMouseOver(index + 1)}
                    />
                  );
                })}
              </div>
              <div>
                <input
                  type="text"
                  placeholder="input your name"
                  required
                  style={styles.input}
                  value={review.Name}
                  onChange={(e) => setReview({ ...review, Name: e.target.value })}
                />
              </div>

              <textarea
                placeholder="what's your feedback"
                required
                style={styles.textarea}
                value={review.review}
                onChange={(e) => setReview({ ...review, review: e.target.value })}
              />
              <button
                type="submit"
                style={styles.button}
                class="btn btn-primary"
                onClick={createReview}
              >
                submit
              </button>
            </div>
          </form>

          <section id="reviews">
            <div class="reviews-heading">
              <span>REVIEWS FROM CUSTOMERS</span>
            </div>

            <div className="container">
              <div className="row">
                {reviews.map((review, i) => ( // calling the api
                  <div className="col-md-6">
                    <div class="reviews-box">
                      <div class="box-top">
                        <div class="profile">
                          <div key={i}></div>
                          <div class="name-user">
                            <strong>{review.Name}</strong>
                          </div>
                        </div>

                        <div style={styles.stars}>
                          {Array.from({ length: review.Rating }).map((i) => (
                            <FaStar key={i} size={18} color={colors.orange} />
                          ))}
                        </div>
                      </div>

                      <div class="client-comment">{review.review}</div>
                    </div>
                  </div>
                ))}
              </div>
            </div>
          </section>
        </>
      );
    }

    const styles = {
      container: {
        align: "center",
        display: "flex",
        flexDirection: "column",
        alignItems: "center",
        boxShadow: "0 0 20px 0 #999",
        width: "30%",
        margin: "50px auto",
        flexDirection: "column",
      },
      input: {
        borderRaduis: 5,
        width: 300,
        margin: "10px 0",
        marginDown: "15px",
        minHeight: 30,
        padding: 1,
        height: "20px",
      },
      textarea: {
        border: "1px solid #a9a9a9",
        borderRaduis: 5,
        width: 300,
        margin: "20px 0",
        minHeight: 100,
        padding: 10,
      },

      button: {
        border: "1px solid #a9a9a9",
        borderRaduis: 5,
        width: 300,
        padding: 10,
        margin: "20px 0",
      },
    };
    export default App;
Here’s also a link to the full source code on github.
Conclusion
We learned about contents types and how to build a rating app using Strapi as our backend. We created content, fed them to our website through Strapi's API. We also learned how to create reviews and feed them (insert) into our database.
The truth is there are countless things we can use Strapi for, and this is just one of them.


Oldest comments (1)
Good explanation !.