
This article looks at how you can refactor your code using Visual Studio Code (VS Code) and Visual Studio Code plugins.
Refactoring improves the code’s internal structure according to best practices or rules without altering the current behavior. You often see development teams plan a refactoring week to evaluate the code architecture and internal structure before starting a new development cycle. It's important for engineering teams to address technical issues continuously and have regular discussions about maintenance and code quality.
Code refactoring is an important activity to improve the code’s quality and maintainability. It’s much easier to build new features on top of clean code, but it will also benefit you when writing tests.
This article looks at how you can refactor your code using Visual Studio Code (VS Code) and Visual Studio Code plugins.
1. Refactoring with Visual Studio Code Shortcuts
First of all, let’s use Visual Studio Code’s native shortcuts to do some basic code refactoring. We’ve created a small code example using JavaScript to help you play around with these functionalities.
There’s an index.js file that contains the business logic. We import a userModule, retrieve a new user object, and convert the user’s name to uppercase.
const userModule = require('./modules/users/retrieve')

const myUser = userModule.getUser("Ben", 17)
console.log(myUser.name)

const name = userModule.toUpperCaseUser(myUser.name)
console.log(name)
Furthermore, here’s the implementation of the userModule, which contains several exported functions that we use in our index.js file. The file is nested in two folders. The resulting path is /modules/users/retrieve.js.
const getUser = (name, age) => ({
   name: toLowerCaseUser(name),
   age
})

const toUpperCaseUser = (name) => {
   return name.toUpperCase()
}

const toLowerCaseUser = (name) => {
   return name.toLowerCase();
}

module.exports = {
   getUser,
   toUpperCaseUser
}
Now, let’s right-click on the getUser function in the index.js file. You’ll see different options that can help us with refactoring the code. Here’s a shortlist:
- Go to definition: Opens up a pane that shows you where the function has been defined
-
Go to implementation: Brings you to the function definition in the
modules/users/retrieve.jsfile - Find all references: Shows you all locations where a function has been used, and it shows you every function usage within a file
The above commands are most useful for quickly navigating and finding function definitions in Visual Studio Code. For instance, you want to figure out in which files a particular function has been used. Therefore, you can use the above commands to quickly solve such tasks.
2. Automatically Fix Imports and Filenames
When refactoring code, developers often can’t resist criticizing poorly chosen filenames. On top of that, refactoring code means that you are shifting code between different files and changing the purpose of certain modules. Therefore, broken imports are all too common when code refactoring has finished.
To save you from the trouble of manually scanning through all files to find spot broken imports, Visual Studio Code can help you with this. When you change a filename for the first time in Visual Studio Code, it will ask you to update imports automatically. Here, choose the “Always automatically update imports” option. You can try this out by renaming the retrieve.js file from the previous example.
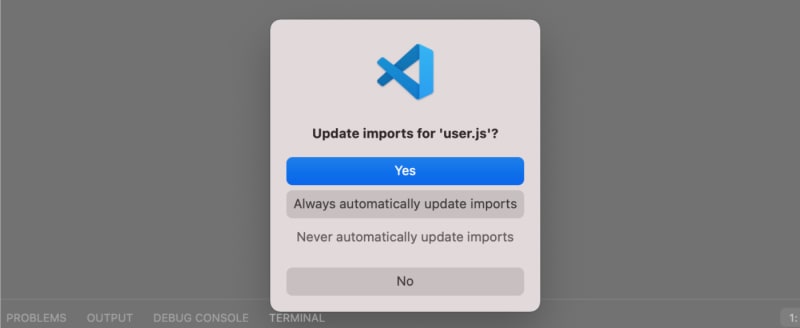
Now, create a new folder and move the retrieve.js file to this folder. When doing so, VS Code will show you another pop-up message asking you if you want to automatically update imports when moving files. Again, select the “Always automatically update imports” option. That’s it!
3. Built-in Code Formatting by Visual Studio Code
From the VS Code documentation, we can read how the built-in formatting option works.
VS Code has default formatters for JavaScript, TypeScript, JSON, and HTML. Each language has specific formatting options (for example,
html.format.indentInnerHtml) which you can tune to your preference in your user or workspace settings.
To trigger the formatting option, you can open the Command Palette (shift + CMD + P) and look for the option “Format Document”. Select this option to format your document. Most likely, this won’t change much to your code except for fixing some indentation issues.
If you want Visual Studio Code to automatically trigger the “Format Document” option whenever you make changes to a file, you can configure this via the user settings. We prefer to format the document whenever hitting the save button (CMD + S). To do so, open your user settings and look for the rule editor.formatOnSave. Click the checkbox next to the rule to enable it.

Alternatively, you can choose for editor.formatOnType, which formats a line after typing, or editor.formatOnPaste, which formats content when you paste it in your editor.
When choosing a formatting rule, you don’t need to do anything else to enable this rule.
4. Custom Code Formatting by Prettier Visual Studio Code Extension
We don’t need to use the built-in code formatting tool provided by VS Code. We can disable the default language formatter and replace it with a custom language formatter or one provided by an extension like Prettier.
You can also disable the default language formatter if you have another extension installed that provides formatting for the same language. (Visual Studio Code documentation)
First of all, we need to find the Prettier extension in the extension pane. Make sure to select the official Prettier extension, which supports multiple languages. You can install the extension by hitting the “Install” button.

You can also select a specific Prettier ESLint extension. However, it’s easier to use the official plugin as you can configure it for different file types. For instance, you might have CSS, JSON, and JavaScript files in a single project.
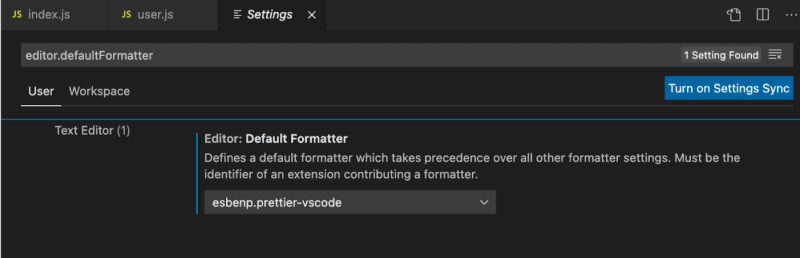
To enable the Prettier formatter as our default formatter for all languages, we have to open the user settings again. Look for the following rule editor.DefaultFormatter and pick the Prettier formatter called esbenp.prettier-vscode.
We need to add Prettier configuration rules to tell Visual Studio Code how to format our document now. The easiest way to do so is by creating a .prettierrcconfiguration file in the root of the project. This file will contain a JSON object which holds all the active rules. The advantage of this approach is that you can commit the configuration file to your repository to enforce the same coding standards across your team. This standardization will reduce refactoring work in the future.
Here are some popular rules that can help you to refactor code quickly:
- tabWidth: Specify the number of spaces per indentation-level
- semi: Print semicolons at the ends of statements
- singleQuote: Use single quotes instead of double quotes
- arrowParens: Include parentheses around a sole arrow function parameter, which we want to avoid in this example.
{
 "tabWidth": 2,
 "semi": false,
 "singleQuote": true,
 "arrowParens": "avoid"
}
You can try out the settings by making a change in one of your files and saving it. Either, you can open the Command Palette again and choose the command “Format Document”.
If you want to take a look at all possible rules, you can find all options in the Prettier documentation.
Is Refactoring Fun?
Yes, refactoring should be fun! First of all, it gives developers a break to evaluate their code, improve, and learn from their mistakes. On top of that, developers like to start from a clean codebase rather than developing new features on top of a messy codebase.
When it comes to refactoring tools and plugins, you have many options to choose from. For instance, we didn’t cover the JS Refactor extension in the Visual Studio Code marketplace because it only offers basic refactoring options.
If you want to make significant gains quickly, we recommend using Prettier. It’s a powerful refactoring tool that also helps to enforce coding style standards across your team using a Prettier configuration file. Not to mention that VSCode offers a couple of useful refactoring functions like finding all references for a function or automatically fixing imports.
How to prioritise refactoring work?
If you're working with a team of engineers and want to prioritise refactoring work properly, check out Stepsize—a free tool for tracking and managing technical debt, straight from VS code.
This post was written by Michiel Mulders. Michiel is a passionate blockchain developer who loves writing technical content. Besides that, he loves learning about marketing, UX psychology, and entrepreneurship. When he’s not writing, he’s probably enjoying a Belgian beer!


Top comments (0)