This guide describes how to connect to a private on-premises non-internet facing Docker registry from a GKE cluster. In order to demonstrate how to do that, we'll use two separate GCP networks, one for the application cluster, and one for the private registry. Similarely, the latter can be replaced by your own on-premises network.
To follow this tutorial, you need to have a knowledge of the followings:
- General networking knowledges: RFC 1918, routers, ...
- Networking with Google Cloud
- Kubernetes
- GKE
- Docker
The tutorial will take you through all the following steps:
- Provisioning the two networks.
- Connecting the networks using Cloud Routers and VPN tunnels.
- Creating the GKE cluster in the on-premises network and deploying a private Docker registry without exposing it to the internet.
- Creating the GKE cluster in the GCP network and deploying a container image uploaded to the private Docker registry.
Caveats
You will learn how to use Cloud VPN to connect your on-premises network to your GCP network. Although, you have to consider the limitations and the performance impact of using this approach.
Because the application GKE cluster will regularly download images from the on-premises network, it can have a significant impact on the trafic going through the VPN tunnels. If you need a higher network bandwidth, please review the Google Cloud hybrid connectivity documentation alternatives to Cloud VPN.
If possible, consider using GCR for private hosting of container images. GCR is the container registry of choice for using with GKE. It works as a fully managed solution and it comes with built-in vulnerability scanning for the hosted images.
Also because of its very reasonable cost, GCR might be a cheaper solution than leveraging Cloud VPN.
Before you begin
You need a GCP project.
The fastest way to get one is to connect or create an account on the GCP web console.
You'll need to create a new billing account and associate it to the project. For new comers, Google offers free credits to help you getting started at no cost. Please review the documentation for using the GCP free trial.
Also make sure to run the following commands.
Configure the default GCP project.
export GPC_PROJECT_ID=<your GCP project id>
gcloud config set project $GPC_PROJECT_ID
Activate the required APIs.
gcloud services enable compute.googleapis.com
gcloud services enable container.googleapis.com
gcloud services enable dns.googleapis.com
gcloud services enable storage-api.googleapis.com
Provisioning the networks
In this section, we create the two Google VPCs and create one subnet in western europe for each one of them.
1) We first create the network that will mimic the on-premises network.
gcloud compute networks create on-prem \
  --subnet-mode=custom \
  --bgp-routing-mode=regional
2) And create a subnet in region europe-west1.
gcloud compute networks subnets create on-prem-europe-west1 \
  --range=10.0.0.0/24 \
  --network=on-prem \
  --region=europe-west1
3) Then we create the second network, that will have the application GKE cluster.
gcloud compute networks create app \
  --subnet-mode=custom \
  --bgp-routing-mode=regional
4) And create a subnet in region europe-west1 for this network as well.
gcloud compute networks subnets create app-europe-west1 \
  --range=10.0.1.0/24 \
  --network=app \
  --region=europe-west1
5) Then we add firewall rules in both networks to allow ICMP protocol.
gcloud compute firewall-rules create on-prem-allow-icmp --direction=INGRESS --priority=1000 --network=on-prem --action=ALLOW --rules=icmp --source-ranges=0.0.0.0/0

gcloud compute firewall-rules create app-allow-icmp --direction=INGRESS --priority=1000 --network=app --action=ALLOW --rules=icmp --source-ranges=0.0.0.0/0
Connecting the networks
In this section, we provide a VPN gateway in each network and use Cloud Router to create BGP sessions and dynamically exchange routes between the two networks.
1) First we reserve two regional IPv4 addresses, one for the on-premises VPN gateway and one for the GCP network VPN gateway.
gcloud compute addresses create app-vpn-ip --region=europe-west1
gcloud compute addresses create on-prem-vpn-ip --region=europe-west1
We'll keep the addresses in environment variables for later use.
APP_VPN_IP=$(gcloud compute addresses describe app-vpn-ip --region europe-west1 --format="value(address)")
ON_PREM_VPN_IP=$(gcloud compute addresses describe on-prem-vpn-ip --region europe-west1 --format="value(address)")
2) Then we create the routers, one for each network.
gcloud compute routers create on-prem-router \
  --region=europe-west1 \
  --network=on-prem \
  --asn=64512 # any private ASN that you are not using elsewhere in your network https://fr.wikipedia.org/wiki/Autonomous_System

gcloud compute routers create app-router \
  --region=europe-west1 \
  --network=app \
  --asn=64513 # needs to be different from on-prem-router ASN
3) Then we create the on-premises VPN.
Create the VPN gateway.
gcloud compute target-vpn-gateways create "on-prem-vpn" \
  --region "europe-west1" \
  --network "on-prem"
Then the required forwarding rules.
gcloud compute forwarding-rules create "on-prem-vpn-rule-esp" \
  --region "europe-west1" \
  --address $ON_PREM_VPN_IP \
  --ip-protocol "ESP" \
  --target-vpn-gateway "on-prem-vpn"

gcloud compute forwarding-rules create "on-prem-vpn-rule-udp500" \
  --region "europe-west1" \
  --address $ON_PREM_VPN_IP \
  --ip-protocol "UDP" \
  --ports "500" \
  --target-vpn-gateway "on-prem-vpn"

gcloud compute forwarding-rules create "on-prem-vpn-rule-udp4500" \
  --region "europe-west1" \
  --address $ON_PREM_VPN_IP \
  --ip-protocol "UDP" \
  --ports "4500" \
  --target-vpn-gateway "on-prem-vpn"
Then the VPN tunnel.
gcloud compute vpn-tunnels create "on-prem-vpn-tunnel-1" \
  --region "europe-west1" \
  --peer-address $APP_VPN_IP \
  --shared-secret "supersecretkey" \
  --ike-version "2" \
  --target-vpn-gateway "on-prem-vpn" \
  --router "on-prem-router" \
  --router-region "europe-west1"
And finally the BGP session for dynamic routing.
gcloud compute routers add-interface on-prem-router \
  --interface-name "bgp-to-app" \
  --vpn-tunnel "on-prem-vpn-tunnel-1" \
  --vpn-tunnel-region "europe-west1" \
  --ip-address "169.254.0.1" \
  --mask-length 16

gcloud compute routers add-bgp-peer on-prem-router \
  --peer-asn 64513 \
  --peer-name "bgp-to-app" \
  --interface "bgp-to-app" \
  --peer-ip-address "169.254.0.2"
4) We create a second VPN in the other network.
gcloud compute target-vpn-gateways create "app-vpn" \
  --region "europe-west1" \
  --network "app"

gcloud compute forwarding-rules create "app-vpn-rule-esp" \
  --region "europe-west1" \
  --address $APP_VPN_IP \
  --ip-protocol "ESP" \
  --target-vpn-gateway "app-vpn"

gcloud compute forwarding-rules create "app-vpn-rule-udp500" \
  --region "europe-west1" \
  --address $APP_VPN_IP \
  --ip-protocol "UDP" \
  --ports "500" \
  --target-vpn-gateway "app-vpn"

gcloud compute forwarding-rules create "app-vpn-rule-udp4500" \
  --region "europe-west1" \
  --address $APP_VPN_IP \
  --ip-protocol "UDP" \
  --ports "4500" \
  --target-vpn-gateway "app-vpn"

gcloud compute vpn-tunnels create "app-vpn-tunnel-1" \
  --region "europe-west1" \
  --peer-address $ON_PREM_VPN_IP \
  --shared-secret "supersecretkey" \
  --ike-version "2" \
  --target-vpn-gateway "app-vpn" \
  --router "app-router" \
  --router-region "europe-west1"

gcloud compute routers add-interface app-router \
  --interface-name "bgp-to-on-prem" \
  --vpn-tunnel "app-vpn-tunnel-1" \
  --vpn-tunnel-region "europe-west1" \
  --ip-address "169.254.0.2" \
  --mask-length 16

gcloud compute routers add-bgp-peer app-router \
  --peer-asn 64512 \
  --peer-name "bgp-to-on-prem" \
  --interface "bgp-to-on-prem" \
  --peer-ip-address "169.254.0.1"
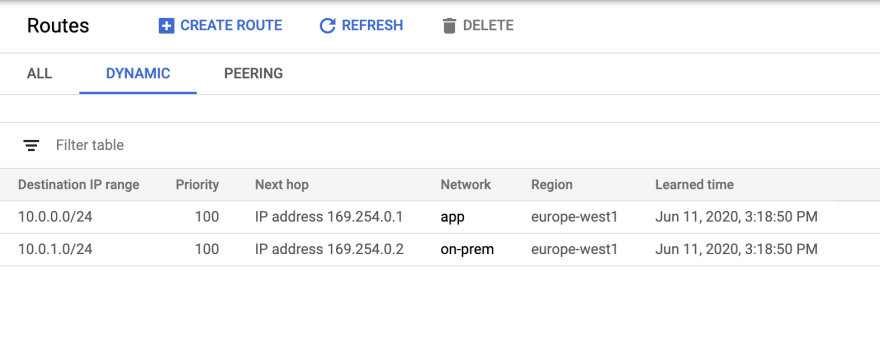
When everything is set, you should be able to see these two routes by navigating to VPC Networks > Routes > DYNAMIC.
Deploying a Docker registry
In this section, we create a new GKE cluster named artifactory-cluster in the on-premises network and deploy a non-internet facing Artifactory in it.
We'll use a self signed SSL certificate for serving HTTPS trafic. Finally we'll create a repository using the Artifactory web interface and publish a Docker image to it.
1) First we create the GKE cluster.
gcloud beta container clusters create "artifactory-cluster" \
  --zone "europe-west1-b" \
  --no-enable-basic-auth \
  --release-channel "regular" \
  --machine-type "n1-standard-4" \
  --image-type "COS" \
  --disk-type "pd-standard" \
  --disk-size "100" \
  --num-nodes "3" \
  --enable-private-nodes \
  --master-ipv4-cidr "172.16.0.0/28" \
  --enable-ip-alias \
  --network "projects/$GPC_PROJECT_ID/global/networks/on-prem" \
  --subnetwork "projects/$GPC_PROJECT_ID/regions/europe-west1/subnetworks/on-prem-europe-west1" \
  --enable-master-authorized-networks \
  --master-authorized-networks 0.0.0.0/0
2) Then we use Cloud NAT to create a gateway to the internet for private IP only VMs in the on-premises network. This is required for the nodes to be able to pull the public Artifactory Docker images.
gcloud compute routers nats create on-prem-nat-gw \
  --router "on-prem-router" \
  --region "europe-west1" \
  --auto-allocate-nat-external-ips \
  --nat-all-subnet-ip-ranges
3) Then we use openssl to generate a certificate authority (CA) key pair.
export ARTIFACTORY_PKI=/tmp/pki

mkdir $ARTIFACTORY_PKI

openssl genrsa -out "$ARTIFACTORY_PKI/ca.key" 2048

openssl req \
  -x509 \
  -new \
  -nodes \
  -key "$ARTIFACTORY_PKI/ca.key" \
  -subj "/CN=my-ca" \
  -days 10000 \
  -out "$ARTIFACTORY_PKI/ca.crt"
4) Then we use it to generate and sign a key pair for the Artifactory HTTPS configuration.
openssl genrsa \
  -out "$ARTIFACTORY_PKI/tls.key" \
  2048

openssl req \
  -new \
  -key "$ARTIFACTORY_PKI/tls.key" \
  -subj "/CN=artifactory.local" \
  -out "$ARTIFACTORY_PKI/tls.csr"

openssl x509 \
  -req \
  -in "$ARTIFACTORY_PKI/tls.csr" \
  -CA "$ARTIFACTORY_PKI/ca.crt" \
  -CAkey "$ARTIFACTORY_PKI/ca.key" \
  -CAcreateserial \
  -out "$ARTIFACTORY_PKI/tls.crt" \
  -days 365
Note the common name (CN)
artifactory.local, we'll need to register a local DNS record for this domain in the app network.
5) Then we install Artifactory by configuring and using kubectl
gcloud container clusters get-credentials artifactory-cluster --zone "europe-west1-b"

kubectl create secret tls artifactory-tls-secret \
  --key "$ARTIFACTORY_PKI/tls.key" \
  --cert "$ARTIFACTORY_PKI/tls.crt"

kubectl apply -f "https://raw.githubusercontent.com/aubm/gke-private-registry-resources/master/artifactory.yaml"
After having waited a few minutes for all the containers to be ready, running kubectl get pods should give the following output.
NAME                                 READY   STATUS    RESTARTS   AGE
artifactory-0                        1/1     Running   0          9m
artifactory-nginx-7fdc5fcb77-5qmq9   1/1     Running   0          9m
postgresql-0                         1/1     Running   0          9m
6) Using a web browser, we connect to the Artifactory web interface and go through the welcome wizard.
The default user is admin and the password is password.
We can skip most steps, except for the admin password reset form. We'll set a new password and remember it for later.
Discover the Artifactory public IP by running
kubectl get services artifactory-nginx -o jsonpath='{.status.loadBalancer.ingress[0].ip}'. This IP is only provided for ease of Artifactory configuration through the web interface. For pulling Docker image from the GKE application cluster, we'll use an internal load balancer private IP address.
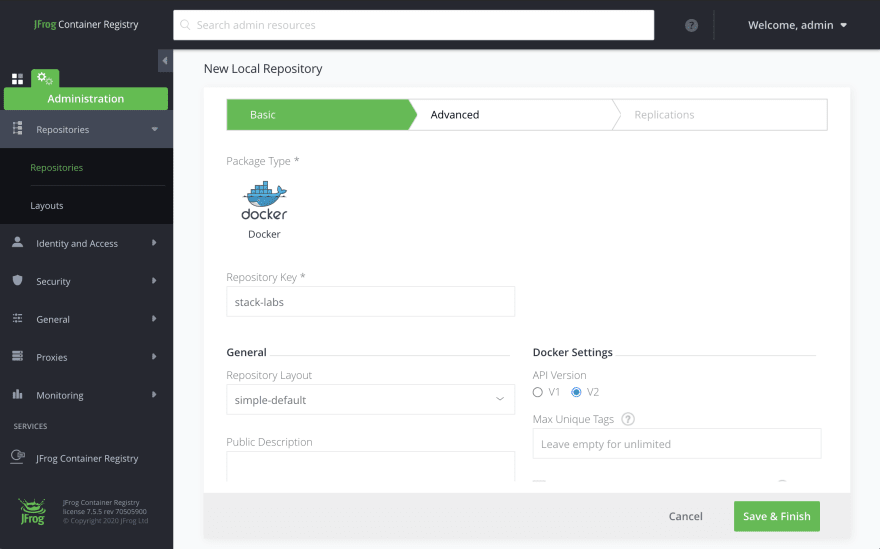
7) When completed the configuration, we navigate to Administration > Repositories, and click New Local Repository. The URL path is /ui/admin/repositories/local/new. We enter the name stack-labs in the Repository Key field, leave the rest to the defaults, and click Save & Finish.
Uploading an image on the registry
In this section, we pull a public image from Docker Hub, and push it to our Artifactory.
1) Because TLS is configured using a self signed SSL certificate, we first need to tell our local Docker daemon that it can trust our registry. We do that by adding a new entry for artifactory.local in the /etc/hosts file, and then copying the CA certificate file in a specific location. Where exactly is that location depends on your operating system, please refer to the Docker documentation. Here is how to do it when using Docker for Mac.
export ARTIFACTORY_PUBLIC_IP=$(kubectl get services artifactory-nginx -o jsonpath='{.status.loadBalancer.ingress[0].ip}')

echo "$ARTIFACTORY_PUBLIC_IP artifactory.local" >> /etc/hosts

mkdir -p "$HOME/.docker/certs.d/artifactory.local"

cp "$ARTIFACTORY_PKI/ca.crt" "$HOME/.docker/certs.d/artifactory.local/ca.crt"

# Restart Docker daemon
2) Then we login to the registry.
docker login artifactory.local --username admin --password <YOUR_PASSWORD>
3) And finally pull the nginx:stable image, tag it and push it to the Artifactory.
docker pull nginx:stable

docker tag nginx:stable artifactory.local/stack-labs/nginx:stable

docker push artifactory.local/stack-labs/nginx:stable
4) We can confirm that the image is visible by navigating the Artifactory web UI to JFrog Container Registry > Artifacts.

Using the registry
In this section, we create a second GKE cluster in the app network, and configure a pod to pull the nginx image that we just pushed to the local Artifactory. We do that by connecting using only the local interface instead of the public load balancer IP address. For that, we create a new private DNS zone using Cloud DNS and add a new record to associate the private IP address to the artifactory.local domain.
1) First we create the private DNS zone in the app network.
gcloud dns managed-zones create artifactory-local \
  --dns-name "artifactory.local" \
  --description "DNS for artifactory.local" \
  --visibility "private" \
  --networks "app"
2) Then we add the DNS record.
export ARTIFACTORY_PRIVATE_IP=$(kubectl get services artifactory-nginx-internal -o jsonpath='{.status.loadBalancer.ingress[0].ip}')

gcloud dns record-sets transaction start --zone "artifactory-local"

gcloud dns record-sets transaction add $ARTIFACTORY_PRIVATE_IP \
  --name "artifactory.local." \
  --ttl 60 \
  --type "A" \
  --zone "artifactory-local"

gcloud dns record-sets transaction execute --zone "artifactory-local"
3) Then we create the application GKE cluster.
gcloud beta container clusters create "application-cluster" \
  --zone "europe-west1-b" \
  --no-enable-basic-auth \
  --release-channel "regular" \
  --machine-type "n1-standard-1" \
  --image-type "COS" \
  --disk-type "pd-standard" \
  --disk-size "100" \
  --num-nodes "1" \
  --enable-private-nodes \
  --master-ipv4-cidr "172.17.0.0/28" \
  --enable-ip-alias \
  --network "projects/$GPC_PROJECT_ID/global/networks/app" \
  --subnetwork "projects/$GPC_PROJECT_ID/regions/europe-west1/subnetworks/app-europe-west1" \
  --enable-master-authorized-networks \
  --master-authorized-networks 0.0.0.0/0
4) Then, we need to configure the GKE nodes in a way that they can trust the registry's self signed certificate. The below commands:
- Create a new secret that contains the CA certificate.
- Create a NAT gateway for the nodes to be able to pull public images from Docker Hub.
- Deploy a privileged daemonset that mounts the secret and copies its contents to the host file system on
/host/etc/docker/certs.d/artifactory.local/ca.crt. The daemonset uses a public Alpine image, which is why the NAT gateway is necessary. More on this solution here.
kubectl create secret generic init-pki --from-file="ca.crt=$ARTIFACTORY_PKI/ca.crt"

gcloud compute routers nats create app-nat-gw \
  --router "app-router" \
  --region "europe-west1" \
  --auto-allocate-nat-external-ips \
  --nat-all-subnet-ip-ranges

kubectl apply -f "https://raw.githubusercontent.com/aubm/gke-private-registry-resources/master/init-daemonset.yaml"
You can avoid this step by configuring the Docker registry with a certificate signed by a well known authority.
5) Then we create a Kubernetes secret containing the Artifactory Docker registry credentials, by reconfiguring and using kubectl.
gcloud container clusters get-credentials application-cluster --zone "europe-west1-b"

kubectl create secret docker-registry artifactory-local \
  --docker-server "artifactory.local" \
  --docker-username "admin" \
  --docker-password "<the password that you changed from the Artifactory web UI>"
6) Finally we run the nginx pod that uses the previously defined secret. More on pulling images from private registries in the Kubernetes documentation.
cat <<EOF | kubectl apply -f -
apiVersion: apps/v1
kind: Deployment
metadata:
  creationTimestamp: null
  labels:
    app: nginx
  name: nginx
spec:
  replicas: 1
  selector:
    matchLabels:
      app: nginx
  strategy: {}
  template:
    metadata:
      creationTimestamp: null
      labels:
        app: nginx
    spec:
      imagePullSecrets:
      - name: artifactory-local
      containers:
      - image: artifactory.local/stack-labs/nginx:stable
        name: nginx
        resources: {}
status: {}
EOF
Cleaning up
gcloud container clusters delete application-cluster --zone "europe-west1-b" --quiet
gcloud container clusters delete artifactory-cluster --zone "europe-west1-b" --quiet

gcloud compute routers nats delete app-nat-gw --router "app-router" --region "europe-west1" --quiet
gcloud compute routers nats delete on-prem-nat-gw --router "on-prem-router" --region "europe-west1" --quiet

gcloud beta dns record-sets transaction start --zone=artifactory-local
gcloud beta dns record-sets transaction remove $ARTIFACTORY_PRIVATE_IP --name=artifactory.local. --ttl=60 --type=A --zone=artifactory-local
gcloud beta dns record-sets transaction execute --zone=artifactory-local
gcloud dns managed-zones delete artifactory-local

gcloud compute routers remove-bgp-peer app-router --peer-name "bgp-to-on-prem"
gcloud compute routers remove-interface app-router --interface-name "bgp-to-on-prem"
gcloud compute vpn-tunnels delete "app-vpn-tunnel-1" --region "europe-west1" --quiet
gcloud compute forwarding-rules delete "app-vpn-rule-udp4500" --region "europe-west1" --quiet
gcloud compute forwarding-rules delete "app-vpn-rule-udp500" --region "europe-west1" --quiet
gcloud compute forwarding-rules delete "app-vpn-rule-esp" --region "europe-west1" --quiet
gcloud compute target-vpn-gateways delete "app-vpn" --region "europe-west1" --quiet

gcloud compute routers remove-bgp-peer on-prem-router --peer-name "bgp-to-app"
gcloud compute routers remove-interface on-prem-router --interface-name "bgp-to-app"
gcloud compute vpn-tunnels delete "on-prem-vpn-tunnel-1" --region "europe-west1" --quiet
gcloud compute forwarding-rules delete "on-prem-vpn-rule-udp4500" --region "europe-west1" --quiet
gcloud compute forwarding-rules delete "on-prem-vpn-rule-udp500" --region "europe-west1" --quiet
gcloud compute forwarding-rules delete "on-prem-vpn-rule-esp" --region "europe-west1" --quiet
gcloud compute target-vpn-gateways delete "on-prem-vpn" --region "europe-west1" --quiet

gcloud compute routers delete on-prem-router --region=europe-west1 --quiet
gcloud compute routers delete app-router --region=europe-west1 --quiet

gcloud compute addresses delete app-vpn-ip --region=europe-west1 --quiet
gcloud compute addresses delete on-prem-vpn-ip --region=europe-west1 --quiet

gcloud compute firewall-rules delete on-prem-allow-icmp --quiet
gcloud compute firewall-rules delete app-allow-icmp --quiet

gcloud compute networks subnets delete on-prem-europe-west1 --region=europe-west1 --quiet
gcloud compute networks delete on-prem --quiet

gcloud compute networks subnets delete app-europe-west1 --region=europe-west1 --quiet
gcloud compute networks delete app --quiet


Top comments (0)