In Bot Framework Composer, you can use the user's OAuth login to enable your bot to access external resources using permissions granted by the end user. This article explains how to use basic OAuth to authenticate your bot with an external service such as GitHub.
Configure OAuth connection settings in Azure
The following steps show how to configure OAuth connection settings to allow a bot to access an external service, GitHub in the example.
In the Azure portal, go to the Azure Bot resource.
In the left pane, in the Settings section, select Configuration.
In the right pane, select Add OAuth Connection Settings.
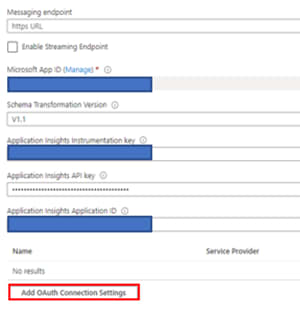
OAuth setting in Azure portal
In the New Connection Settings, enter the required information to configure the OAuth connection. Note that the options will differ depending on the service to access. The figure below shows the settings for configuring GitHub OAuth connection.

- Configure an OAuth setting in Azure
Note
Record the Name of your connection. you will need to enter this value in Composer exactly as it is displayed in this setting.
Enter the values of Client ID, Client Secret, and optionally Scopes. To obtain these values in this example of GitHub, follow the steps described below.
Go to your GitHub Developer settings and register a new OAuth app. GitHub will open a Register a new OAuth application page. Enter the required values for your application:
Application name: a name you would like to give to your OAuth application, such as Composer
Homepage URL: the full URL to your application homepage, such as http://microsoft.com
Authorization callback URL: the callback URL of your application, such as https://token.botframework.com/.auth/web/redirect. Read about Authorizing OAuth Apps in the GitHub developer docs.
Select Register application. Then you will see the Client ID, Client Secret values generated in the application webpage as shown below.

OAuth app credentials
Save the Client ID and Client Secret values.
Go back to Azure and paste the values you saved in the New Connection Settings. These values configure the connection between your Azure resource and GitHub.
Optionally, enter user, repo, admin in Scopes. This field specifies the permission you want to grant to the bot.
Select Save.
You can test the connection. In the right pane, select the connection you created, GitHubLogin in the example.
Select Test Connection.

Test OAuth setting in Azure
If the test succeeds, you get the connection token back.

Test OAuth setting in Azure token
Now, with the Name , Client ID, Client Secret, and Scopes of your new OAuth connection setting in Azure, you are ready to configure your bot.
Configure OAuth connection settings in Composer
In the Composer menu, select Project Settings.
In the right pane, select Development Resources tab.
At the bottom of the window, in the Microsoft App ID section, in the fields of Microsoft App Id and Microsoft App Password, enter the app ID and app password values from your Azure Bot registration.

Composer OAuth setting
In the left menu, select Design and add the OAuth login action to your dialog.
Select OAuth login from the Access external resources menu.
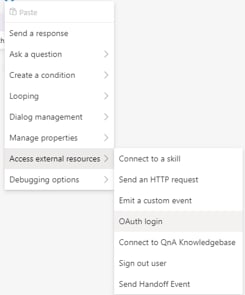
OAuth menu
The Connection Name in the properties pane must be set to the same value you used in Azure for the Name of the connection setting.
Configure at least the Text and Title values, which configure the message that will be displayed alongside the log-in button, and the Property field, which will bind the results of the OAuth action to a variable in your bot's memory.

Tip: It's best practice to not keep the token for longer than is required. Use the turn memory scope.
OAuth sign-in properties
This will open a New Connection Settings, where you can configure the OAuth connection. The options will differ depending on the service you are authenticating with. Pictured below is the settings pane for configuring a login to GitHub:
Use the OAuth token in your bot
When you launch the bot in the Emulator and trigger the appropriate dialog, the bot will present a log-in card. Selecting the log-in button in the card will launch the OAuth process in a new window.
OAuth card in emulator
You'll be asked to log in to whatever external resource you've specified. Once complete, the window will close automatically, and your bot will continue with the dialog.
The results of the OAuth action will now be stored into the property you specified. To reference the user's OAuth token, use .token. For example, if the OAuth prompt is bound to turn.oauth, the token will be turn.oauth.token.
To use this to access the protected resources, pass the token into any API calls you make with the HTTP Request action. You can refer to the token value in URL, body, or headers of the HTTP request using the normal LG syntax, for example: ${turn.oauth.token}.
Best Practices from this issue Discussion by Bot Framework Composer Product team:
https://github.com/microsoft/BotFramework-Composer/issues/5611#issuecomment-767775387
The best practice we recommend for using the OAuth Login is to always just call it immediately before you need access to the token. You should save your token to a temporary variable like turn.token . You shouldn't ever save it to user.token as that's not secure and the token will expire (maybe that's what you're trying to do in the true flow... refresh it.)
If you call the OAuth Login before each use it will automatically refresh the access token so you never have to worry about tokens expiring.
The logic of oauth prompt is like this: 1) retrieve token from service 2) if failed, prompt. When in step 1, the service help you refresh token and always return a useful token if user log in. There is nothing special to set for OAuth prompt (the only thing you need to notice is don't enable the alwaysPrompt flag). So that means, if a user is log in, the OAuth Prompt won't prompt, if user is not log in, the OAuth prompt will prompt. It does not prompt everytime. So be free to add many OAuth prompts in your flow.
The oauth prompt will help you refresh token.
Note: please do not store the token by yourself, when you want to use token, get it from oauth prompt. Then it will help you manage your token


Top comments (0)