
Within minutes, you will be able to deploy a static site/blog (with Publish) that you can style easily (with TailwindCSS).
If you don't want to create your own theme, you can save some time and use my Casperish theme, a port of Ghost's Casper theme using Tailwind CSS.
Install Publish
Publish is a static site generator built specifically for Swift developers, created by John Sundell (@johnsundell) and powering his very own swiftbysundell.com.
You need to have installed Xcode and its Command Line Tools. It's preferable to have a basic understanding of how it works (build, run, understand crash logs).
For now, open your terminal and follow the README.
git clone https://github.com/JohnSundell/Publish.git
cd Publish
make
Create your website
Publish is just the engine, it's now time to create your website.
Let's get out of /Publish and create your website source next to it. We'll call it MyWebsite.
cd ..
mkdir MyWebsite
cd MyWebsite
publish new
And since we're impatient, let's see what it looks like at this point.
publish run
This should output something like this
Fetching https://github.com/johnsundell/publish.git
…
…
…
Publishing MyWebsite (6 steps)
[1/6] Copy 'Resources' files
[2/6] Add Markdown files from 'Content' folder
[3/6] Sort items
[4/6] Generate HTML
[5/6] Generate RSS feed
[6/6] Generate site map
✅ Successfully published MyWebsite
🌍 Starting web server at http://localhost:8000

Press ENTER to stop the server and exit
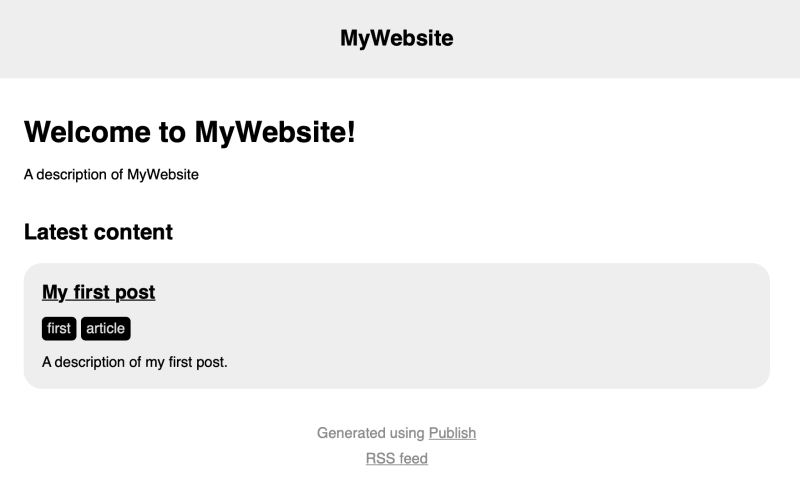
Open http://localhost:8000 in your browser of choice (Safari here) and it should look like this:
or in dark mode:

Time to launch Xcode
We've been lazy alright, it's time to open Xcode and dive into some code.
From /Publish/MyWebsite run
open Package.swift
It will look like this:
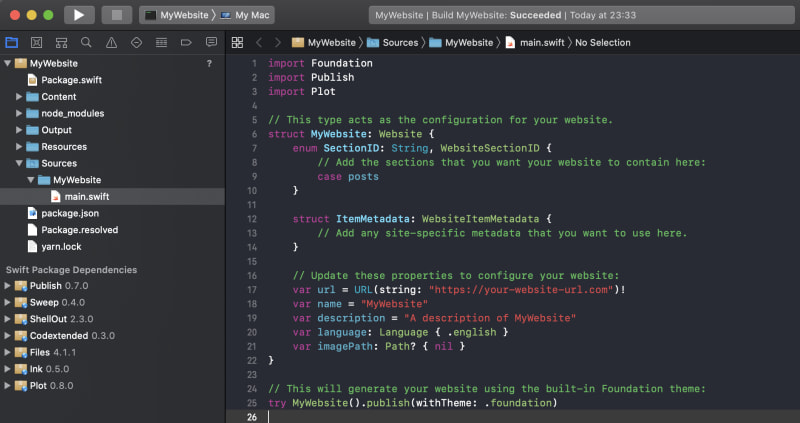
A couple things to notice:
- You can see at the top of the screen that the active scheme is "My Mac". This is important because you won't be able to build/run on devices or simulators
-
/Sources/MyWebsite/main.swiftis were you can configure your app - You won't have the
package.jsonoryarn.lockfiles at this point -
/Contentcontains the markdown content we saw when we opened the site (ex: "Welcome to MyWebsite")
Pause for coffee and think about your future
From now on, before your refresh your browser to see the result of any change you made to your configuration or content, don't forget to rebuild your site in Xcode using ⌘+R.
Getting ready for TailwindCSS with a new Plot theme
To build the website from the Content folder, Publish used its default theme called Foundation which is two parts:
- Theme+Foundation.swift which adopts the HTMLFactory protocol in order to create HTML for a site's various locations using the Plot DSL. Basically, it defines the HTML markup of each pages (index, article, page, tags index, tag page) ⇒ we'll want to have access to this in some way to inject our TailwindCSS classes.
- styles.css which is the CSS stylesheet for that theme ⇒ we'll want to change that with the ones generated by TailwindCSS.
As you may have guessed, we need to build our own theme.
What do we need to do?
Let's start with the end and work our way up.
We will tell Publish to use our own theme, so open main.swift and change the last line (should be line 25).
// main.swift

// From
try MyWebsite().publish(withTheme: .foundation)
// to
try MyWebsite().publish(withTheme: .myTheme)
Alright. Except this won't work of course so don't try to build or run right now.
Now we need to define myTheme somewhere. We'll just create a new theme file in the Sources, next to /Sources/MyWebsite/main.swift.
Let's call it Theme+MyTheme.swift (from Xcode, right click on the Sources/MyWebsite folder and "New file").
But what should we put in there? The Publish README explains how to build a custom theme. Again, we'll write things as they should be in the end, and work our way up.
So we want to end up with something like this:
import Foundation
import Plot
import Publish

extension Theme where Site == MyWebsite {
    static var myTheme: Self {
        Theme(
            htmlFactory: MyThemeHTMLFactory<MyWebsite>(),
            resourcePaths: ["Resources/MyTheme/styles.css"]
        )
    }
}
What did we add there that doesn't exist already? Two things:
- MyThemeHTMLFactory
- "Resources/MyTheme/styles.css"
Looks familiar? This is the same setup I mentioned above when I introduced the Foundation theme.
If you open the Theme+Foundation.swift file (you can find it in Xcode under "Swift Package Dependencies" by opening the Publish package and going down to /Publish/Sources/Publish/API), you will
MyThemeHTMLFactory: Our own HTML Factory
We want to build a custom theme, so let's take inspiration from the free one we're given.
In Xcode, under "Swift Package Dependencies" you will find the Publish package, and inside of it is Publish/Sources/Publish/API/Theme+Foundation.swift.
A few lines below the public extension Theme declaration that we don't need since we just defined our own, you will find the foundation factory that we will use as a starting point.
We need to do 3 things:
- Copy the rest of the file, which includes one struct and one extension
private struct FoundationHTMLFactory<Site: Website>: HTMLFactory {
  …
}

private extension Node where Context == HTML.BodyContext {
  …
}
- Paste it in our
Theme+MyTheme.swift, below ourextension Theme where Site == MyWebsite {}declaration. - Change
FoundationHTMLFactorytoMyThemeHTMLFactory
So to be clear, Theme+MyTheme.swift should look like this
import Foundation
import Plot
import Publish

extension Theme where Site == MyWebsite {
    static var myTheme: Self {
        Theme(
            htmlFactory: MyThemeHTMLFactory<MyWebsite>(),
            resourcePaths: ["Resources/MyTheme/styles.css"]
        )
    }
}

private struct MyThemeHTMLFactory<Site: Website>: HTMLFactory {
        // What's inside didn't change
}

private extension Node where Context == HTML.BodyContext {
        // What's inside didn't change
}
OK!
There's one last thing we need: "Resources/MyTheme/styles.css"
Let's add TailwindCSS!
Let's add Tailwind by following the documentation https://tailwindcss.com/docs/installation.
We will also add the typography plugin since we're dealing with Markdown, and this plugin was specifically created to add beautiful typographic defaults to any vanilla HTML you don't control.
From /MyWebsite, open your terminal and run:
yarn add tailwindcss
yarn add @tailwindcss/typography
We'll now add our theme stylesheet in Resources
cd Resources
mkdir MyTheme
touch theme.css
Open theme.css in Xcode, and add those lines:
@import "tailwindcss/base";

@import "tailwindcss/components";

@import "tailwindcss/utilities";
We need to create a config file for TailwindCSS since we want the typography plugin, so we'll create a config file in /Resources/MyTheme as well.
npx tailwindcss init
Open the tailwind.config.js file it created in Xcode and add the typography plugin.
module.exports = {
  content: [],
  theme: {
    extend: {},
  },
  variants: {},
  plugins: [require('@tailwindcss/typography')],
}
Now to give this a spin and make sure it works so far, let's use the tailwind cli (from within /Resources/MyTheme)
npx tailwindcss build theme.css -o styles.css -c tailwind.config.js
TADA! We now have our .css file
At this point (or anytime you make a change), you can just run the package Product > Run (or ⌘+R) and refresh your page in the browser (assuming your server, launched with publish run is still running).
It should look like this.
So, that's a step back for sure.
But now, you can ride like the wind and build your own theme using Tailwind!
Getting started
We already know it works since all styles were reset, but let's add a class to make sure it really does.
Open your Theme+MyTheme.swift file, locate makeIndexHTML() and change the header as explained below:
func makeIndexHTML(for index: Index,
                       context: PublishingContext<Site>) throws -> HTML {
        HTML(
            .lang(context.site.language),
            .head(for: index, on: context.site),
            .body(
                .header(for: context, selectedSection: nil),
                .wrapper(
                    // Turn this
                    .h1(.text(index.title)),
                    // into this
                    .h1(.text(index.title), .class("text-2xl font-semibold")),
                    .p(
                        .class("description"),
                        .text(context.site.description)
                    ),
                    .h2("Latest content"),
                    .itemList(
                        for: context.allItems(
                            sortedBy: \.date,
                            order: .descending
                        ),
                        on: context.site
                    )
                ),
                .footer(for: context.site)
            )
        )
    }
Now rerun (⌘+R), refresh your browser, and enjoy a bigger title!

That's not much, but there rest is up to you, sky's the limit.
Controlling styles.css File Size
Right now we included all TailwindCSS styles in the styles.css file, so the file is 10 times bigger than it could be.
In order to shave off a few pounds, we'll setup purge in the tailwind.config.jsfile, which should end up looking like this.
It will only keep classes present in your theme file (assuming you did name it Theme+MyTheme.swift otherwise you need to adjust the content line).
module.exports = {
  content: ['../../Sources/**/Theme+*.swift'],
  theme: {
    extend: {},
  },
  variants: {},
  plugins: [require('@tailwindcss/typography')],
}
Now we need to re-build the styles.css. Before you do it, check the number of lines in your current styles.css file so you can compare before/after the purge.
npx tailwindcss build theme.css -o styles.css -c tailwind.config.js
And with this, we are done!
Too much work?
Don't worry, I got your back!

If you want a website that looks like this, just checkout my article Your Publish website with my Casperish theme in less than 5 min, and then read Deploy your Publish website for free on GitHub Pages.


Oldest comments (0)