Overview
With the recent Pandemic, the need for ML in the medical field is necessary more than year. Everyone nowadays is interested in ML, AI and Android, so this tutorial will aim to cover a little of everything.
We will be building an ML Android App that can detect pneumonia using X-Rays and can further detect if the pneumonia is Viral or Bacterial(If Detected)
We'll also be integrating our app with SashiDo for push notifications for our users.
Table of Contents
- Overview
- Goals
- Train our ML Model
- Set up the Android skeleton app
- Add TensorFlow Lite to the Android app
- Checking out all todo list
- Run the custom model with TensorFlow Lite
- FINAL APP RUN THROUGH
- Connect SashiDo to Android Studio
- Connect App using Parse
- Push Notifications
- References
Goals
- Make a predictive model that can detect Viral & Bacteria Pneumonia
- Set up Android App
- Integrate the ML Model
- Connect SashiDo for Push Notifications
Train our ML Model
- Clone the GitHub Repo
- Go to the https://github.com/soumallyadev07/Xanalyse and clone the the repository
- Unzip TFLClassify.rar
- Change Directory
- Change your directory and enter into the folder called - "Model Training"
cd Model Training
- Go to https://www.kaggle.com/soumallyadev/pneumonia-xray-detection
- Download the Given Data Set
- Unzip chest_xay.zip
- Open ModelTrain.py or ModelTrain.ipynb file
-
Open the above mentioned files, if you have Jupyter Notebooks configured, you can open the .ipynb file otherwise, you can simply open the .py file in your text editor
- Understand the File Structure
-
You can find our training photos/data under the folder called - chest_xray with 3 subfolders. These 3 folders are our categories and labels. If you want to add any more data, do remember to follow the same structure.
- Install all necessary Dependencies
- Our code consists of a lot of dependencies and try to install all of them before running to avoid the "Module Not Found" error and even if you get one, since we are learning, you can always search the error on Google and get 1000s of resources to solve them and solving errors is a crucial part of development.
pip install MODULE_NAME
- Run the Code & Export the Model
-
Run your python program or each cell of the Jupyter Notebook and export the model in the same directory.
- Rename your Model
Rename your model to "XrayModel.tflite"
Set up the Android skeleton app
Install Android Studio 4.1 beta 1
If you don't have it installed already, go install AndroidStudio 4.1 Beta 1 or above.
Open the project with Android Studio
Open a project with Android Studio by taking the following steps:
- Open Android Studio After it loads select "Open an Existing project" from this popup:

- In the file selector, choose TFLClassify/build.gradle from your working directory.
The project contains two modules, start and finish. If you get stuck, refer to the finish module for a hint.
- You will get a "Gradle Sync" popup, the first time you open the project, asking about using gradle wrapper. Click "OK".

- Enable developer model and USB Debugging on your phone if you have not already. This is a one-time set up. Follow these instructions.
- Once both your project and your phone is ready, you can run it on a real device by selecting TFL_Classify.start and press the run button on the toolbar:

- Now allow the Tensorflow Demo to access your camera:

- You will see the following screen on your phone with random numbers taking the place of where real results will be displayed.

Add TensorFlow Lite to the Android app
- Select the start module in the project explorer on the left hand side:

- Right-click on the start module or click on File, then New -> Other -> TensorFlow Lite Model
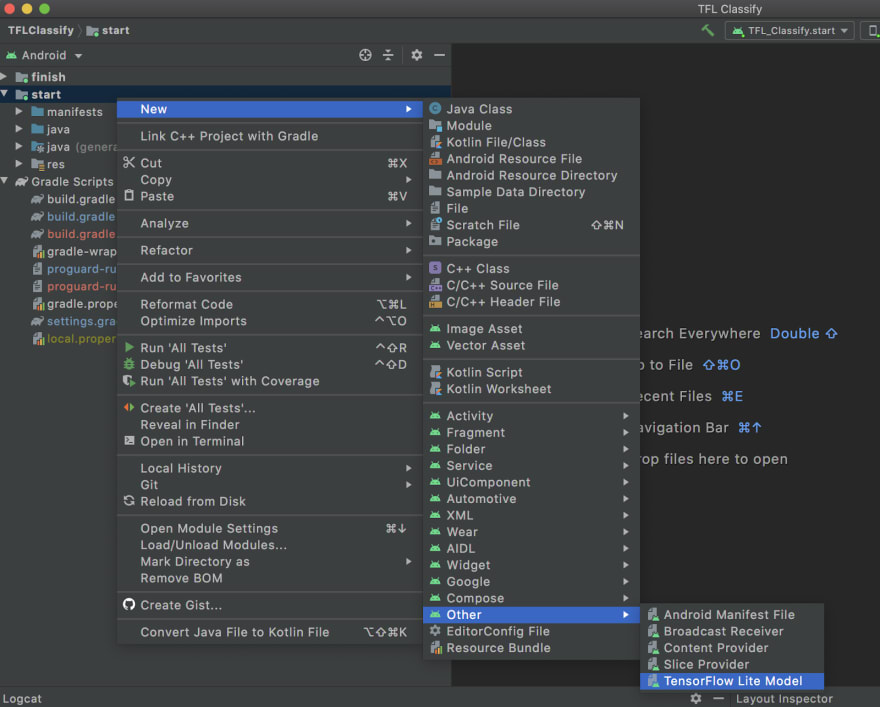
- Select the model location where you have downloaded the custom trained XrayModel.tflite earlier.
Note that the tooling will configure the module's dependency on your behalf with ML Model binding and all dependencies automatically inserted into your Android module's build.gradle file.

- Click Finish.
- You will see the following at the end. The XrayModel.tflite is successfully imported and it shows the high level information regarding the model including the input / output as well as some sample code to get you started.

Checking out all todo list
TODO list makes it easy to navigate to the exact location where you need to update the codelab. You can also use it in your Android project to remind yourself of future work. You can add todo items using code comments and type the keyword TODO. To access the list of TODOs, you can:
- A great way to see what we are going to do is to check out the TODO list. To do that, select from the top menu bar View > Tool Windows > TODO

- By default, it lists all TODOs in all modules which makes it a little confusing. We can sort out only the start TODOs by clicking on the group by button on the side of the TODO panel and choose Modules

- Expand all the items under the start modules:

Run the custom model with TensorFlow Lite
- Click on TODO 1 in the TODO list or open the MainActivity.kt file and locate TODO 1, initialize the model by adding this line:
privateclassImageAnalyzer(ctx: Context, private val listener: RecognitionListener) :

ImageAnalysis.Analyzer-

...

// TODO 1: Add class variable TensorFlow Lite Model

private val xrayModel = XrayModel.newInstance(ctx)

...

}
- Inside the analyze method for the CameraX Analyzer, we need to convert the camera input ImageProxy into a Bitmap and create a TensorImage object for the inference process.
Note that current tooling requires image input to be in Bitmap format.
- This means if the input is a file rather than ImageProxy , you can feed it directly to the method fromBitmap as a Bitmap object.
- If you are interested in how ImageProxy is converted into Bitmap , please check out the method toBitmap and the YuvToRgbConverter. We expect the needs for these methods to be temporary as the team works towards ImageProxy support for TensorImage.
override fun analyze(imageProxy: ImageProxy) {

...

// TODO 2: Convert Image to Bitmap then to TensorImage

val tfImage = TensorImage.fromBitmap(toBitmap(imageProxy))

...

}
Process the image and perform the following operations on the result:
Descendingly sort the results by probability under the attribute score with the highest probability first.
Take the top k results as defined by the constant MAX_RESULT_DISPLAY. You can optionally vary the value of this variable to get more or less results.
override fun analyze(imageProxy: ImageProxy) {

...

// TODO 3: Process the image using the trained model, sort and pick out the top results

val outputs = xrayModel.process(tfImage)

.probabilityAsCategoryList.apply {

sortByDescending { it.score } // Sort with highest confidence first

}.take(MAX\_RESULT\_DISPLAY) // take the top results

...

}
- Convert the sorted and filtered results into data objects Recognition ready to be consumed by RecyclerView via Data Binding:
override fun analyze(imageProxy: ImageProxy) {

...

// TODO 4: Converting the top probability items into a list of recognitions

for (output in outputs) {

items.add(Recognition(output.label, output.score))

}

...

}
- Comment out or delete the following lines which help generate the fake results we see before:
// START - Placeholder code at the start of the codelab. Comment this block of code out.

for (i in0..MAX\_RESULT\_DISPLAY-1){

items.add(Recognition("Fake label $i", Random.nextFloat()))

}

// END - Placeholder code at the start of the codelab. Comment this block of code out.
- Run the app on a real device by selecting TFL_Classify.start and press the run button on the toolbar:
- You will see the following screen on your phone with random numbers taking the place of where real results will be displayed.
FINAL APP RUN THROUGH

Accelerate inference with GPU delegate
TensorFlow Lite supports several hardware accelerators to speed up inference on your mobile device. GPU is one of the accelerators that TensorFlow Lite can leverage through a delegate mechanism and it is fairly easy to use.
- Open build.gradle under the start module or you can click on TODO 5 under the TODO list and add the following dependency:
// TODO 5: Optional GPU Delegates

implementation "org.tensorflow:tensorflow-lite-gpu:2.2.0"
Note: we are adding this import manually in this codelab but when you do this in your project, you can just tick on the second box in the import screen to add GPU acceleration dependency
- Go back to the MainActivity.kt file or click on TODO 6 in the TODO list and initialize the following model option:
privateclassImageAnalyzer(ctx: Context, private val listener: RecognitionListener) :

ImageAnalysis.Analyzer {

...

// TODO 6. Optional GPU acceleration

private val options = Model.Options.Builder().setDevice(Model.Device.GPU).build()

...

}
Note: there are multiple Model objects, choose the object org.tensorflow.lite.support.model.Model in your import
- Change the model initializer to use this by adding options to the method input:
privateclassImageAnalyzer(ctx: Context, private val listener: RecognitionListener) :

ImageAnalysis.Analyzer {

...

// TODO 1: Add class variable TensorFlow Lite Model

private val flowerModel = xrayModel.newInstance(ctx, options)

...

}
- Run the app on a real device by selecting TFL_Classify.start and press the run button
 on the toolbar:
On a medium/high end mobile device, GPU is much faster than CPU. Low end devices tend to have slower GPUs, so the speedup you see will vary.
Connect SashiDo to Android Studio
- Now go back to Android Studio and open your "build.gradle(Project:Your project name)" file
- Add this code after the "dependencies" tag
allprojects {
   repositories {
       maven{ url "https://jitpack.io"}
       google()
       jcenter()
   }
}
Now, go to your "build.gradle(Module:app)" file and add this implementation
implementation "com.github.parse-community.Parse-SDK-Android:parse:latest_Jitpack_Version_Here"
Note: You can find the latest version at jitpack.io

Search this up in the Git repo URL box and press "Look Up" to get all the versions of Parse available.
Click 'Sync Now' on the top section of your Android Studio Gradle file to sync your gradle files.
Connect App using Parse
To make your app have access to the internet, go to your AndroidManifest.xml file (app>manifests>AndroidManifest.xml) and add this code before the application tag.
<uses-permission android:name="android.permission.ACCESS_NETWORK_STATE" />
<uses-permission android:name="android.permission.INTERNET" />
Add this code in the "application" section in the AndroidManifest.xml file
<meta-data
   android:name="com.parse.SERVER_URL"
   android:value="@string/SashiDo_server_url" />
<meta-data
   android:name="com.parse.APPLICATION_ID"
   android:value="@string/SashiDo_app_id" />
<meta-data
   android:name="com.parse.CLIENT_KEY"
   android:value="@string/SashiDo_client_key" />
Now go to the strings.xml file (app>res>values>strings.xml) and add this code
<string name="SashiDo_server_url">https://pg-app-tcbt8h75fl11zv9cv0zqzes6ebsjef.scalabl.cloud/1//</string>
<string name="SashiDo_app_id">[your app id here]</string>
<string name="SashiDo_client_key">[your client key here]</string>
Copy-paste your app id and client key from SashiDo. The server URL is under the API URL address box in SashiDo.

Import the following:
import com.parse.Parse;
The class name should look like this:
public class App extends Application {
Now inside the class, inside the onCreate() function, add this code:
import android.app.Application;
import com.parse.Parse;

public class App extends Application {
   public void onCreate(){
       super.onCreate();
       Parse.initialize(new Parse.Configuration.Builder(this)
               .applicationId(getString(R.string.SashiDo_app_id))
               .clientKey(getString(R.string.SashiDo_client_key))
               .server(getString(R.string.SashiDo_server_url))
               .build()
       );
          }
}
Now let's test! In the main activity of your app, add this code:
ParseInstallation.getCurrentInstallation().saveInBackground();
Click run, and go to your SashiDo database. You should see the installation in your database.

Push Notifications
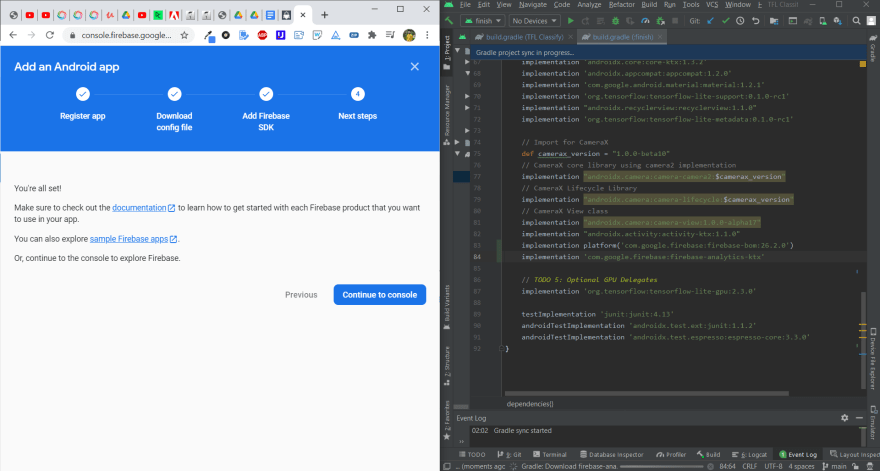
First, go to the Firebase console (make an account if you don't have one) and click "Add Project." Enter a name for your project and press continue. On the Google Analytics page use the default account for firebase.
Once your project is created, click the android logo, and follow the instructions. You can find the package name of your app at the top of your AndroidManifest.xml file. (Should start with "com."


Then remember to put the google.json file in the app file of your app.
Finally, add this in your "build.gradle(Project:Your project name)" file in the dependencies tag:
classpath 'com.google.gms:google-services:4.3.3'
Add these implementations in the "build.gradle(Module:app)" file:
implementation "com.github.parse-community.Parse-SDK-Android:fcm:1.25.0"
implementation 'com.google.firebase:firebase-analytics:17.2.2'
implementation "com.github.parse-community.Parse-SDK-Android:fcm:1.19.0"
implementation 'com.google.firebase:firebase-core:17.2.2'
implementation 'com.google.firebase:firebase-messaging:17.2.2'
REMEMBER TO MAKE SURE YOU HAVE ALL THE IMPLEMENTATIONS LISTED ON THIS SCREEN!
Now, go to the project settings on firebase and then go to the cloud messaging tab and copy the Sender ID and the Server Key
Now, go to SashiDo's dashboard and go to "App Settings" and then "Push". Then copy-paste the Sender ID and the Server Key into the appropriate boxes and click save.
To finish up, go to your AndroidManifest.xml file and add these 3 sections of code:
<service android:name="com.parse.fcm.ParseFirebaseMessagingService">
   <intent-filter>
       <action android:name="com.google.firebase.MESSAGING_EVENT" />
   </intent-filter>
</service>
<receiver
   android:name="com.parse.ParsePushBroadcastReceiver"
   android:exported="false">
   <intent-filter>
       <action android:name="com.parse.push.intent.RECEIVE" />
       <action android:name="com.parse.push.intent.DELETE" />
       <action android:name="com.parse.push.intent.OPEN" />
   </intent-filter>
</receiver>
<uses-permission android:name="android.permission.WAKE_LOCK" />
<uses-permission android:name="android.permission.VIBRATE" />
<uses-permission android:name="android.permission.RECEIVE_BOOT_COMPLETED" />
<uses-permission android:name="android.permission.GET_ACCOUNTS" />
<uses-permission android:name="com.google.android.c2dm.permission.RECEIVE" />
To finish up, go to your App class, and add this to the onCreate() function.
ParseInstallation.getCurrentInstallation().save();
If you aren't able to see push notifications on the screen of your device, then try changing the above line of code to this:
ParseInstallation installation = ParseInstallation.getCurrentInstallation()
installation.put("GCMSenderId", “<Your GCM SenderId”)
installation.saveInBackground()
Remember to put your Sender Id in the <> (found on the firebase console).
Now you can send push notifications! Run your app on a device/ emulator, and go to the SashiDo dashboard and click "Push." Navigate to "Send new push" and type out your message. Make sure the preview is displayed on the android device, not the iPhone.


Make sure the android button is selected
Finally, click "Send" and your device should get a notification!

References
https://codelabs.developers.google.com/codelabs/recognize-flowers-with-tensorflow-on-android-beta/
https://blog.sashido.io/sashidos-getting-started-guide/#spreadyourmessagewithpushnotifications
Closing Remarks
I hope this tutorial is helpful for beginners and helps induce the passion of coding, development, Machine Learning and above all, problem solving.


Oldest comments (0)