In this post, I'm going to do some exercises using 6502 Emulator
I have already filled the bitmap display with yellow color. In this post, I'm going to change the code to get some different results.
The source code will will work on:
    lda #$00    ; set a pointer in memory location $40 to point to $0200
    sta $40     ; ... low byte ($00) goes in address $40
    lda #$02
    sta $41     ; ... high byte ($02) goes into address $41

    lda #$07    ; colour number

    ldy #$00    ; set index to 0

loop:   sta ($40),y ; set pixel colour at the address (pointer)+Y

    iny     ; increment index
    bne loop    ; continue until done the page (256 pixels)

    inc $41     ; increment the page
    ldx $41     ; get the current page number
    cpx #$06    ; compare with 6
    bne loop    ; continue until done all pages
The result the code generates.

Assemble > Run > No errors > Yellow output.
Now lets modify the code to make the following changes.
- Change the code to fill the display with light blue instead of yellow. (Tip: you can find the colour codes on the 6502 Emulator page).
- Change the code to fill the display with a different colour on each page (each "page" will be one-quarter of the bitmapped display).
Making the changes.
Changing the color from yellow to light blue.
To chage the color from yellow to light blue we can change the line
lda #$07 to lda #$e
The color numbers are:
$0: Black
$1: White
$2: Red
$3: Cyan
$4: Purple
$5: Green
$6: Blue
$7: Yellow
$8: Orange
$9: Brown
$a: Light red
$b: Dark grey
$c: Grey
$d: Light green
$e: Light blue
$f: Light grey
The desired result is obtained.
I have checked the monitor checkbox to see how the light blue color is stored.

Change the code to fill the display with a different colour on each page.
Now, I'm going to change the code to fill the display with a different color on each page (each page: one-quarter of the bitmapped display).
This line is responsible for generating random color. (not exactly random).
inc $10 ; increment the color number
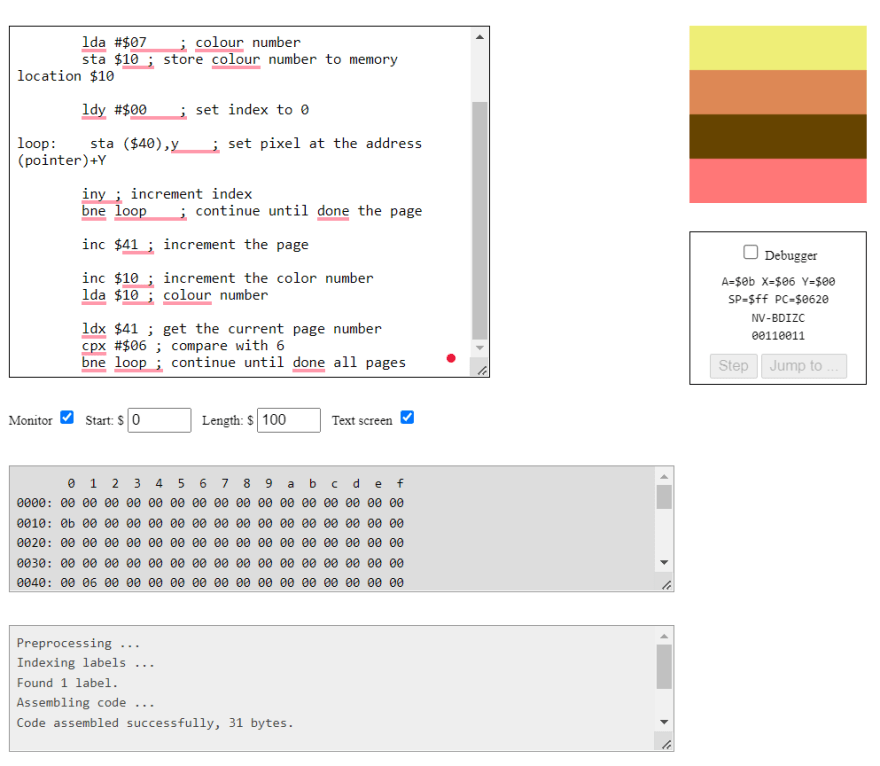
This is the final code:
        lda #$00    ; set a pointer at $40 to point to $0200
        sta $40
        lda #$02
        sta $41

        lda #$07    ; colour number
        sta $10 ; store colour number to memory location $10

        ldy #$00    ; set index to 0

loop:    sta ($40),y    ; set pixel at the address (pointer)+Y

        iny ; increment index
        bne loop    ; continue until done the page

        inc $41 ; increment the page

        inc $10 ; increment the color number
        lda $10 ; colour number

        ldx $41 ; get the current page number
        cpx #$06 ; compare with 6
        bne loop ; continue until done all pages
The final result:
This code will generate rendom color page using random color number ($fe)
You can also set the first color as a random color (lda $fe) by using pseudo-random number generator (PRNG) at $fe
  lda #$00    ; set a pointer at $40 to point to $0200
        sta $40
        lda #$02
        sta $41

        lda $fe ; random color
        sta $10 ; store colour number to memory location $10

        ldy #$00    ; set index to 0

loop:    sta ($40),y    ; set pixel at the address (pointer)+Y

        iny ; increment index
        bne loop    ; continue until done the page

        inc $41 ; increment the page

        inc $10 ; increment the color number
        lda $10 ; colour number

        ldx $41 ; get the current page number
        cpx #$06 ; compare with 6
        bne loop ; continue until done all pages


The more I work with the emulator the more I understand it.


Top comments (0)