Photo by krakenimages on Unsplash
Docker Content Trust (DCT) is a mechanism to improve the security of Docker images. Since we are working together with large enterprises and governments we are slowly but surely pushed into a direction to implement every possible mechanism to strengthen security for the Piral Feed Service.
Our whole infrastructure - from code repositories to build processes to actual runtime environment - is in Azure. For us this has some benefits. Luckily, one benefit is that enabling DCT on Docker images published to the Azure Container Registry (ACR) is quite easy. Another benefit is that these images can be published rather easily. Unfortunately, I did not find very good sources for this - so I decided to write up the steps that worked for me.
The ultimate goal of these steps is to change an existing Azure Pipeline for building and publishing a Docker image from not using DCT to using it, i.e., publishing signed images.
Useful References
The resources that I found useful up to some degree are:
- Microsoft documentation for Azure Pipelines with DCT
- Docker documentation about trust delegation
- Dávid Kaya's post on the topic
Preparation
Without further ado let's start by breaking down the process.
- (Azure) enable DCT on the target ACR
- (Azure) assign the necessary roles to the user account and service principal
- (Local) create private and public delegation keys
- (Local) initialize the (ACR) repository with the private key
- (Azure) add the private key to the pipeline secrets
- (CI/CD) change the Azure Pipeline to use DCT when publishing
Steps 1-5 are all preparation steps. The real work is done in step 6.
Enable DCT on ACR
The first - and presumably most simple - step is to enable Docker Content Trust in the ACR blade of the Azure Portal. Select your ACR and set the "Content Trust" to "Enabled".

Note that this option is only applicable for premium registries. If you have a basic SKU then you'll not see this option.
Besides turning on the DCT you'll also need to assign a certain role to service principals and users that should be able to use this feature.
Assign Roles
A key point in this section is to identify which service principal(s) you need to give the special role to allow signing images. Here, you need to find out what service principal(s) have been created when you established the service connection to the ACR in your Azure Pipelines project.
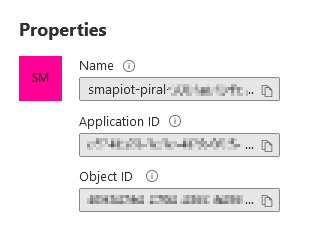
Each created service principal consists of multiple IDs. The ones that are shown directly in the Azure Portal are:
- the client (or application) ID
- the object ID
The latter is what we need to identify. The connection to Azure Pipelines is usually visible via the name. It should contain the Azure DevOps organization and project name. In addition, it will usually end with a GUID representing the chosen Azure subscription.
The service principals created by Azure Pipelines for new service connections to an ACR all have the push role assignment (AcrPush). If we identify those, we can just use them to give them the AcrImageSigner role.
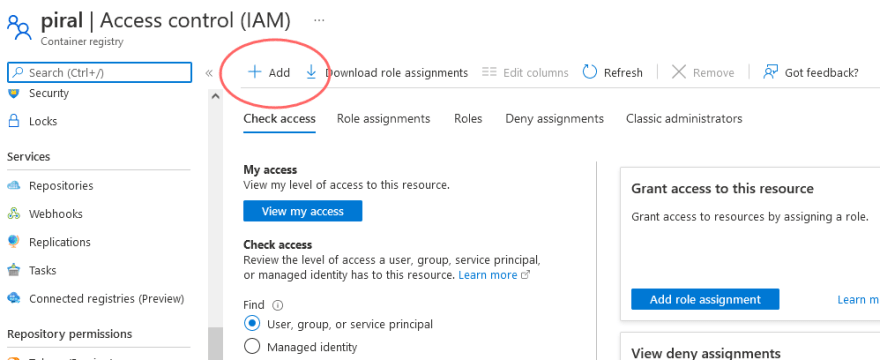
First, let's click on the accounts in the role assignments overview tab. The information should look a bit like that:
Now, let's add new roles by clicking on "Add". Select "Add Role Assignment".
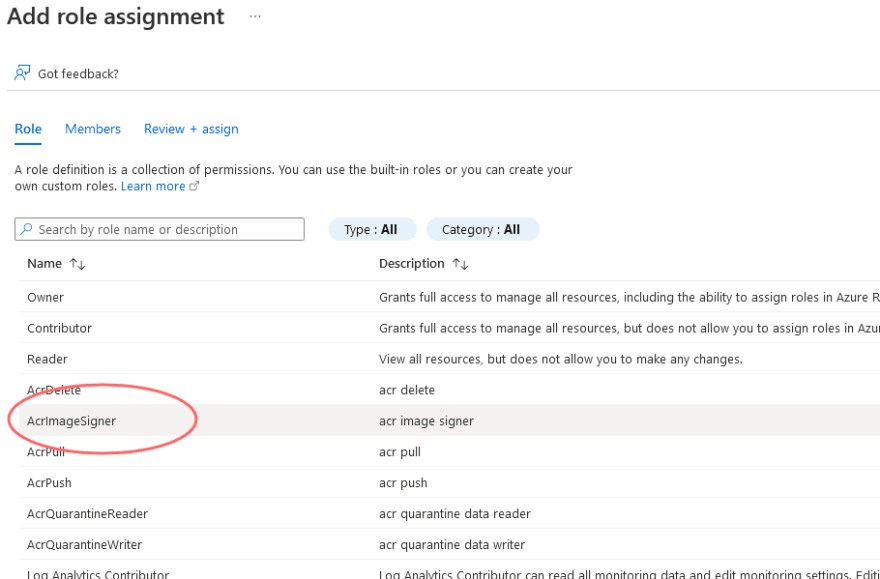
Finally, we can assign new roles. Make sure to pick the AcrImageSigner role. Then add new members, picking the previously selected service principal(s).
When everything is done you should see a role assignment overview similar to the one shown below. Important part is that the service principal(s) in question have both, the AcrPush and AcrImageSigner roles.

Also make sure to give your own account the AcrImageSigner role. This will be important to actually initialize the ACR repository later on.
Create Delegation Keys
Now it's time to actually create the keys. For this, you should have a nix environment (MacOS, Linux, WSL) and the OpenSSL toolchain installed.
First, let's generate a new key:
openssl genrsa -out delegation.key 2048
Now we can actually pair the private key with a public one - ready for a signing request.
openssl req -new -sha256 -key delegation.key -out delegation.csr
It is sufficient to self-sign the key. Let's do that - keeping the public key active for a year.
openssl x509 -req -sha256 -days 365 -in delegation.csr -signkey delegation.key -out delegation.crt
Now we set the access rights such that no one else can read or write the private key. If we don't do that the Docker tooling will refuse to work with the key.
chmod 600 delegation.key
Once done we can tell Docker to use the key as signing source. We can give it a name to identify it (locally) again. I've chosen to just give it the company's name.
docker trust key load delegation.key --name smapiot
This is great - the key is now ready and we can initialize the repository.
Initialize ACR Repository
Now that we set up everything we can "initialize" the repository. This is the step to actually teach the ACR about our generated key. For security reasons this step is quite important.
After all, up to this point anyone could come, somewhat sign an image and say "hey it's signed - so it's fine". No, it's not. It should be a specific signature. And by initializing the repository we make sure to pin the repository to a specific signature.
We start by logging into Docker using the Azure CLI. This way, we will actually use Docker with a 3 hour valid access token pinned to our account. Since we gave our account the AcrImageSigner role we can use it to initialize the repository.
az acr login --name piral.azurecr.io
The actual step is to add the signer using the public certificate and the key using the docker CLI:
docker trust signer add --key delegation.crt smapiot piral.azurecr.io/piral-feed-service
Now, we can actually inspect the delegation key for the given repository.
docker trust inspect --pretty piral.azurecr.io/piral-feed-service
Which should give something similar to the following output:
No signatures for piral.azurecr.io/piral-feed-service


List of signers and their keys for piral.azurecr.io/piral-feed-service

SIGNER    KEYS
smapiot   123...

Administrative keys for piral.azurecr.io/piral-feed-service

  Repository Key:       987...
  Root Key:     abc...
The important part is to note down the repository key. We will need this for the pipeline.
Add Private Key to Pipeline Secrets
We need to store / use three values within our pipeline:
- The private key file. This should be uploaded / stored as a pipeline secret, e.g., in a library via the secure files feature.
- The used passphrase for the key. When we added the signer earlier one we had to set up a passphrase. Now, we need to provide this passphrase.
- The repository key of the used key. We could also just rename the file uploaded in (1) to the used key.
Pipeline Adjustments
Now to the grand finale... In the azure-pipelines.yml we'll need to go from something like a buildAndPush command to a more explicit (and lengthy) variant.
Let's say we started with something like the following:
- task: Docker@2
  inputs:
    command: buildAndPush
    dockerfile: ./Dockerfile
    repository: $(dockerImageName)
    containerRegistry: $(dockerRegistryConnection)
    tags: |
      latest
We now need to decompose this into the different parts (login, build and push) and enhance it with the DCT settings.
Importantly, we need to import the file we placed in the secure files library. This file should be renamed to the ID we've found out previously. It should also be configured correctly; such that no one else could read it.
Let's see the code quickly:
- task: Docker@2
  inputs:
    command: login
    containerRegistry: $(dockerRegistryConnection)

- task: DownloadSecureFile@1
  name: contentTrust
  inputs:
    secureFile: 'docker-content-trust.key'

- script: |
    mkdir -p $(DOCKER_CONFIG)/trust/private
    cp $(contentTrust.secureFilePath) $(DOCKER_CONFIG)/trust/private
    echo "Copied $(contentTrust.secureFilePath) to $(DOCKER_CONFIG)/trust/private"
    mv $(DOCKER_CONFIG)/trust/private/docker-content-trust.key $(DOCKER_CONFIG)/trust/private/$KEY_ID.key
    chmod 600 $(DOCKER_CONFIG)/trust/private/$KEY_ID.key
    docker trust key load $(DOCKER_CONFIG)/trust/private/$KEY_ID.key
  env:
    DOCKER_CONTENT_TRUST_REPOSITORY_PASSPHRASE: $(dockerContentTrustPassphrase)
    KEY_ID: 987...

- task: Docker@2
  inputs:
    command: build
    dockerfile: ./Dockerfile
    containerRegistry: $(dockerRegistryConnection)
    repository: $(dockerImageName)
    tags: |
      latest
    arguments: '--disable-content-trust=false'

- task: Docker@2
  inputs:
    command: push
    containerRegistry: $(dockerRegistryConnection)
    repository: $(dockerImageName)
    tags: |
      latest
    arguments: '--disable-content-trust=false'
  env:
    DOCKER_CONTENT_TRUST_REPOSITORY_PASSPHRASE: $(dockerContentTrustPassphrase)
In there we are also using the previously set dockerContentTrustPassphrase. This is required at all position where either we just consume DCT signed images or where we want to consume such images.
Conclusion
Setting up DCT with the ACR is not difficult, but requires quite some steps. Together with some - not very well documented - behavior (e.g., name of the file, file access rights, ...) the whole process can be more tedious than it actually needs to be.
The gained security is definitely worth the effort. Now, images have an additional layer of trust that is easily verifiable by consumers - much to the liking of large enterprises and governments.


Latest comments (0)