
Forms are ubiquitous in web applications. Some apps such as Gmail use forms to collect data to sign up users and provide an email address, whereas some apps such as PayPal use forms to fulfill online transactions to facilitate shopping experience. Some web forms are used to apply for a new car loan whereas some forms are used to order pizza for dinner. It is, therefore, important that the data collected from forms is cleansed, formatted correctly and devoid of any malicious code. This is called form validation.
We need form validation anytime we are accepting a user input. We must ensure that the data entered is in correct format, lies within a valid range of data (such as for date fields) and does not contain malicious code that could lead to SQL injections. Malformed or missing data can also causes erroneous results from API.
What are the different types of form validations?
Form validation can happen on -
- Client side and
- Server side.
Client side validation occurs using HTML5 attributes and client side JavaScript. You may have noticed that in some forms, as soon as you enter an invalid email address, the form gives an error "Please enter a valid email". This immediate type of validation is usually done via client side JavaScript.
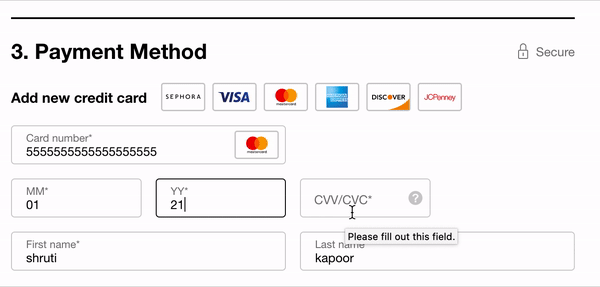
In other cases, you may have noticed that when you fill out a form and enter details such as a credit card, it may show a loading screen and then show an error "This credit card is invalid". Here, the form made a call to its server side code, and returned a validation error after performing additional credit card checks. This validation case where a server-side call is made is called server side validation.
What should be validated?
Form validation is needed anytime you accept data from a user. This may include -
- Validating the format of fields such as email address, phone number, zip code, name, password.
- Validating mandatory fields
- Checking the type of data such as string vs number for fields such as social security number.
- Ensuring value entered is a valid value such as country, date, etc.
Client side validation
On client side, validation can be done in two ways -
- Using HTML5 functionality
- Using JavaScript
Using built in HTML5 functionality
HTML5 provides a bunch of attributes to help validate data. Here are some common validation cases:
- Making fields required using
required - Constraining the length of data:
-
minlength,maxlength: for text data -
minandmaxfor max value of num type
-
- Restricting the type of data using
type:<input type="email" name="multiple>
- Specifying data pattern using
pattern:- specifies a regex pattern that entered form data needs to match
When the input value matches the above HTML5 validation, it gets assigned a psuedo-class :valid and :invalid if it doesn't.
Let's try an example -
<form>
<label for="firstname"> First Name: </label>
<input type="text" name="firstname" id="firstname" required maxlength="45">
<label for="lastname"> Last Name: </label>
<input type="text" name="lastname" id="lastname" required maxlength="45">
<button>Submit</button>
</form>
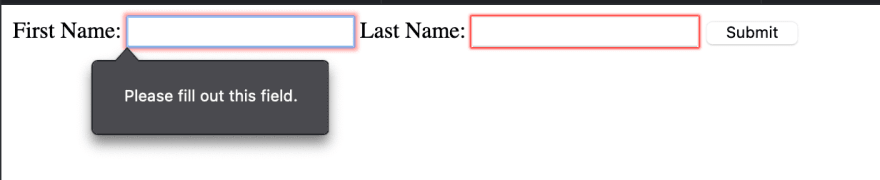
Here we have two required fields - First Name and Last Name. Try this example in JSFidle. If you skip either of these fields and press submit, "Please fill out this field". This is validation using in-built HTML5.
Using JavaScript
When implementing form validation, there are a few things to consider -
- What is defined as "valid" data?
- This helps you answer questions such as the format, length, required fields and type of data.
- What happens when invalid data is entered?
- This will help you define the user experience of the validation - whether to show an error message inline or top of the form, how detailed should the error message be, should the form be sumitted anyways? Should there be analytics to track invalid format of data?
JavaScript validation can be performed in two ways:
- Inline validation using JavaScript
- HTML5 Constraint validation API
Inline validation using JavaScript
In this example, we check for required fields using JavaScript. If a required field is not present, we use CSS to show the error message. Aria labels are modified accordingly to signal an error. By using CSS to show / hide an error, we are reducing the number of DOM manipulations we need to make. The error message is provided in-context thereby making the user experience intuitive.
HTML5 Constraint validation API
required and pattern HTML attributes can help perform basic validation, but if you want more complex validation or provide detailed error messaging, you can use Constraint Validation API. Some methods provided by this API are -
checkValiditysetCustomValidityreportValidity
The following properties are useful -
-
validity -
validationMessage -
willValidate
In this example, we will validate using HTML5 inbuilt methods such as required, length in conjunction with Constraint Validation API to provide detailed error messages.
Server side:
Client side validation is not the only validation check you should do. You must also validate the data received from your client on server side code to ensure that the data matches what you expect it to be. This can be used to perform business logic verifications that should not live on client side.
Best practices
- Always have server side validation since malicious actors can bypass client side validation.
- Provide detailed error message in-context with the field that produced an error.
- Provide an example of what the data should look like in case of an error message, such as - "Email did not match format - test@example.com"
- Avoid using single error pages that involve redirection. This is bad user experience and forces the user to go back to previous page to fix the form and lose context.
- Always mark required fields.
Additional Reading
- https://medium.com/@andrew.burton/form-validation-best-practices-8e3bec7d0549
- https://developer.mozilla.org/en-US/docs/Learn/Forms/Form_validation
- https://developer.mozilla.org/en-US/docs/Learn/Forms/HTML5_input_types
- https://developer.mozilla.org/en-US/docs/Learn/Server-side/First_steps/Website_security
- https://www.smashingmagazine.com/2009/07/web-form-validation-best-practices-and-tutorials/
- https://css-tricks.com/form-validation-part-1-constraint-validation-html/
Interested in more tutorials and articles like this?
Sign up for my newsletter or follow me on Twitter
16:30 PM - 15 Jan 2021


Latest comments (0)