This article is the second in a multi-part series to walk through the creation of a Twitch extension. For the second part, the goal is to install the front-end panel.
To go directly to the project, the source code repository is available at github.com/shrmpy/pavlok-panel
Requirements:
- 2FA
- Deploy EBS
§ Steps
There will be steps from part 1 of the series that overlap. So some steps may already be done. That said, the intention is for part 2 to be as self-contained as reasonable.
Enable two-factor. Follow the instructions from Twitch support docs. 2FA is a requirement for creating extensions.
-
Follow the tutorial to register a new extension. Specifically (repeated here):
Creating the Extension in the Console
1) Go to the Extensions Developer Console. From this console, you can start the process of creating a new Extension, view and clone your Extensions, and manage specific versions of your Extension(s). Login with your Twitch ID. You should see a page like this:

2) Click the Create an Extension button on the right side of the page.3) Fill in the Name Your Extension section with any name you want, and then click Continue.

4) On this versions page, be sure to fill out respective fields- Type of Extension — (Required) Select Panel.
- Version Number — (Required) Leave this as 0.0.1.
- Summary — (Optional) This will be viewable by broadcasters and viewers. It should be 1-2 brief sentences describing what your Extension does. To provide more detail, use the Description.
- Description — (Optional) More detail than the Summary about the functions of your Extension.
- Author Name — (Optional) The full name of the Extension author or organization that will receive credit on the Extensions manager.
- Author Email — (Optional) Contact information for the Extension creator. This is used to contact the developer with information about the Extension’s life cycle (e.g., reject/accept notifications). Twitch will never reveal this email to anyone on the site. If you provide this information, you’ll get a verification email soon after creating the Extension version. Be sure to check your email, as you need to verify ownership of the author email address.
- Support Email — (Optional) Public contact information for support-related queries from broadcasters.
5) Click Create Extension Version. You will then see the Status page of the Extension Manager. This page essentially shows the current status (Local Test) of the Extension in the Extension Life Cycle, and also provides you with next steps to move the Extension through the life cycle. You should see the following page:

-
Set the filenames of the broadcaster config, live config, and viewer panel.
- Click the Asset Hosting tab.
- The Panel Viewer Path should already be pre-filled with the name
panel.html. If not, then input the namepanel.html.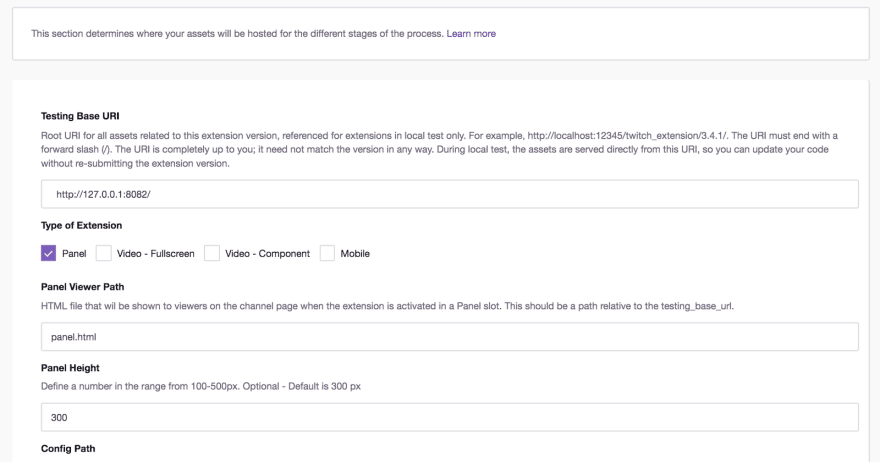
- The Config Path should already be pre-filled with the name
config.html. If not, then input the nameconfig.html. - The Live Config Path should be empty. Input the name
live_config.html. - Click the Save Changes button to save the filename settings.
-
Choose Configuration Service from the Capabilities tab. Taken from the tutorial (repeated here):
Before testing the Extension, go to the Console Manager and enable the Configuration Service. Go to the Capabilities tab of the Extension Manager, and scroll down to the second frame, where you should see a section titled “Select how you will configure your Extension.” Select Extension Configuration Service, and then save the changes.

-
Find the new extension secret as explained in Step 2: JWT Secret. Specifically (repeated here):
Concept: Each Extension maintains a shared secret that is used to sign tokens that validate the identity of users. Extension Secret is
base64encoded and is provided to you by the Extension Manager.To retrieve the secret, lets go to the Extension Manager. To get to the Manager, go to the console, select a version of the Extension and click Manage. Once on this page, you will see the default status page. On the top right of the manager, click the Extension Settings button. You will see the following page:

Under the Extension Client Configuration section, copy the key provided. We need to use this key to verify that the token provided is signed with the same secret. -
Obtain the ZIP archive of the front-end files. Navigate to the source code repository.
Click on the Releases link on the right hand column to reach the release files. Download the archive named
panel.zip:

-
Upload ZIP archive. With the
panel.zipdownloaded from the source code repository, return to the console where the Files tab can be found (same as Go to Files link in Status tab).Package your Extension
When you send Twitch an Extension, you need to bundle the Extension files into a zip file. Make sure you are bundling the files, not the folder containing your Extension files.To upload your zip file to Twitch, choose Files > Upload Version in Assets > Choose File. Then click the purple Upload button at the bottom.
Now we’re ready to move to Hosted Test. Click Next Step in the top right, click Move To Hosted Test, and confirm your choice.
Switch to Hosted Test. Navigate to the Status tab. The heading will show Current Status: Local Test. Now the Move to Hosted Test button will be available. Click the button to change to Hosted Test.
Quick Deploy the EBS. The URL that Netlify creates for the deployment will be our EBS base URL. If you completed part 1 previously, then step #9 is already done.
-
Activate. Follow tutorial:
We are ready to see the Extension live on Twitch! To do so, go to the Status page of the Extension Manager, and scroll down to the section titled “Next Steps.” Click the View on Twitch and Install button.

Clicking this button will open a new tab with the Extension Details page.Installation: Next, click the purple Install button. When the Extension is installed, you will see a confirmation pop-up informing you that Extension installation is complete, and that if you want to activate the Extension right now, you need to configure it.

Configuration: Click Configure. Upon doing so, you will be directed to the Broadcaster Configuration Page. Here we see the page we created where the Broadcaster can select the options they want viewers to be able to choose from.

The URL shown here (https://randomized-phrase.netlify.app) is an example, but the format of EBS base URL will be similar from the result of step #9.Clicking the button connect pavlok (opens in new tab) will be the first test that the configuration fields are matched correctly. If everything works, the Pavlok OAuth Login prompt will display. Unless pop-up windows are blocked, in which case the browser configuration needs to allow
dashboard.twitch.tvfor this step.

If the Pavlok Login is successful, the pop-up will be closed and return you to the extension config view. Close the config view, and the extension will have the Activate dropdown available:

Choose Set as Panel 1 if that is available. Now the extension is activated.
§ Test
Go to the Stream Manager page on Twitch, and under the Quick Actions list click on the new extension. It should launch the Live Config view in a new window.

Click on the shock button and if everything is connected, the Pavlok API call will be invoked. If the Discord webhook is configured, the API result code will be logged in the respective channel, too.
* Notes, Lessons, Monologue

Legacy panel view flow; need to revise for iterations so far.

Legacy broadcaster config; need to revise.


Top comments (0)