Under the Hood
The story begins when I post a story on learning blockchain app development and this 24 hours hackathon challenge. I mean this single challenge helps you as a developer to develop something fast and learn a new stack quickly. Do give a read to the new 24 hours hackathon as it will certainly help you in grasping the new stack easily.
Let’s not waste time and start today’s story with another 24 hours hackathon but with a different title. I’ve always been obsessed with breakdown things into multiple smaller tiny steps, more often a strategy of divide and conquer.
What is DeX?
A decentralized exchange platform is a platform where one token is exchanged into another token with the same value. The best example is uniswap you can exchange your Ethereum tokens with some bitcoins or TRON and any other coins you want in exchange.
What is the benefit of DeX?
There are multiple benefits to exchanging tokens as mentioned
- Some communities are only for certain types of token holders so if you don’t have those tokens you can anytime exchange and get the required tokens in return to enter the community.
- Flash loans — Mean people buy some tokens and exchange them with huge loans to gain some profits and make money.
- If you know the coin you are holding will goes down in price then instead of selling you can exchange it with another token to gain profits from other tokens
- ….many more….
Developing DeX
Yes, let's begin the main part. 4 steps to create your in-house DeX.
- Install moralis in your frontend application
- Authenticate the user using metamask or any other wallet you want.
- Create a form for both token exchange token and return token.
- Fetch all tokens with their name, symbols and exchange prices.
- Swap the token or exchange them using the oninch plugin provided by moralis.
That’s it, But understand this it took me multiple days and a thorough read and research to break down the task into only 4 steps. You have to go through difficulties to execute them and then you can break it down at the end into 4/5 easy steps to achieve it again.
1.Installing Moralis & Metamask
I will cover this in detail as I’ve already written a story with github repository attached. So refer the article below to understand the setup process, architecture and how to install metamask using moralis.
- Exchanged tokens forms This is again quite straightforward, if you are new to token swap applications then see uni swap website.
Considering DeX applications have more often a similar UI. The difference can be witnessed in styling, colors and different domains.
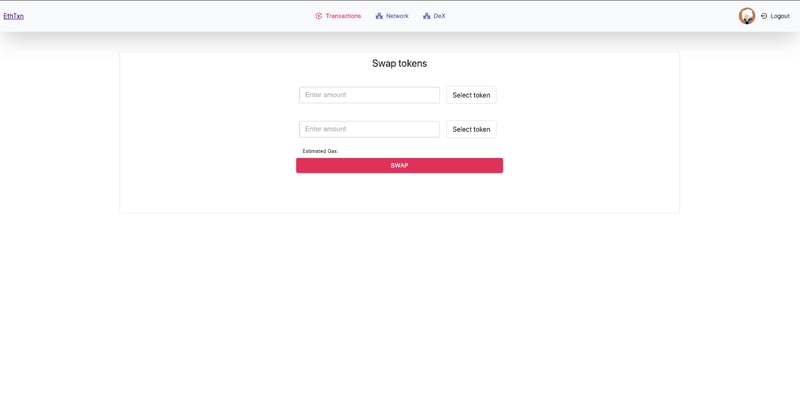
- Token and its metadata User can select the swap token from the select token dropdown. To provide all the available tokens we need the token and its metadata such as symbol and image. Since we are using moralis and moralis provide the plugin to work with oneinch API. one-inch provides blockchain API to deal with everything we need to develop DeX(Decentralised Exchange), we will use the same for our project. Its easy to use, integrate and easy learning curve(infact only 4 methods or functions to provide swap token functionality).
Moralis Plugins
Plugins are the way to work with third-party web3 software, modules and packages. Let’s say you want to work with blockchain API provided by third party just like one-inch. Moralis provide a way around via plugins to work with these third-party packages directly and easily. I will not cover much detail in installing the plugin in moralis, it's a one document read effort that can be found in the below link.
Once the one-inch plugin is installed, we are ready to use the methods provided to integrate swap functionality the one. I am adding a doc for the working procedure of oneinch API.
Fetching tokens
It's time to use one-inch plugin to fetch tokens and its metadata. Following are the 3 lines of code or one method that will give all tokens and its metadata.
async function getSupportedTokens() {
  const tokens = await Moralis.Plugins.oneInch.getSupportedTokens({
  chain: 'bsc', // The blockchain you want to use (eth/bsc/polygon)
});
  console.log(tokens);
}
- Swap, Approve, and Allowance Before swapping tokens we need to fetch token exchange price followed by checking if user can swap the tokens if not give allowance and in the add swap token method.
- Fetch exchanged token price
- Validate user tokens availability and allowance
- Approving token swap if not allowed
- Swap token by invoking swap method.
To fetch token price here is the method —
async function getQuote() {
 const quote = await Moralis.Plugins.oneInch.quote({
 chain: 'bsc', // The blockchain you want to use (eth/bsc/polygon)     fromTokenAddress: '0x0da6ed8b13214ff28e9ca979dd37439e8a88f6c4',
 toTokenAddress: '0x6fd7c98458a943f469e1cf4ea85b173f5cd342f4',
 amount: '1000',
});
 console.log(quote);
};
Validating token availability
async function hasAllowance() {
  const allowance = await Moralis.Plugins.oneInch.hasAllowance({
  chain: 'bsc',
  fromTokenAddress: '0x0da6ed8b13214ff28e9ca979dd37439e8a88f6c4',
fromAddress: '0x6217e65d864d77DEcbFF0CFeFA13A93f7C1dD064',
  amount: '1000',
});
 console.log(`The user has enough allowance: ${allowance}`);
};
Approving token swap if not allowed
async function approve() {
  await Moralis.Plugins.oneInch.approve({
  chain: 'bsc',
  tokenAddress: '0x0da6ed8b13214ff28e9ca979dd37439e8a88f6c4',
  fromAddress: '0x6217e65d864d77DEcbFF0CFeFA13A93f7C1dD064',
});
};
Swapping token
async function swap() {
 const receipt = await Moralis.Plugins.oneInch.swap({
 chain: 'bsc',
 fromTokenAddress: '0x0da6ed8b13214ff28e9ca979dd37439e8a88f6c4',
 toTokenAddress: '0x6fd7c98458a943f469e1cf4ea85b173f5cd342f4',
 amount: '1000',
 fromAddress: '0x6217e65d864d77DEcbFF0CFeFA13A93f7C1dD064',
 slippage: 1,
});
console.log(receipt);
};
Conclusion
Its a wrap, since we have compiled it in a 4 steps that doesn't mean that its cake walk. I still recommend you to read the story multiple times, read the below article multiple times before jumping the code. After reading multiple times make a wireframe of your tasks, break down things into steps and then start executing one at a time. This is how I did and that is how I’ve developed DeX in just 4 steps.
For more reference here is the github repository. Until next time, have a good day people and don’t forget to follow.
For more such stories visit our website iHateReading


Oldest comments (0)