Basic AWS knowledge is required.
A static website + WordPress blog 🤔
A very very common scenario where you want to keep your website static or build with Nextjs SSG, or probably with Reactjs. On the other hand, your marketing team wants WordPress to write blogs because it's in their comfort zone and they don't want to learn anything new.
In a startup, where you don't have much time to deal with all these. You might choose one of the three following options:
- Build your entire website with WordPress using a theme so your content writers feel at home
- Create static pages for each blog and deploy them with the static site
- Create a custom blogging tool
But hold on, you have another option. It requires a bit of a hassle though for the first time. But it will make your life much easier on the long run.
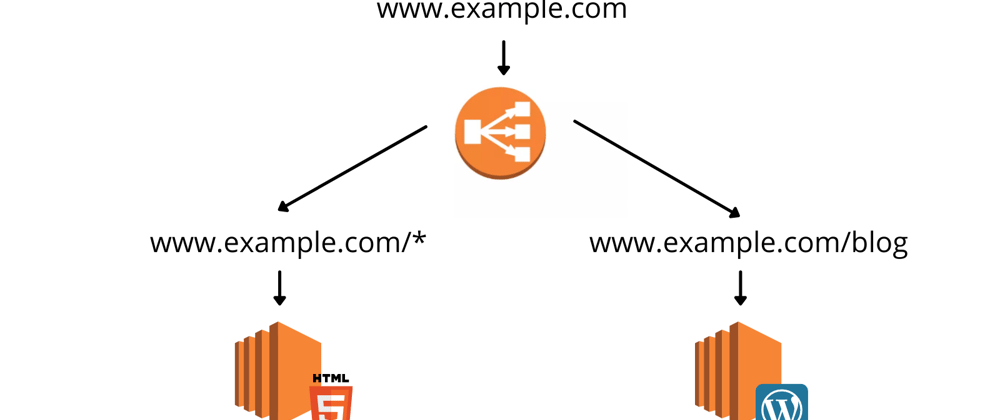
Serve your website statically using Nginx from one server, and run WordPress on another server. Now use AWS load balancer's smart routing to load blogs whenever someone goes to /blog on your site.
Feeling overwhelmed? 🤯 Let's break it down and understand it in more detail.
But first, look at an example
- www.teamingway.com (Main website is built with Nextjs SSG (static site generation) and statically deployed on an EC2)
- www.teamingway.com/blog/ (A WordPress site, running on another EC2, routed using AWS load balancer)
We will set up the same thing.
Deploy static website
Create a t2.micro EC2 instance with the following Nginx config:
# filename: example.com
# location: /etc/nginx/sites-enabled

# redirect http to https
# redirect example.com to www.example.com
server {
    listen 80;
    server_name example.com;
    return 301 https://www.example.com$request_uri;
}

# main block
server {
    listen 80;

    server_name www.example.com;

    # path to the static website folder
    root /srv/www/your-website-folder;
    index index.html index.htm index.nginx-debian.html;

    location / {
        # serve static website files, throw "nginx 404 error" if file not found
        try_files $uri $uri.html $uri/ =404;
    }
}
Notice, we only handled "HTTP" and not "HTTPS", because we will handle HTTPS at Load Balancer level and attach
sslcertificate there too.
Restart Nginx:
sudo service nginx restart
Our static website is now up and running.
Deploy WordPress site
We will not go into the details of creating a WordPress instance on AWS because we're solving a different problem here. We will only explore things that are relevant to our goal.
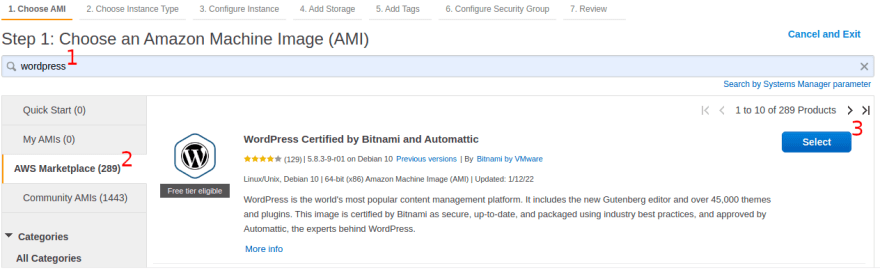
To create a WordPress instance, go to Launch Instances on the main instances page. Search WordPress and select a Bitnami WordPress instance (as shown in the image below):
Or you can manually set up one, it's all up to you. Once your WordPress instance is up and running, move to the next step.
Set up redirection using "AWS Load Balancer" and "Route 53"
1) Create Load Balancer
On your EC2 dashboard, go to Load Balancers from the left sidebar:

and then create a new load balancer, make sure you select Application Load Balancer

It should be:
- Internet-facing
- In the same
VPCas your website and WordPress instance - In the same
Availability zoneas your website and WordPress instance
Add default listener as your website instance with port 80 and complete the load balancer creation. We'll change it later anyway.
2) Set up ALB routing
Add the first listener for port 80. Add one rule to permanently redirect to HTTPS 443.

Add the second listener for port 443. Now there will be two rules (See the image below for reference)
Rule 1: Default action will be to forward all the traffic to our static website.
Explanation: This means all requests coming on example.com or example.com/anypage will be forwarded to our static website instance. The instance name is website-static in the image below.
Rule 2: If the path matches the pattern /blog*, forward the request to our WordPress instance.
Explanation: This means if the request URL contains /blog in it, the request will now be forwarded to our WordPress instance instead of the static website instance. If a request does not contain /blog, it will satisfy Rule 1 and will be forwarded to the static website instance.

Note: You will need to add your SSL certificate to the AWS Certificate Manager (ACM) and attach it to the load balancer. We will not go into its details as well.

3) Add Load Balancer to Route 53
We have everything ready now:
- Static website instance
- WordPress site instance
- Load Balancer with https and rules to redirect based on URL
The next and final step is to make a DNS entry for our website so we can access it via domain name.
Go to your AWS Route 53 directory and create a new Route:
Choose Record type = A
Turn on the Alias toggle in the Route Traffic to section and select Alias to Application and Classic Load Balancer
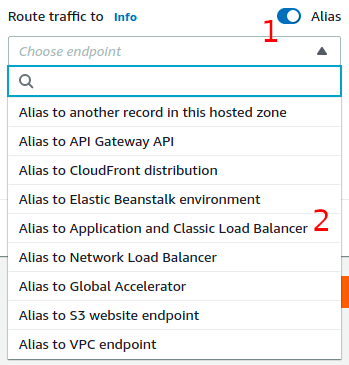
Select your zone i.e. us-west-1 and your load balancer will automatically appear, select and create the record.
Add sub path to your wordpress posts
Change your site name and url, add /blog at the end:

Change permanent links by going into Settings > Permalinks

and that's it 🥳
Your main website is running on a separate instance which could be static site, reactjs, nextjs or anything you want it to be and when you open /blog your wordpress site will load.
That will make your marketing team lives much easier regarding posting blogs, updates and sharing them on social media and other sites with easy SEO via wordpress plugins like yoast seo.


Top comments (1)
I think there's a much simpler way to deploy a website on AWS S3.
Here's a simple automation pipeline template that will deploy a static website to an Amazon S3 bucket.
This pipeline uses the AWS CodeBuild plugin, creates a pipeline using the AWS Codepipeline plugin and deploys it to an AWS S3 bucket. The AWS Codebuild plugin will pull the code from the Github repository and do the necessary build process and the Codebuild process will then push the resulting artifacts to the S3 bucket. The AWS S3 Bucket policy in this pipeline will make the bucket accessible to the public.
You can add a Github trigger that listens to your repo for a push to trigger this pipeline.
kaholo.io/templates/website-deploy...