Kubernetes: ClusterIP vs NodePort vs LoadBalancer, Services, and Ingress — an overview with examples

For network communications, Kubernetes presents four Service types — ClusterIP (the default one), NodePort, LoadBalancer, and ExternalName, plus the Ingress resources.
In this post, we will take a short overview of all of them, and will check how they are working.
The documentation is available here — Publishing Services (ServiceTypes).
I’m using AWS Elastic Kubernetes Service so keep in mind that we have AWS Virtual Private Cloud and AWS Application Load Balancers under the hood.
The network and Kubernetes
In a Kubernetes cluster you may need to use the following network scenarios:
- direct communication between containers — is provided by the Pod abstraction and access by containers to each other via localhost inside of the same pod — see the pods
- communication between Pod to Pod in a cluster scope- provided by network plugins, in case of AWS EKS see the AWS VPC CNI for Kubernetes
- connections from Pod to a Service — is provided by the Service abstraction, for example — ClusterIP
- connections from the world to pods in a cluster — is provided by the Service abstraction, with an external resource, for example — AWS Load Balancer
The main goal of the Services in Kubernetes is to provide persistent access to its pods without the necessity to look for a Pod’s IP each time when you’ll recreate such a pod.
Also, Services can provide a minimal load balancing between similar pods, see Services.
Preparation
For tests let’s create a deployment with a pod with NGINX web-server which will accept connections to its port 80:
$ kubectl create deployment nginx — image=nginx
deployment.apps/nginx created
Check:
$ kk get deploy nginx
NAME READY UP-TO-DATE AVAILABLE AGE
nginx 1/1 1 1 53s
Because Services will look for pods by their labels — let’s check which labels this deployment have:
$ kubectl get deploy nginx -o jsonpath=’{.metadata.labels}’
map[app:nginx]
Okay — it’s the app tag with the nginx value — remember it.
kubectl port-forward
To make sure that our pod is up and running and is able to handle incoming connections to the port 80 let use the kubectl port-forward. After we will check that it is working - we can start playing with the network setting from the Kubernetes cluster side.
Find the pod’s name:
$ kubectl get pod
NAME READY STATUS RESTARTS AGE
nginx-554b9c67f9-rwbp7 1/1 Running 0 40m
Pass it to the kubectl port-forward as the first argument, then specify a local port (8080), and port on the pod (80):
$ kubectl port-forward nginx-554b9c67f9-rwbp7 8080:80
Forwarding from [::1]:8080 -> 80
From the local machine check connection to the NGINX pod in the Kubernetes cluster:
$ curl localhost:8080
<!DOCTYPE html>
<html>
<head>
<title>Welcome to nginx!</title>
…
Cool — “It works!”, we have a working pod and now we can use it for our Services.
Kubernetes Service types — an overview
Let’s take a brief overview of each type and then will start with examples:
- ClusterIP : the default type, will create a Service resource with an IP address from the cluster's pool, such a Service will be available from within the cluster only (or with kube-proxy)
- NodePort : will open a TCP port on each WorkerNode EС2, “behind it” automatically will create a ClusterIP Service and will route traffic from this TCP port on an ЕС2 to this ClusterIP - such a service will be accessible from the world (obviously, if an EC2 has a public IP), or within a VPC
- LoadBalancer : will create an external Load Balancer (AWS Classic LB), “behind it” automatically will create a NodePort, then ClusterIP and in this way will route traffic from the Load Balancer to a pod in a cluster
- ExternalName : something like a DNS-proxy - in response to such a Service will return a record taken via CNAME of the record specified in the externalName
ClusterIP
The simplest type, the default one.
Will open access to an application within a cluster, without access from the world.

It can be used, for example, to give access to a caching service to make it accessible for all pods in a namespace.
Let’s use the next Kubernetes manifest:
---
apiVersion: v1
kind: Service
metadata:
  name: "nginx-service"
  namespace: "default"
spec:
  ports:
    - port: 80
  type: ClusterIP
  selector:
    app: "nginx"
Create the Service:
$ kubectl apply -f nginx-svc.yaml
service/nginx-service created
Check it:
$ kk get svc nginx-service
NAME TYPE CLUSTER-IP EXTERNAL-IP PORT(S) AGE
nginx-service ClusterIP 172.20.54.138 <none> 80/TCP 38s
kubectl proxy and Service DNS
Because ClusterIP Service type will be accessible from the cluster only - we can use kubectl proxy to test it - this will open a local TCP port to the API-server and then we can use it to access our NGINX.
Start the proxy:
$ kubectl proxy — port=8080
Starting to serve on 127.0.0.1:8080
Now, knowing our Service name — we set it in the metadata: name - we can open a connection to the localhost:8080 and then via a namespace name - to the Service itself:
$ curl -L localhost:8080/api/v1/namespaces/default/services/nginx-service/proxy
<!DOCTYPE html>
<html>
<head>
<title>Welcome to nginx!</title>
…
Or just can obtain information about the Service:
$ curl -L localhost:8080/api/v1/namespaces/default/services/nginx-service/
{
“kind”: “Service”,
“apiVersion”: “v1”,
“metadata”: {
“name”: “nginx-service”,
“namespace”: “default”,
“selfLink”: “/api/v1/namespaces/default/services/nginx-service”,
…
So, the ClusterIP:
- will provide access to an application within a Kubernetes cluster but without access from the world
- will use an IP from the cluster’s IP-pool and will be accessible via a DNS-name in the cluster’s scope, see the DNS for Services and Pods
NodePort
Now, let’s take a closer look at the NodePort Service type.
With this type, Kubernetes will open a TCP port on every WorkerNode and then via kube-proxy working on all nodes will proxy requests from this TCP port to a pod on this node.

Update our manifest:
---
apiVersion: v1
kind: Service
metadata:
  name: "nginx-service"
  namespace: "default"
spec:
  ports:
    - port: 80
      nodePort: 30001
  type: NodePort
  selector:
    app: "nginx"
The nodePort parameter here is optional, added here just for an example. Without it, Kubernetes will allocate a port from the 30000-32767 ports range.
Update the Service:
$ kubectl apply -f nginx-svc.yaml
service/nginx-service configured
Check it:
$ kubectl get svc nginx-service
NAME TYPE CLUSTER-IP EXTERNAL-IP PORT(S) AGE
nginx-service NodePort 172.20.54.138 <none> 80:30001/TCP 20h
And check the port on an EC2 instance:
[root@ip-10–3–49–200 ec2-user]# netstat -anp | grep 30001
tcp6 0 0 :::30001 :::* LISTEN 5332/kube-proxy
Obviously, if WorkerNodes are placed in private subnets and they have no access from the world — such a Service can’t be used to give access to an application from outside on the network.
Still, you can access the NGINX application from the same network, for example from a Bastion-host:
[ec2-user@ip-10–3–49–200 ~]$ curl 10.3.49.200:30001
<!DOCTYPE html>
<html>
<head>
<title>Welcome to nginx!</title>
…
So, the NodePort type is:
- tied to a specific host like ЕС2
- if the host isn’t available from the world — then such a Service will not provide external access to pods
- will use an IP from a provider’s pool, for example, AWS VPC CIDR
- will provide access to pods only on the same Worker Node
LoadBalancer
The most used Service type.
In the case of AWS — it will create an AWS Load Balancer, by default Classic type, which will proxy traffic to all ЕС2 instances of the TargetGroup tied to this Load Balancer, and then via NodePort Service - to all the pods.
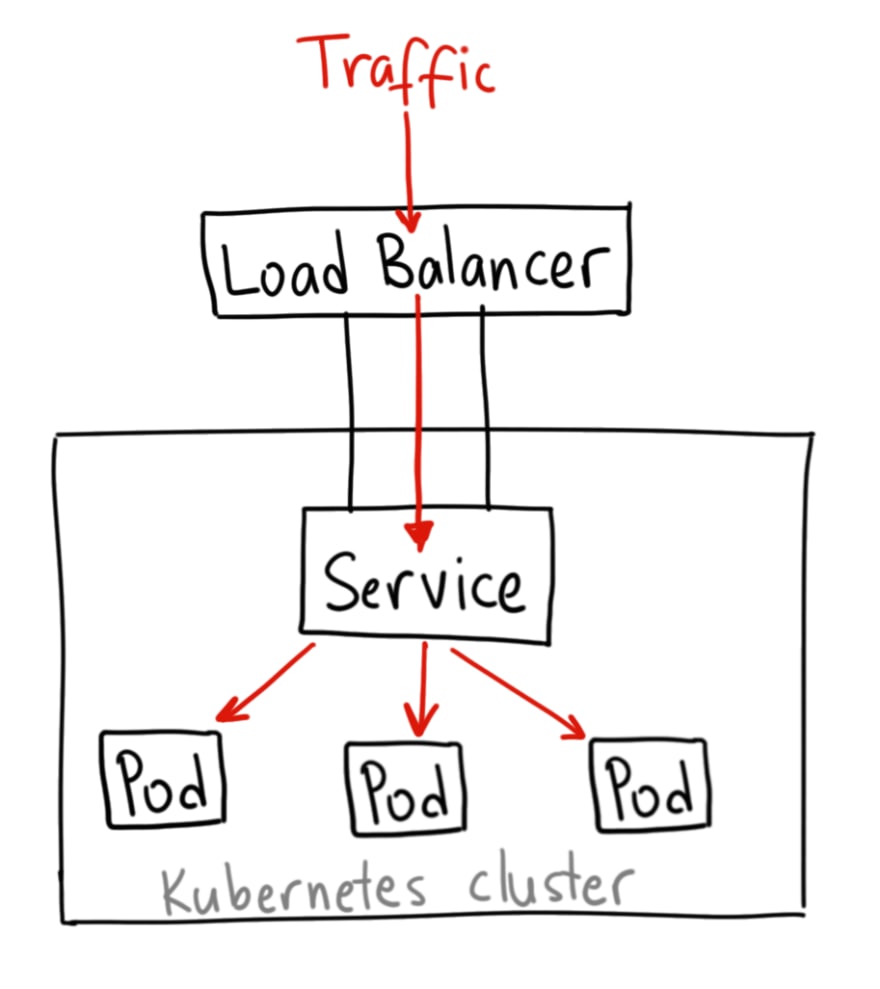
On such a Load Balancer you can use TLS, can use various load balancer types — Internal/External, and so on, see the Other ELB annotations.
Update the manifest:
---
apiVersion: v1
kind: Service
metadata:
  name: "nginx-service"
  namespace: "default"
spec:
  ports:
    - port: 80
  type: LoadBalancer
  selector:
    app: "nginx"
Apply it:
$ kubectl apply -f nginx-svc.yaml
service/nginx-service configured
Check:
$ kubectl get svc nginx-service
NAME TYPE CLUSTER-IP EXTERNAL-IP PORT(S) AGE
nginx-service LoadBalancer 172.20.54.138 ac8415de24f6c4db9b5019f789792e45–443260761.us-east-2.elb.amazonaws.com 80:30968/TCP 21h
Wait a couple of minutes while your DSN will be updated ad check the URL of the balancer created:
$ curl ac8415de24f6c4db9b5019f789792e45–443260761.us-east-2.elb.amazonaws.com
<!DOCTYPE html>
<html>]
<head>
<title>Welcome to nginx!</title>
…
What you can’t do using this type is to use a host or path-based routings, see the Application Load Balancer vs. Classic Load Balancer.
Actually, to have all possibilities on the AWS Application Load Balancer we can use another Service type — Ingress, will speak about it shortly in the Ingress part of this post.
So, the LoadBalancer Service type:
- will provide external access to pods
- will provide a basic load-balancing to pods on different EC2
- will give an ability to terminate SSL/TLS sessions
- doesn’t support level-7 routing
ExternalName
Another Service type is the ExternalName, which will redirect a request to a domain specified in its externalName parameter:
---
apiVersion: v1
kind: Service
metadata:
  name: "google-service"
  namespace: "default"
spec:
  ports:
    - port: 80
  type: ExternalName
  externalName: google.com
Create it:
$ kubectl apply -f nginx-svc.yaml
service/google-service created
Check the Service:
$ kubectl get svc google-service
NAME TYPE CLUSTER-IP EXTERNAL-IP PORT(S) AGE
google-service ExternalName <none> google.com 80/TCP 33s
And check how it’s working — go to the NGINX pod and use the dig utility to check the DNS record:
root@nginx-554b9c67f9-rwbp7:/# dig google-service.default.svc.cluster.local +short
google.com.
172.217.8.206
Here, we are asking a local DNS-name of the google-servic_e, which was resolved to an IP of the _google.com domain which was set in the externalName.
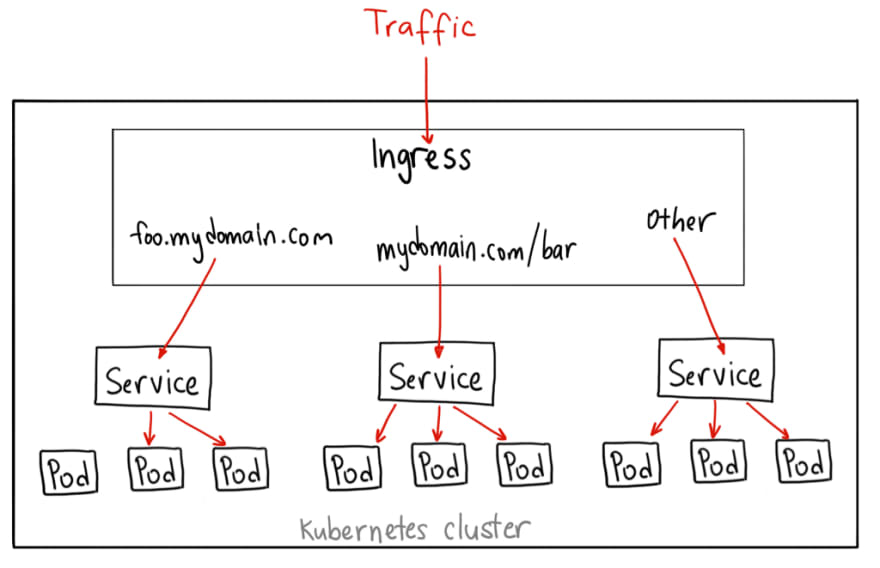
Ingress
Actually, the Ingress isn't a dedicated Service - it just describes a set of rules for the Kubernetes Ingress Controller to create a Load Balancer, its Listeners, and routing rules for them.
The documentation is here>>>.
In the case of AWS, it will be the ALB Ingress Controller — see the ALB Ingress Controller on Amazon EKS and AWS Elastic Kubernetes Service: running ALB Ingress controller.
To make it working, Ingress requires an additional Service where Ingress will route traffic to - kind of a backend.
For the ALB Ingress Controller a manifest with the Ingress and its Service can be the next:
---
apiVersion: v1
kind: Service
metadata:
  name: "nginx-service"
  namespace: "default"
spec:
  ports:
    - port: 80
  type: NodePort
  selector:
    app: "nginx"
---
apiVersion: extensions/v1beta1
kind: Ingress
metadata:
  name: "nginx-ingress"
  annotations:
    kubernetes.io/ingress.class: alb
    alb.ingress.kubernetes.io/scheme: internet-facing
  labels:
    app: "nginx"
spec:
  backend:
    serviceName: "nginx-service"
    servicePort: 80
Here we are creating a Service with the NodePort type and Ingress with the ALB type.
Kubernetes will create an Ingress object, then the alb-ingress-controller will see it, will create an AWS ALB сwith the routing rules from the spec of the Ingress, will create a Service object with the NodePort port, will open a TCP port on WorkerNodes and will start routing traffic from clients => to the Load Balancer => to the NodePort on the EC2 => via Service to the pods.
Let’s check.
The Service:
$ kubectl get svc nginx-service
NAME TYPE CLUSTER-IP EXTERNAL-IP PORT(S) AGE
nginx-service NodePort 172.20.54.138 <none> 80:30968/TCP 21h
Ingress:
$ kubectl get ingress nginx-ingress
NAME HOSTS ADDRESS PORTS AGE
nginx-ingress * e172ad3e-default-nginxingr-29e9–1405936870.us-east-2.elb.amazonaws.com 80 5m22s
And the Load Balancer’s URL:
$ curl e172ad3e-default-nginxingr-29e9–1405936870.us-east-2.elb.amazonaws.com
<!DOCTYPE html>
<html>
<head>
<title>Welcome to nginx!</title>
…
“It works!” ©
Path-based routing
In the example above we will send all the traffic from the ALB to the same Service and its pods.
By using the Ingress and its rules we can also specify rules to send traffic to a specific backend depending on, for example, URI of the request.
So, let’s spin up two NGINX pods:
$ kubectl create deployment nginx-1 — image=nginx
deployment.apps/nginx-1 created

$ kubectl create deployment nginx-2 — image=nginx
deployment.apps/nginx-2 created
Create a file on each — but with different content:
$ kubectl exec nginx-1–75969c956f-gnzwv — bash -c “echo svc-1 > /usr/share/nginx/html/sv1.html”

$ kubectl exec nginx-2-db55bc45b-lssc8 — bash -c “echo svc-2 > /usr/share/nginx/html/svc2.html”
Update the manifest file and add one more Service, and set rules for the Ingress with two backends:
---
apiVersion: v1
kind: Service
metadata:
  name: "nginx-1-service"
  namespace: "default"
spec:
  ports:
    - port: 80
  type: NodePort
  selector:
    app: "nginx-1"
---
apiVersion: v1
kind: Service
metadata:
  name: "nginx-2-service"
  namespace: "default"
spec:
  ports:
    - port: 80
  type: NodePort
  selector:
    app: "nginx-2"
---
apiVersion: extensions/v1beta1
kind: Ingress
metadata:
  name: "nginx-ingress"
  annotations:
    kubernetes.io/ingress.class: alb
    alb.ingress.kubernetes.io/scheme: internet-facing
  labels:
    app: "nginx"
spec:
  rules:
  - http:
      paths:
      - path: /svc1.html
        backend:
          serviceName: "nginx-1-service"
          servicePort: 80
      - path: /svc2.html
        backend:
          serviceName: "nginx-2-service"
          servicePort: 80
Here we set two rules: if URI == /svc1.html or /svc2.html — then sent the traffic to the nginx-1 or nginx-2 accordingly.
Deploy it:
$ kubectl apply -f nginx-svc.yaml
service/nginx-1-service created
service/nginx-2-service created
ingress.extensions/nginx-ingress configured
Check the rules:
$ kubectl describe ingress nginx-ingress
…
Rules:
Host Path Backends
 — — — — — — — —
*
/svc1.html nginx-1-service:80 (<none>)
/svc2.html nginx-2-service:80 (<none>)
…
Check it — make a request to the URIs svc1.html and svc2.html:
$ curl e172ad3e-default-nginxingr-29e9–1405936870.us-east-2.elb.amazonaws.com/svc1.html

svc-1

$ curl e172ad3e-default-nginxingr-29e9–1405936870.us-east-2.elb.amazonaws.com/svc2.html

svc-2
Name-based routing
Another example is the hostname-based routing.
Let’s create three DNS records — svc1.example.com, svc2.example.com, and just svc.example.com, and then via CNAME-records point them to our Load Balancer URL created from the Ingress resource.
Then, update the manifest:
---
apiVersion: v1
kind: Service
metadata:
  name: "nginx-1-service"
  namespace: "default"
spec:
  ports:
    - port: 80
  type: NodePort
  selector:
    app: "nginx-1"
---
apiVersion: v1
kind: Service
metadata:
  name: "nginx-2-service"
  namespace: "default"
spec:
  ports:
    - port: 80
  type: NodePort
  selector:
    app: "nginx-2"
---
apiVersion: extensions/v1beta1
kind: Ingress
metadata:
  name: "nginx-ingress"
  annotations:
    kubernetes.io/ingress.class: alb
    alb.ingress.kubernetes.io/scheme: internet-facing
  labels:
    app: "nginx"
spec:
  rules:
  - host: "svc1.example.com"
    http:
      paths:
      - backend:
          serviceName: "nginx-1-service"
          servicePort: 80
  - host: "svc2.example.com"
    http:
      paths:
      - backend:
          serviceName: "nginx-2-service"
          servicePort: 80
  - http:
      paths:
      - backend:
          serviceName: "nginx-1-service"
          servicePort: 80
Here we left Services without changes, but in the Rules, we set that a request to the svc1.example.com must be sent to the Service-1, svc2.example.com — to the Service-2, svc.example.com — to the default backend, e.g. Service-1.
Check it:
$ curl svc1.example.com
svc-1

$ curl svc2.example.comsvc-2

$ curl svc.example.com
svc-1
And check those rules on the Listener of the Load Balancer in the AWS Console:

“That’s all folks!” ©
Originally published at RTFM: Linux, DevOps, and system administration.


Top comments (1)
Very nice article, lots of learning, keep posting. I also created a full course on Kubernetes in 10hr on YouTube, please have a look and motivate me. Thanks
youtu.be/toLAU_QPF6o