In the first chapter of this series, we had the chance to walk through the Fauna and Next.js tutorials and started a simple website with a basic login mechanic. In this chapter, we are going to create the functions within Fauna to sign up new users, create following relationships between users, create posts, like them and comment them, we have our first approach to Fauna’s permissions system by granting users permissions to execute the functions mentioned.
Create new users
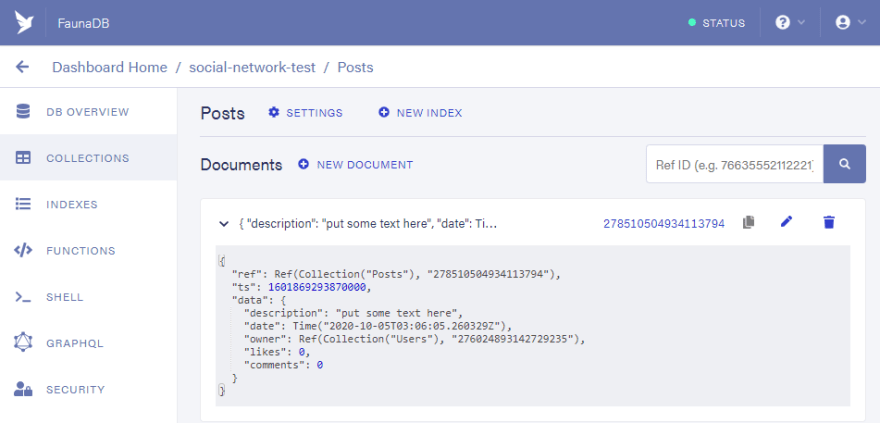
Last time, we did register our user using the Fauna dashboard. This is an impractical approach because we want our site to be autonomous and that transaction should be done from the user interface in our website. This is what the API called signup does.
What does this API do?
This API imports the query commands from fauna
1 import { query as q } from 'faunadb'
And then, uses the Create command to create a new document on the Users collection,
16  user = await serverClient.query(
17    q.Create(q.Collection('User'), { //errata: our collection is called Users
18      credentials: { password },
19      data: { email },
20    })
21  )
As you can see, it’s very similar to the way we created our user with the Fauna’s dashboard. The main difference here is that we need to prepend every command with q. so it’s recognized as a Fauna’s method.
After creating the user, the API logs the user and returns the login token
31  const loginRes = await serverClient.query(
32    q.Login(user.ref, {
33    password,
34  })
35  )
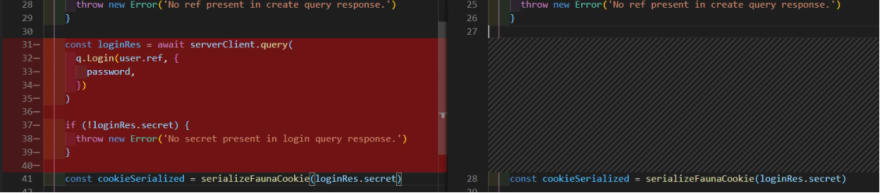
The secret returned is very similar to the Server Key we created on the first chapter. We need to save it on a cookie so the user keeps it when navigating through the website.
41    const cookieSerialized = serializeFaunaCookie(loginRes.secret)
42
43    res.setHeader('Set-Cookie', cookieSerialized)
As you can see, we needed to call serverClient twice, the first time to create the user and the second time to log into the account. Even if two queries doesn’t look like a lot of calls, the user creation API is a good point to start using User Defined Functions (UDF), so, why don’t we try to make it a single database query to reduce latency on these requests? After this, we can understand how to do the same on larger functions that require an important amount of reads/writes.
Start using User Defined Functions (UDF) to improve your site's performance
Fauna allows you to create your own functions using the FQL methods described here, don’t panic, you don’t have to learn them all just yet. Most of the time we will be using Match, Paginate, Select and Get methods to get all the documents we require. Let’s now navigate to Fauna and create some simple functions.

Let’s open our database from the Fauna’s dashboard, open the functions menu and click on New Function. Usually Fauna gives you a short example function’s body by default, it goes:
Query(
  Lambda(
    "x", Add(Var("x"), Var("x"))
  )
)
Let’s explain it by parts:
- Query: it’s only parameter is a lambda function and its purpose is to prevent the lambda function for immediate execution. It encases the function definition.
- Lambda: this method has two parameters, the first one is the set of arguments the function can get (in this case, x), and the second one is the lambda function, which means the commands we will execute. All argument names should be strings, also, if you need to use more than one parameter, you should put all names in an array (e.g [“x”,”y”]).
- Add: In the example code provided by Fauna, they use
Addas the only method used, this returns the arithmetic sum of all the arguments. However, we will change this part to login the user. - Var: Everytime we make a reference to an existing variable, we need to call the method
Varand put as argument the name of the variable as a string.
Ok, the functional part is Lambda, so let’s transform the default function’s body and make it a function for creating users.
Query(
  Lambda(
    ["email","password"],
    Let(
      {
        user:Create( //create the user
          Collection("Users"),
          {
            credentials: { password: Var("password") },
            data: {
              email: Var("email"),
              posts: 0,
              activeSince: Now()
            }
        }),
        userRef: Select(
          "ref",
          Var("user")
        ),
      },
      Login(Var("userRef"), {
        password: Var("password"),
        data: {
          message: "first Login"
        }
      })
    )
  )
)
This time, I changed the parameters in the Lambda function to show you how to put more than one variable. In this case, email is the user’s email and password is the user’s password.
The method Let allows you to create an object with temporal variables (represented as the object’s fields) and use them in the second argument by calling the method Var. We create a field named user and define it as the response for creating a new user on the Users collection with the data provided and some additional fields (for reference). The response of Create is the created document.
We also create a field called userRef in which we Select the field ref of our newly created user (this is equivalent to using user.ref in javascript). After defining our binding variables, we set the second parameter of Let to Login the user, this means, the Let method will return the result of Login.
When you login a user, you can provide additional data, we did put a field called message and put the string first login. You can be more creative and include relevant information for metrics like user’s IP, language, web browser, etc.
Let's name our function as signupUser and save it.
Next step: call this function from the signup API on our local repository.
If you don't have this repository yet, you can create it with the _create-next-app. Just run this from your command shell
npx create-next-app --example with-cookie-auth-fauna with-cookie-auth-fauna-app
or
yarn create next-app --example with-cookie-auth-fauna with-cookie-auth-fauna-app
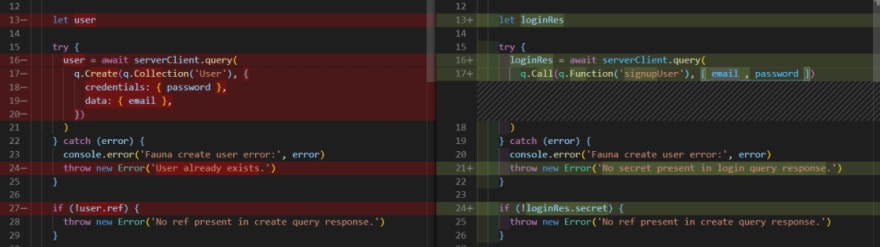
Replace the method in the first serverClientquery to
q.Call(q.Function('signupUser'), [ password , email ])
This function will return the result from Login the user, thus, the second query is unnecessary and you can delete it.
When we test it, we should have the same behaviour we had before adding the UDF.
What did we achieve with this? On the API, we reduced the queries to Fauna from 2 to 1, reducing some lines of code. On the database, we reduced the data sent and received by performing both processes on the same query, we didn’t need to receive any information to perform the Login as we used the Let method.
If we have additional processes like adding tasks, roles, historic data, etc. we will have even better performance when we use UDFs.
In this case it doesn’t seem as much, but when we start expanding our database, we will have more efficiency by having UDFs vs performing many database queries.
You can make these functions available in your repository by adding them to a setup file. This way, when you are setting up a similar database for another server, you can recreate the same structure with just a single command. If you already have some experience with Next.js, you can adapt this example from Fauna’s developer team. Otherwise, wait until Chapter 3 when we will summarize all our progress in a setup script for Javascript that we will be able to track on your repository of choice.
Use UDF to follow users and post contents with less connection requests
Setting-up: Following relationships
We have the methods for creating new users, but there’s not a lot we can do with that. It’s time to add following relationships between our users. In this series, we will use a follower/followee relationship in which a user can follow another, this is not necessarily reciprocal.
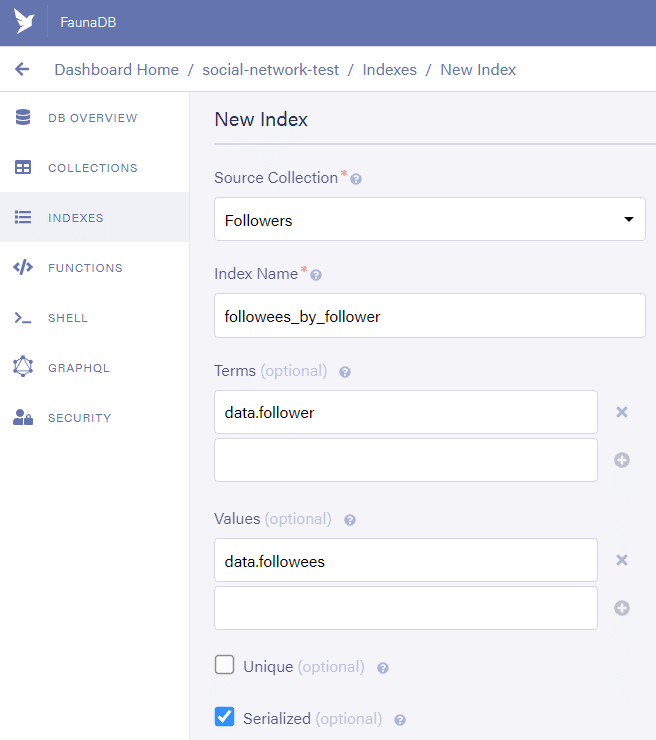
Use the Fauna's dasboard to create a new collection and name it Followers, leave the other fields with their default values. Create two new indexes for your new collection, name them followers_by_followee and followees_by_follower. We will make the first index return all the followers of an user and the later index will return the people a user is following (followees). Let’s also make a third index called is_followee_of_user, with this, we can find if a user is already following another one and make unique the document related to the following condition.
Create Followers collection:

Also, you can do it from the Fauna’s shell using the method CreateCollection:
CreateCollection({name:”Followers”})Create Index followers_by_followee:

Create it from the Fauna’s shell using CreateIndex:
CreateIndex({
  name: "followers_by_followee",
  unique: false,
  serialized: true,
  source: Collection("Followers"),
  terms: [
    {
      field: ["data", "followee"]
    }
  ],
  values: [
    {
      field: ["data", "follower"]
    }
  ]
})
- Create Index followees_by_follower:
And with Fauna Shell:
CreateIndex({
  name: "followees_by_follower",
  unique: false,
  serialized: true,
  source: Collection("Followers"),
  terms: [
    {
      field: ["data", "follower"]
    }
  ],
  values: [
    {
      field: ["data", "followee"]
    }
  ]
})
- Create the index is_followee_of_user:

With this, we prepared our database to handle follower/followee relationships between all users, now, let’s prepare to post content.
Setting-up: User’s posts
Create a new collection and name it Posts. At this point, I think you’ve already got the hang of it.
Create an index for this collection and name it posts_by_owner. This index will have the field owner as term and the value field will be empty.

Now, our database can contain something more than users. Let’s create some functions to follow users and to create posts.
Follow users
CreateFunction({
  name: ‘followUsers’
  role: null,
  body: Query(
    Lambda(
      "followee",
      If(
        IsEmpty(
          Match(Index("is_followee_of_user"), [Identity(), Var("followee")])
        ),
        Do(
          Create(Collection("Followers"), {
            data: { follower: Identity(), followee: Var("followee") }
          }),
          { isFollowing: true }
        ),
        Do(
          Delete(
            Select(
              ["data", 0],
              Paginate(
                Match(Index("is_followee_of_user"), [
                  Identity(),
                  Var("followee")
                ])
              )
            )
          ),
          { isFollowing: false }
        )
      )
    )
  )
})
This function toggles the follow/unfollow state of the users. If you already follow a user, you’ll stop following it, if you are not a follower, you’ll become one. Also, this function returns the new following status as true or false.
Create Post
CreateFunction({
  name: "createPost",
  role: null,
  body: Query(
    Lambda(
      "description",
      Create(Collection("Posts"), {
        data: {
          description: Var("description"),
          date: Now(),
          owner: Identity(),
          likes: 0,
          comments: 0
        }
      })
    )
  )
})
With this function, you can create a new post and put initial values like the date it was posted as well as set the amount of likes and comments to 0.
List Users
CreateFunction({
  name: "listUsers",
  role: null,
  body: Query(
    Lambda(
      "cursor",
      Map(
        Paginate(Reverse(Documents(Collection("Users"))), {
          after: Var("cursor")
        }),
        Lambda("ref", {
          userId: Select("id", Var("ref")),
          isFollowee: IsNonEmpty(
            Match(Index("is_followee_of_user"), [Identity(), Var("ref")])
          ),
        isSelf: Equals(Identity(), Var("ref"))
        })
      )
    )
  )
})
This function brings all the users, due to the nature of Paginate, every function call will return a page of 64 documents by default, in case we need the next page of 64 users, we can send a cursor variable containing the ref of the last user from the last result. Also, we can change the size of every page as we need. The response will contain a field called data which is an array of objects containing the fields userId (a string with the reference of the user), isFollowee (a boolean stating if you are following this user), and isSelf (a boolean indicating whether this user is you).
We’ve got several functions and indexes, but our users have permissions to none of them, all they can do is get their own user id. Let’s use the Fauna dashboard and the hints they provide to help us set the permissions for everyone.
First, let’s get to the manage roles section:

Click on new custom role and name it basicUser, then start adding the collections and functions, add everything except the index called users_by_email and the function called signupUser.

Fauna’s ABAC (Atribute-Based Access Control) will grant the documents of a collection all the permits that you grant. An authenticated document (in this case user) can have one or more roles, if any role grants permission to perform a certain action, the action will be performed when required.
After you finish adding your collections and indexes, you should see this:

Each row represents a collection, index or function. Each column stands for an action.
+Over the Collections your actions are Read / Write(update) / Create / Delete / Read History / Write on History / Unrestricted (do all)
+Over the indexes, you can Read / Unrestricted access (read all index's records, even for documents you can’t directly access)
+You can Call functions
Now, let’s grant the permissions for these items, click on the red X to turn it into a green checkmark on the next items:
+Read permissions for collections Users, Followers, Posts.
+Create permissions on Followers and Posts (we will change that later).
+Delete permissions on Followers.
+Read permissions on all indexes.
+Call permissions on all functions.
Finally, let’s click on the Membership tab on the upper side of the window to define who will have the permissions we’ve just set.
Select the Users collection as the users will be the ones with these permissions, now you can click on the new Row with the name Users to set a predicate function. In this case, all users will have permissions, so let’s just make the function return true all the time.

It’s done. Click save and we are ready to test our new functions using Next.js
For this, let’s clone this repository
https://github.com/Sertge/fauna-example
In this repository, we updated the example from Fauna in this address
https://github.com/vercel/next.js/tree/canary/examples/with-cookie-auth-fauna
To include the APIs that will call the functions we’ve just created. When you’re done cloning, add your Fauna’s server key to the environment variable, input the command npm install or yarn, and then npm run dev or yarn dev to run your local server.
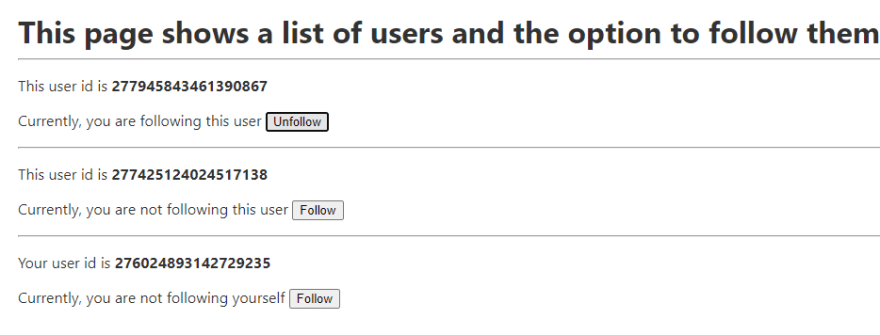
When you clone this repository and run it, you should see some additional options in your header

From Signup, create some new users and click on the Users option from the header.
Here, you can see a list of all users on the database and will have the option to follow/unfollow them, also, you can follow yourself.
And finally, you can add some posts and see them on the database from the tab called New post

Great, now we can create some follower/followee relationships, see which users we are following as well as the ones we aren’t and we can create some posts, all of this by using Fauna’s UDF. In the next section, we will harvest even more power from Fauna.
Interact with your followers, have them like and comment your posts
On a social network, we want to have our wall/feed populated with the users we follow and keep up to date with them. Also, we want to let them know we admire their work by liking or commenting on their posts. It’s time to add a collection called Likes and another one called Comments as well as create the functions to post comments, toggle the like/unlike status on a post, and finally, grant permissions to our users so they can do all of this.
+Use the dashboard to create a new collection and name it Likes or use CreateCollection({name:’Likes’}) on the Shell.
+Create a new collection and name it Comments.
+Create a new Index for the collection Likes and name it likes_by_post_id, use the field postId as search term.

You can also run the command on the shell
CreateIndex({
  name: "likes_by_post_id",
  unique: false,
  serialized: true,
  source: Collection("Likes"),
  terms: [
    {
      field: ["data", "postId"]
    }
  ]
})
+Create another index for the Comments collection and name it comments_by_post_id, it's the same as the previous step, just change the collection and the name.
+Create an index for the Likes collection called is_liked_by_user and use the owner and the postId as terms. Make it unique by marking the Unique field, so a user can only like a post once.

Let’s also add a function to post comments and name it postComment
CreateFunction({
  "name": "postComment",
  "role": null,
  "body": Query(
    Lambda(
      ["postId", "description"],
      Create(Collection("Comments"), {
        data: {
          owner: Identity(),
          date: Now(),
          likes: 0,
          description: Var("description"),
          postId: Var("postId")
        }
      })
    )
  )
})
A function to toggle the like/unlike status on the post
CreateFunction({
  name: "toggleLike",
  role: null,
  body: Query(
    Lambda(
      "postId",
      If(
        IsEmpty(Match(Index("is_liked_by_user"), [Identity(), Var("postId")])),
        Do(
          Create(Collection("Likes"), {
            data: { owner: Identity(), postId: Var("postId"), date: Now() }
          }),
          { isFollowing: true }
        ),
        Do(
          Delete(
            Select(
              ["data", 0],
              Paginate(
                Match(Index("is_liked_by_user"), [Identity(), Var("postId")])
              )
            )
          ),
          { isFollowing: false }
        )
      )
    )
  )
})
A function to get the posts of all the users you follow (feed):
CreateFunction({
  name: "getFeed",
  role: null,
  body: Query(
    Lambda(
      "cursor",
      Map(
        Paginate(
          Reverse(
            Join(
              Match(Index("followees_by_follower"), Identity()),
              Index("posts_by_owner")
            )
          )
        ),
        Lambda(
          "post",
          Merge(Select("data", Get(Var("post"))), {
            isLiked: IsNonEmpty(
              Match(Index("is_liked_by_user"), [Identity(), Var("post")])
            ),
            postId: Var("post"),
            userIsOwner: Equals(
              Identity(),
              Select(["data", "owner"], Get(Var("post")))
            )
          })
        )
      )
    )
  )
})
And finally, a function to get the comments from a post:
CreateFunction({
  name: "getComments",
  role: null,
  body: Query(
    Lambda(
      "postId",
      Map(
        Paginate(Match(Index("comments_by_post_id"), Var("postId"))),
        Lambda(
          "comment",
          Merge(Select("data", Var("comment")), {
            isLiked: IsNonEmpty(
              Match(Index("is_liked_by_user"), [Identity(), Var("comment")])
            ),
            commentId: Var("comment"),
            userIsOwner: Equals(
              Identity(),
              Select(["data", "owner"], Get(Var("comment")))
            )
          })
        )
      )
    )
  )
})
We’re almost there, it’s time to add the permissions so our regular users are able to use these collections, indexes and functions. Add the following permissions:
+Likes: Read, Create, Delete.
+Comments: Read, Create
+All new indexes: Read
+All new functions: Call
Now, you can head to the feed and get all the posts your followees have posted:

Click on any post to open it and see all the comments:

Now, we have some of the functions a small social network requires to work. In the next chapter, we will display more information, add the stories, chats, and use Fauna's ABAC to limit the user’s actions, giving us some control within our application. Also, we will learn how to create ABAC predicate functions and debug them.


Top comments (0)